

The code is available on GitHub
Using the Bridge Pattern you can decouple an abstraction from its implementations, allowing to extend them independently. By placing them in separate class hierarchies connected by a bridge/reference, they can be varied independently from each other.
When to use
Use the Bridge Pattern when an abstraction has multiple aspects or responsibilities that need to be extended independently.
By using inheritance you bind the abstraction to an implementation. This approach allows for the addition of new functionality by creating new implementations. However, it works well only when the abstraction doesn’t hides aspects that should be decoupled and extended separately. Otherwise, it can lead to numerous implementations containing redundant code.
A solution to this is to introduce an extra level of separation between the abstraction and its implementation. This can be achieved by dividing the primary inheritance hierarchy into two separate class hierarchies. The primary abstraction will have a reference (bridge) to a separate interface or abstraction. These two hierarchies can then be extended independently, making the two concepts orthogonal.
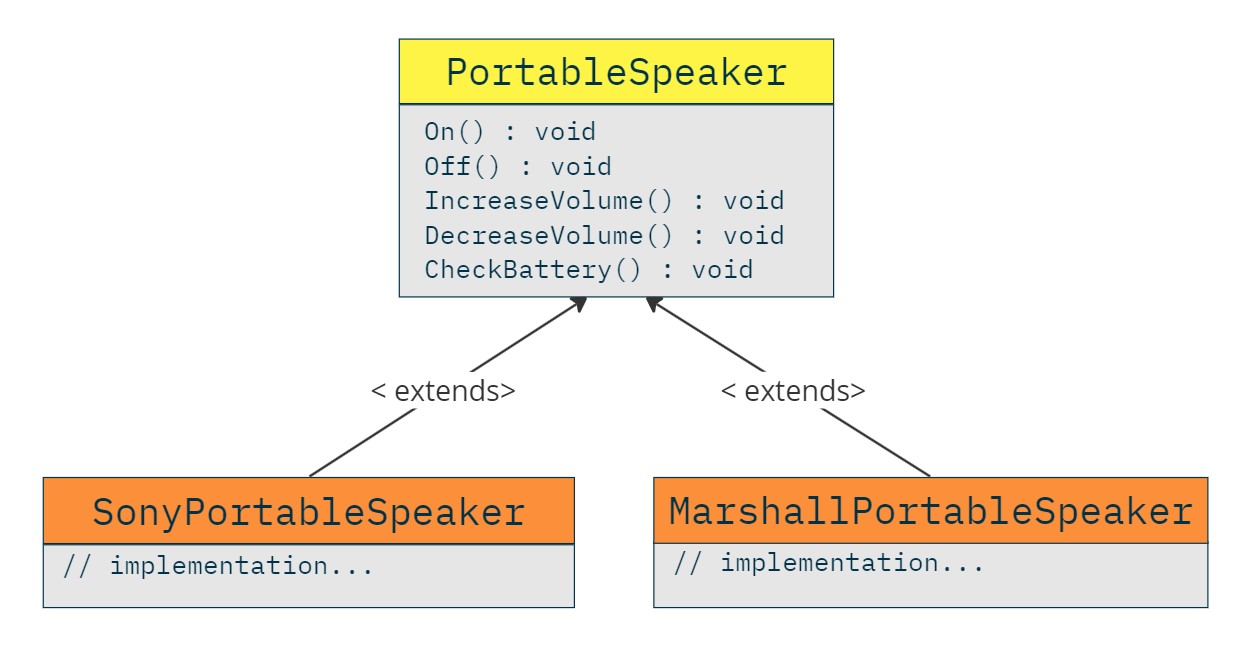
For example, consider we are writing code for a portable speaker. We have to take into account the different implementations it could have considering its electronics. We can have a portable speaker that uses electronics (the internal speaker, a microcontroller, buttons etc ) from Marshall and also another portable speaker, with the same User Interface, that is implemented using electronics from Sony. The main concept, PortableSpeaker, can have distinct implementations for each company:
public abstract class PortableSpeaker
{
   public abstract void On();
   public abstract void Off();
   public abstract void IncreaseVolume();
   public abstract void DecreaseVolume();
   public abstract void CheckBattery();
}

public class SonyPortableSpeaker : PortableSpeaker
{
   // Implement the abstract class..
}

public class MarshallPortableSpeaker : PortableSpeaker
{
   // Implement the abstract class..
}
However, future changes might require altering the speaker’s user interface, adding new functions to the PortableSpeaker class. For example, a small cube-shaped portable speaker might differ in operations from a column-shaped one. The current design would demand additional classes for each speaker type to support new combinations:
// If we want a new interface for our Portable Speaker, which will have different or
// new methods in the PortableSpeaker abstract class, the subclasses will be greatly increased,
// because we probably also have to support every company for this new interface.
public abstract class CubePortableSpeaker : PortableSpeaker
{
   // The cube-shaped portable speakers provide this extra operation.
   public abstract void Mute();
}

public class SonyCubePortableSpeaker : CubePortableSpeaker
{
   // Re-implement the SonyPortableSpeaker for Cube Portable Speaker interface.
   // A lot of duplicate code also.

   public override void Mute() => Console.WriteLine($"{GetType().Name} => Mute.");
}

public class MarshallCubePortableSpeaker : CubePortableSpeaker
{
   // Re-implement the MarshallPortableSpeaker for Cube Portable Speaker interface.

   public override void Mute() => Console.WriteLine($"{GetType().Name} => Mute.");
}
The same is true for the column-shaped Portable Speaker types. We also have to create two new implementations, one for each electronics company:
// The same is true for a column-shaped portable speaker, which will have different
// needs and a different interface.
public abstract class ColumnPortableSpeaker : PortableSpeaker
{
   // The column-shaped portable speakers provide these extra operations.
   public abstract void TurnOnBluetooth();
   public abstract void TurnOffBluetooth();
}

public class SonyColumnPortableSpeaker : ColumnPortableSpeaker
{
   // PortableSpeaker implementation..

   public override void TurnOnBluetooth() => Console.WriteLine($"{GetType().Name} => Turn on bluetooth.");
   public override void TurnOffBluetooth() => Console.WriteLine($"{GetType().Name} => Turn off bluetooth.");
}

public class MarshallColumnPortableSpeaker : ColumnPortableSpeaker
{
   // PortableSpeaker implementation..

   public override void TurnOnBluetooth() => Console.WriteLine($"{GetType().Name} => Turn on bluetooth.");
   public override void TurnOffBluetooth() => Console.WriteLine($"{GetType().Name} => Turn off bluetooth.");
}
As we can see this would end up in duplicate code across numerous classes, as shown in the class diagram below:
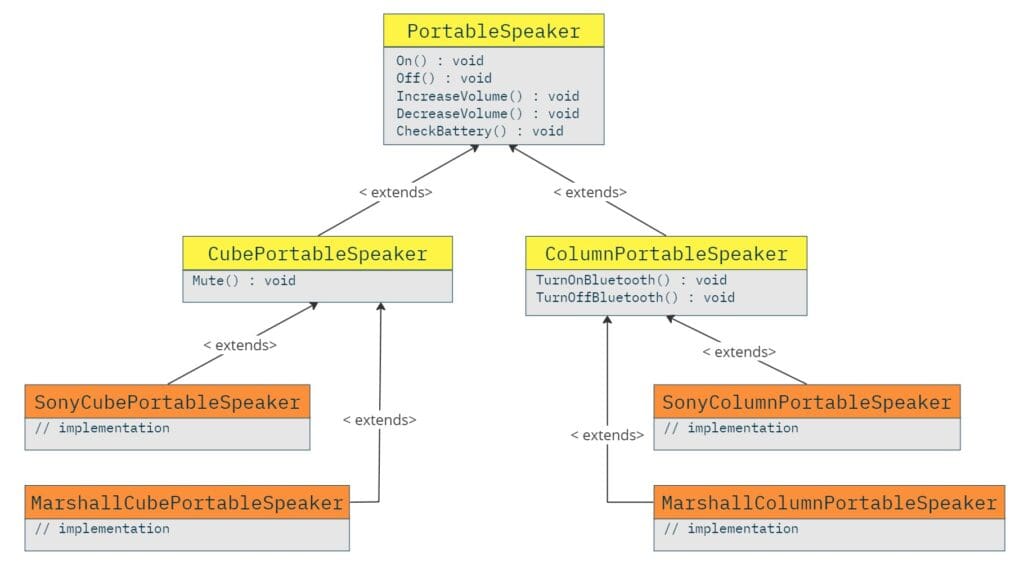
This kind of design is not scalable when both the interface and electronics are need to be extended for portable speakers.
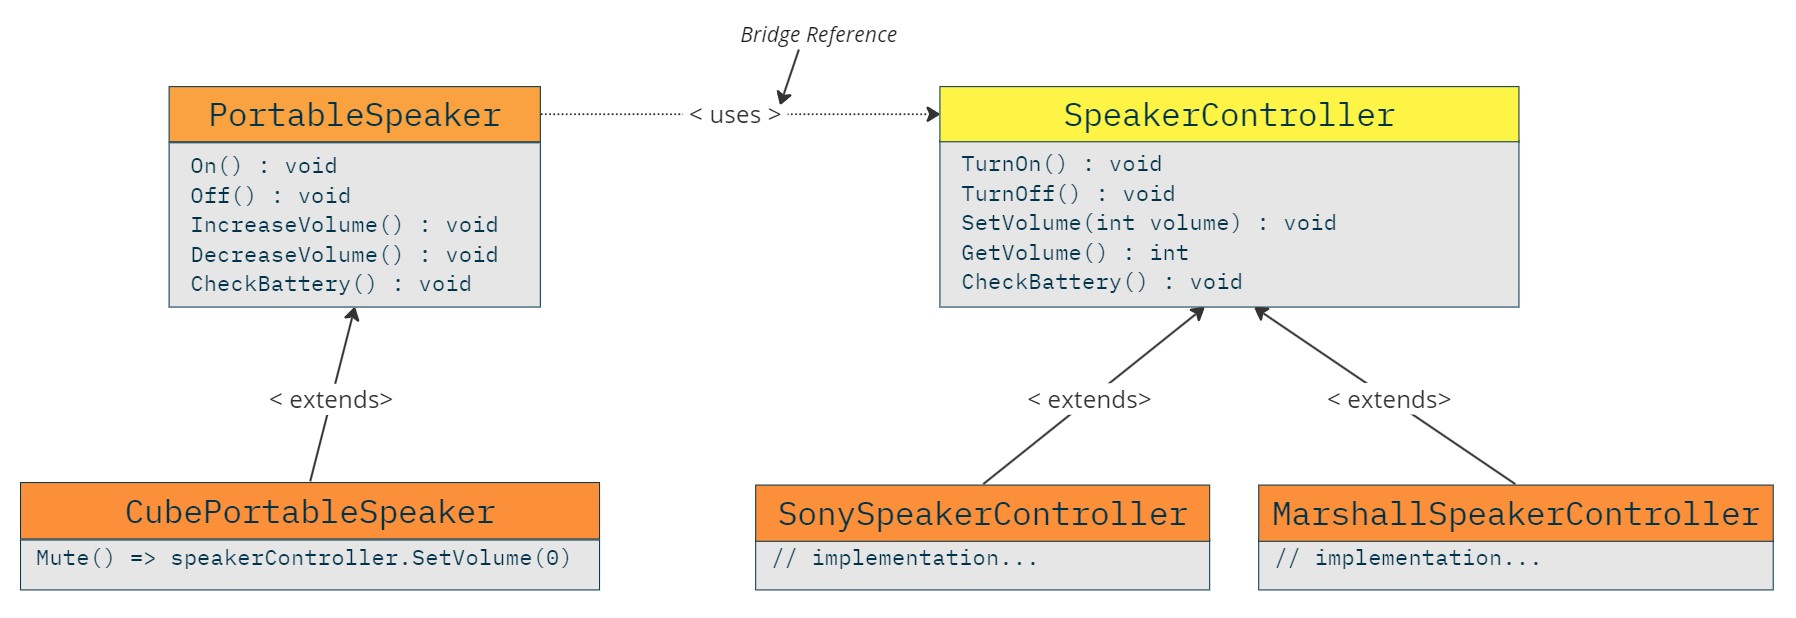
The solution is to separate company implementations from the PortableSpeaker abstraction. To achieve this, we introduce a new abstraction called SpeakerController with implementations for Sony, Marshall, and potential future companies. The PortableSpeaker abstraction will have a reference (acting as a bridge) to the SpeakerController and can be extended to support different user interface requirements. This way, the PortableSpeaker can delegate calls to the SpeakerController.
The new design is shown below:
public abstract class PortableSpeaker
{
    // This is the bridge reference.
   protected readonly SpeakerController speakerController;

   protected PortableSpeaker(SpeakerController speakerController)
   {
      this.speakerController = speakerController;
   }

   public void On() => speakerController.TurnOn();

   public void Off() => speakerController.TurnOff();

   public void IncreaseVolume() => speakerController.SetVolume(speakerController.GetVolume() + 5);
   public void DecreaseVolume() => speakerController.SetVolume(speakerController.GetVolume() - 5);

   public void CheckBattery() => speakerController.CheckBattery();
}

public class CubePortableSpeaker : PortableSpeaker
{
   public CubePortableSpeaker(SpeakerController speakerController)
      : base(speakerController) { }

   public void Mute() => speakerController.SetVolume(0);
}

public abstract class SpeakerController
{
   public abstract void TurnOn();
   public abstract void TurnOff();
   public abstract void SetVolume(int volume);
   public abstract int GetVolume();
   public abstract void CheckBattery();
}

public class SonySpeakerController : SpeakerController
{
   public override void CheckBattery() => Console.WriteLine("Report the battery level.");

   public override int GetVolume() => 40; // Returning the volume percentage.

   public override void SetVolume(int volume) { /* Setting the volume. */ }

   public override void TurnOff() { /* Turn off device. */ }

   public override void TurnOn() { /* Turn on device. */ }
}

public class MarshallSpeakerController : SpeakerController
{
   public override void CheckBattery() { /* Report the battery level. */ }

   public override int GetVolume() => 40; // Returning the volume percentage.

   public override void SetVolume(int volume) { /* Setting the volume. */ }

   public override void TurnOff() { /* Turn off device. */ }

   public override void TurnOn() { /* Turn on device. */ }
}
And the class diagram with the Bridge Pattern implemented is shown below:
Use the Bridge Pattern when you want to avoid coupling an abstraction to its implementation.
By using inheritance in our design, we bind the implementations with the abstraction at compile time. As a result, extending the abstraction and its implementations independently cannot easily be done. In such cases, the Bridge Pattern offers a solution by dividing the primary hierarchy into two separate ones, which can be extended independently from each other.
Use the Bridge Pattern when you want to change the implementation of the abstraction at runtime.
By using composition over inheritance, our design does not statically bind the implementation to the abstraction. This flexibility enables us to swap one implementation with another at runtime. Consider a game scenario where characters have weapons, each with distinct logic and behavior. At runtime, we can swap a weapon with another when an upgrade is done in a character.
abstract class Character
{
   Weapon weapon;
   public void Upgrade(Weapon newWeapon) => weapon = newWeapon;

   // Delegates the call to the bridge reference.
   public void DoDamage() => weapon.DoDamage();
}

// The Character hierarchy can be extended independently from the Weapon hierarchy.
class Peasant : Character { }
class Hero : Character { }

abstract class Weapon
{
   public abstract void DoDamage();
}

class Stick : Weapon
{
   public override void DoDamage() { /*Implementation*/ }
}

class Sword : Weapon
{
   public override void DoDamage() { /*Implementation*/ }
}
For a given instance, we can dynamically switch its weapon (bridge reference) due to an upgrade or a spell cast on the character, as illustrated below:
Character peasant = new Peasant(new Stick());
Character hero = new Hero(new Sword());

peasant.DoDamage();
hero.DoDamage();

// After an upgrade and a spell we can change the instances at runtime:
peasant.Upgrade(new Sword()); // After an upgrade.
hero.Upgrade(new Stick()); // After a bad spell.

// Now the damage will be done by using the new reference.
peasant.DoDamage();
hero.DoDamage();
Use the Bridge Pattern when you want to combine different implementations together that result in new behavior.
Splitting the Abstraction hierarchy into two separate hierarchies we can combine any implementations from one with those from the other hierarchy. With this approach we can create new functionalities by making new combinations of implementations. However, this great flexibility can also introduce unintended or unexpected behavior into our application. Let’s examine a simple example to grasp this concept better:
Consider a game where characters can carry a Weapon. We have Villagers, Trolls, and Heroes as character types. Villagers use berries, trolls use rocks, and heroes have swords. Instead of implementing an Attack method in each character by directly utilizing its weapon, we can have a separate hierarchy that encapsulates weapon implementations.
abstract class Character {
   Weapon weapon; // the bridge reference.
   public void Attack() => weapon.DoDamage();
}

class Villager : Character { /*Implementation*/ }
class Troll : Character { /*Implementation*/ }
class Hero : Character { /*Implementation*/ }

abstract class Weapon {
   public void DoDamage();
}

class Berry : Weapon { /*Implementation*/ }
class Rock : Weapon { /*Implementation*/ }
class Sword : Weapon { /*Implementation*/ }
We then instantiate characters as follows:
Character villager = new Villager(new Berry());
Character troll = new Troll(new Rock());
Character hero = new Hero(new Sword());

villager.Attack();
troll.Attack();
hero.Attack();
By avoiding static binding between the Abstraction and its implementation, we can build any combination we need. For instance, in this scenario, we could instantiate a troll with a berry as weapon due to a cast spell, or equip a villager with a sword temporarily because of some special power gained.
How to implement
Define the Abstraction interface.
Begin by defining the primary Abstraction class that you want to extend independently from other aspects. Within this class, define the necessary operations. The abstraction will hold a (bridge) reference to an Implementor abstract class (or interface) to fulfil its functionalities. It will redirect requests to the Implementor interface.
// The main abstraction that can be extended independently from
// the aspect the Implementor models.
public abstract class Abstraction
{
   protected Abstraction(Implementor implementor)
   {
      this.implementor = implementor;
   }
   private readonly Implementor implementor; // The bridge reference.
   public void OperationA() => implementor.DoOperationA(); // Forward the call.
   public void OperationB() => implementor.DoOperationB();
}
Define the Implementor interface.
Next, define the abstract class (or interface) for the aspect you want to extend independently from the primary Abstraction. The Implementor class will be used by the Abstraction. Methods in the Implementor do not necessarily need to match those in the Abstraction. The Implementor might expose more primitive functionalities, while the Abstraction utilizes these methods at a higher level.
// An aspect of the Abstraction is independently modeled
// through the implementor abstract class.
public abstract class Implementor
{
   public abstract void DoOperationA();
   public abstract void DoOperationB();
}
Create implementations for the Implementor.
Create implementations for the Implementor class. These implementations should contain specific details and functionalities unrelated to the main Abstraction. You can create multiple new implementations without changing the Abstraction hierarchy.
public class ConcreteImplementorA : Implementor
{
   public override void DoOperationA()
      => Console.WriteLine(nameof(ConcreteImplementorA) + nameof(DoOperationA));

   public override void DoOperationB()
       => Console.WriteLine(nameof(ConcreteImplementorA) + nameof(DoOperationB));
}

public class ConcreteImplementorB : Implementor
{
   public override void DoOperationA()
      => Console.WriteLine(nameof(ConcreteImplementorB) + nameof(DoOperationA));

   public override void DoOperationB()
       => Console.WriteLine(nameof(ConcreteImplementorB) + nameof(DoOperationB));
}
Finally, create the implementations for the Abstraction.
At this stage, you can define a new implementation for the main Abstraction without altering the Implementor hierarchy.
public class ConcreteAbstraction : Abstraction
{
   public ConcreteAbstraction(Implementor implementor)
      : base(implementor)
 {
 }

   public void AnotherOperation()
      // You can also utilize the implementor instance.
      => Console.WriteLine("Another operation");
}
An interesting property of this design is that it enables combinations of instances from the Abstraction hierarchy with any implementation from the Implementor hierarchy, as long as they are compatible. For instance, we can instantiate the ConcreteAbstraction with any of the implementor instances as shown below:
new ConcreteAbstraction(new ConcreteImplementorA());
new ConcreteAbstraction(new ConcreteImplementorB());
Using Abstract Factory to determine and create the Implementor instance
We can utilize the Abstract Factory Pattern in order the Abstraction to create and use the proper Implementor instance.
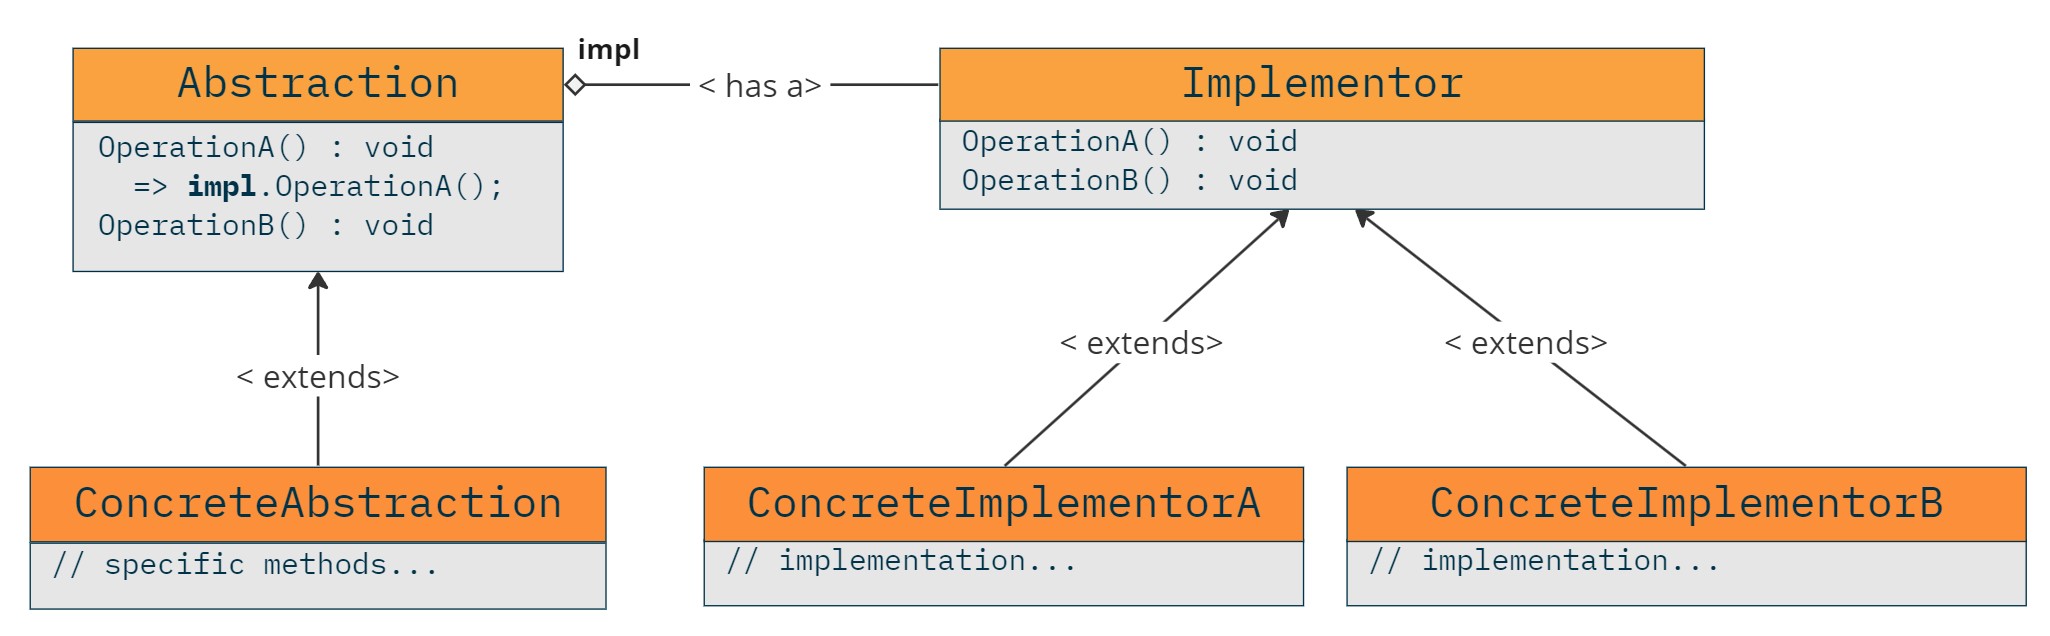
Bridge Pattern – Class diagram
Below we illustrate the components the Bridge Pattern consists of. The class diagram depicts two hierarchies, with the Abstraction on one side, capable of independent extension from the Implementor in the other hierarchy. The Abstraction hierarchy holds a reference to the Implementor hierarchy.
Pros and Cons
Pros
- Implementation of the Abstraction set at runtime – Because we decouple the interface from the implementation, we can set or even change the implementation at runtime.
- Eliminate compile-time dependencies – By separating the Abstraction from the implementation, the implementation classes aren’t necessary for compiling the Abstraction class/hierarchy. This flexibility allows designing implementations across different modules or plugins.
- More extensibility – Giving the Abstraction and the Implementation their own hierarchies we can extend them independently, offering more flexibility to the design.
- Shared Functionality – Implementors placed within a separate hierarchy can be utilized among multiple objects where suitable.
Cons
- Increased Indirection Complexity – The added level of freedom between Abstraction and Implementor introduces complexity when navigating through classes during debugging or code exploration. However, the Bridge Pattern enforces the Single Responsibility Principle, which mitigates this issue in a large extent. To mitigate this, try to organize the implementations inside your solution in a way that is more easily readable.
Example – Serializer
In this example we explore the Bridge Pattern by implementing different serializers for various entities. We’ll initially design the solution without the Bridge Pattern, explore its limitations, then refactor using the Bridge Pattern. Finally, we’ll extend the design to accommodate new requirements.
Approaching the Problem Using Simple Inheritance
Initially, we aim to export products and customers in CSV format for database import or external usage. We start our design by considering either Entity or Serializer as the core concept. Let’s begin with Entity as the primary concept. The Entity will contain a Serialize method to convert the model to CSV.
// Entity classes with tightly coupled CSV serialization.
public abstract class Entity
{
   public string Id { get; set; }

   public abstract string Serialize();
}

public class Customer : Entity
{
   public string Firstname { get; set; }
   public string Lastname { get; set; }

   public override string Serialize() =>
      $"{Id},{Firstname},{Lastname}";
}

public class Product : Entity
{
   public string Name { get; set; }
   public string Sku { get; set; }

   public override string Serialize() =>
      $"{Id},{Sku},{Name}";
}
The initial design tightly couples the Entity abstraction with CSV serialization, limiting extensibility.
Now we can create some product and customer instances and serialize them to CSV as shown below:
// In this example the Entity abstraction is tightly coupled
// with the CSV serialization.
// We cannot easily extend the Entity to support new serialization formats.
var customer = new SerializerExample.WithoutBridgePattern.Customer()
{
   Id = Guid.NewGuid().ToString(),
   Firstname = "FirstName1",
   Lastname = "LastName1"
};
var customerAsCsv = customer.Serialize();
Console.WriteLine("SerializerExampleWithoutBridgePattern, customer: " + customerAsCsv);

var product = new SerializerExample.WithoutBridgePattern.Product()
{
   Id = Guid.NewGuid().ToString(),
   Sku = "1234",
   Name = "Product 1"
};
var productAsCsv = product.Serialize();
Console.WriteLine("SerializerExampleWithoutBridgePattern, product: " + productAsCsv);

// Output:
// SerializerExampleWithoutBridgePattern, customer: 9c7544cd-1bd1-477b-88b9-224245c48c12,FirstName1,LastName1
// SerializerExampleWithoutBridgePattern, product: 96253e52-ded4-4f1c-b0f2-b7faf1a83b1b,1234,Product 1
The class diagram of our design, so far, consists of the Entity abstract class and two concrete classes, Product and Customer:
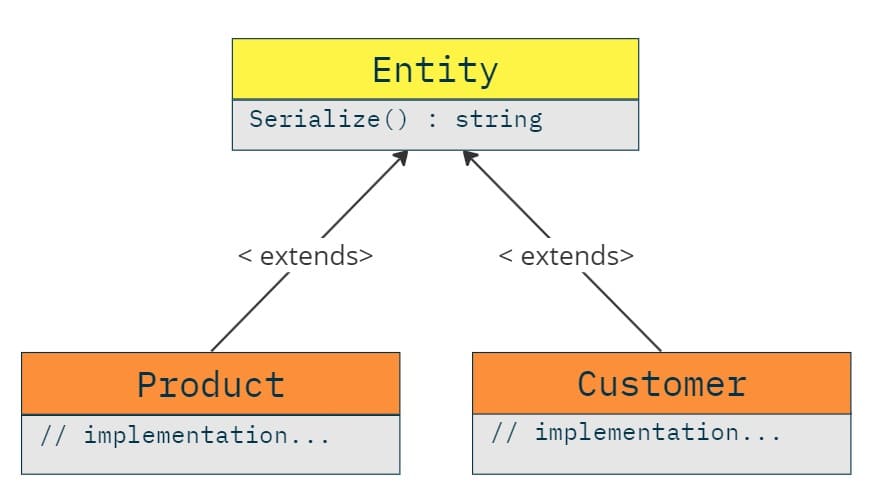
This approach works well for CSV but struggles to extend to new serialization formats without creating numerous classes for each format and entity type.
Now, lets explore the option to have the Serializer as our main concept. We begin by creating a Serializer abstract class with a Serialize method that accepts an Entity to serialize.
public abstract class Serializer<T>
   where T : Entity
{
   public abstract string Serialize(T entity);
}

public class ProductSerializer : Serializer<Product>
{
   public override string Serialize(Product product)
      => $"{product.Id},{product.Sku},{product.Name}";
}

public class CustomerSerializer : Serializer<Customer>
{
   public override string Serialize(Customer customer)
      => $"{customer.Id},{customer.Firstname},{customer.Lastname}";
}
Similarly, the previous code works well with CSV format. However, this design has also the same problem as the previous one. It does not extend easily if we want to add a new format. In order to do that we have to create two new abstract subclasses, CsvSerializer and JsonSerializer, one for each format. Then we have to extend those and create classes for each entity type we have, as shown below:
public abstract class CsvSerializer<T> : Serializer<T>
   where T : Entity
 {
 }

public abstract class JsonSerializer<T> : Serializer<T>
   where T : Entity
 {
 }

public class ProductCsvSerializer : CsvSerializer<Product>
{
   public override string Serialize(Product product)
      => $"{product.Id},{product.Sku},{product.Name}";
}

public class ProductJsonSerializer : JsonSerializer<Product>
{
   public override string Serialize(Product product)
      => JsonConvert.SerializeObject(product);
}

public class CustomerCsvSerializer : CsvSerializer<Customer>
{
   public override string Serialize(Customer customer)
      => $"{customer.Id},{customer.Firstname},{customer.Lastname}";
}

public class CustomerJsonSerializer : JsonSerializer<Customer>
{
   public override string Serialize(Customer customer)
      => JsonConvert.SerializeObject(customer);
}
From the previous code we can conclude that whenever a new format or a new entity type is added in our requirements the number of classes that we need to create and maintain would be very large depending on how many entity types and how many formats we support, so this design would not be scalable.
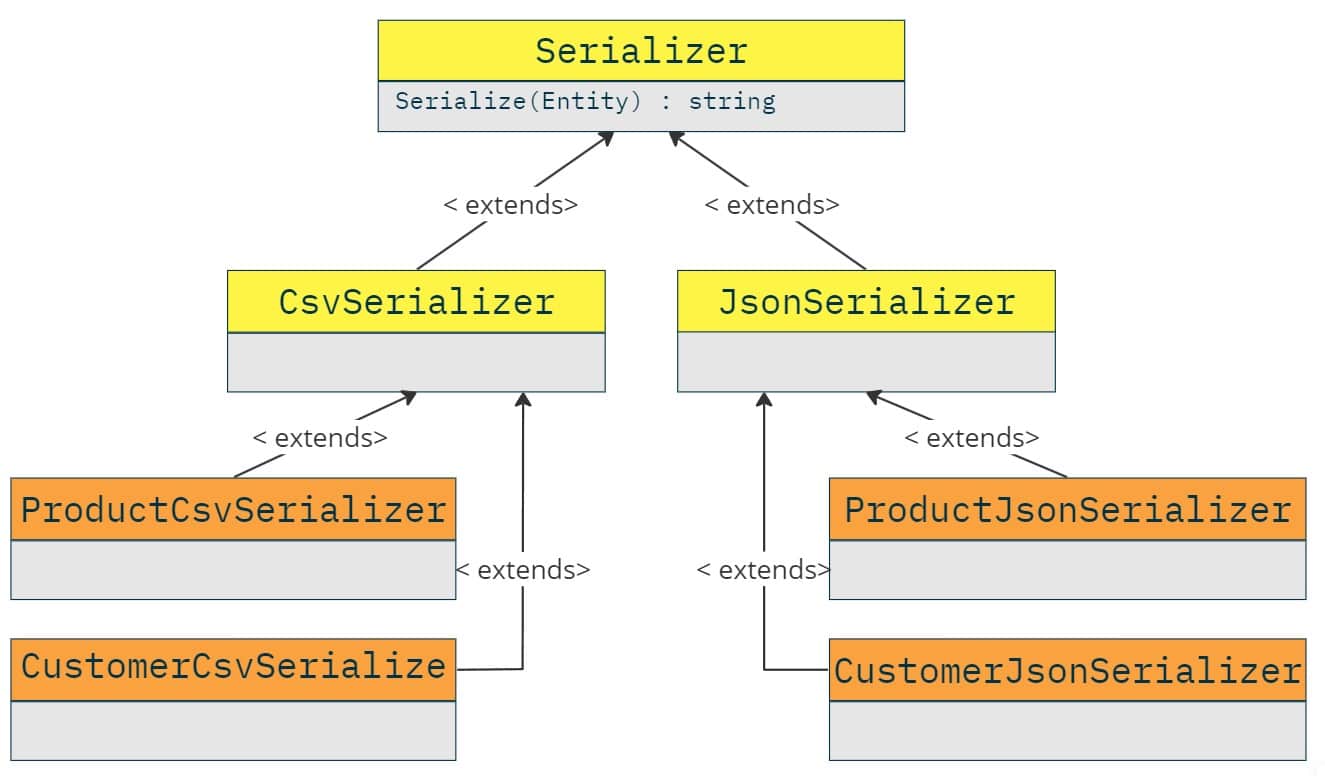
As we can see from the class diagram and the previous code, if we wanted to add a new format then, we should create three more classes (the new base class for the format and the two implementations one for each entity type).
Refactoring to Bridge Pattern
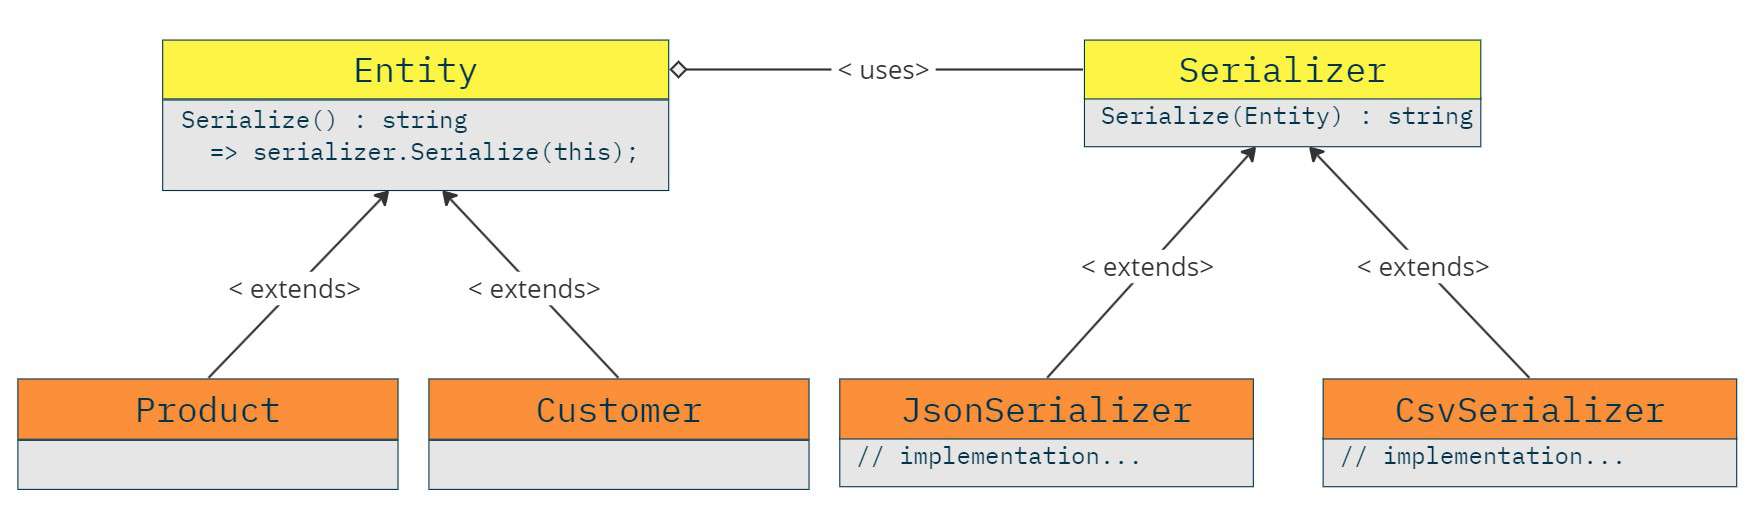
Now, lets revisit the first approach with the Entity as our main concept, find the problem and try to fix it. In this case, we identify that the Entity abstraction hides two different concepts together, which they should be separated in order our design to be extensible for new serialization formats. The new hierarchy will have the Serialization as its abstract class and will have implementations like CsvSerialization and JsonSerialization. This way, we decouple the entities from the serialization logic. In order the Entity to handle the serialization it will have a reference to the Serialization class.
public abstract class Entity
{
   // The bridge reference.
   private Serializer Serializer;

   public void SetSerializer(Serializer serializer)
      => Serializer = serializer;

   public string Id { get; set; }

   public string Serialize() => Serializer.Serialize(this);
}

public class Customer : Entity
{
   public string Firstname { get; set; }
   public string Lastname { get; set; }
}

public class Product : Entity
{
   public string Name { get; set; }
   public string Sku { get; set; }
}

// The concept of serialization is now independent from the Entity.
public abstract class Serializer
{
   public abstract string Serialize(Entity entity);
}

public class CsvSerializer : Serializer
{
   public override string Serialize(Entity entity)
   {
      List<string> values = new List<string>();
      foreach (var prop in entity.GetType()
         .GetProperties(BindingFlags.Public | BindingFlags.Instance))
      {
         values.Add(prop.GetValue(entity).ToString());
      }
      return string.Join(",", values);
   }
}

public class JsonSerializer : Serializer
{
   public override string Serialize(Entity entity)
   {
      return JsonConvert.SerializeObject(entity);
   }
}
This refactored design allows independent extension of entities and serializations. Adding a new serialization format only requires adding a new Serialization subclass.
Usage Example
Entities can be instantiated and serialized by initializing respective serializers:
var csvSerializer = new CsvSerializer();
var jsonSerializer = new JsonSerializer();

var customer = new Customer()
{
   Id = Guid.NewGuid().ToString(),
   Firstname = "Firstname1",
   Lastname = "Lastname1"
};

var product = new Product()
{
   Id = Guid.NewGuid().ToString(),
   Sku = "1234",
   Name = "Product 1"
};

customer.SetSerializer(csvSerializer);
product.SetSerializer(jsonSerializer);

Console.WriteLine("SerializerExampleWithBridgePattern, customer: " + customer.Serialize());
Console.WriteLine("SerializerExampleWithBridgePattern, product: " + product.Serialize());

// Output:
// customer: Firstname1,Lastname1,69225952-641e-43fc-97e3-f887c3839785
// product: {"Name":"Product 1","Sku":"1234","Id":"ef4915e1-d6b6-4c8f-800d-323a51a4dcbe"}
Extending the Design for New Serialization Formats
Finally, we explore how our design can be extended whenever a new serialization is added. As an example, in order to add XML as a new serialization format, we have to create a new XmlSerializer and implement its Serialize method:
public class XmlSerializer : Serializer
{
   public override string Serialize(Entity entity)
   {
      System.Xml.Serialization.XmlSerializer x = new System.Xml.Serialization.XmlSerializer(entity.GetType());
      using MemoryStream s = new MemoryStream();
      x.Serialize(s, entity);
      return Encoding.ASCII.GetString(s.ToArray());
   }
}
Similarly, we can extend and create new Entities without altering the Serialization hierarchy.
We can now use the new XmlSerializer as shown below:
var product = new Product()
{
   Id = Guid.NewGuid().ToString(),
   Sku = "1234",
   Name = "Product 1"
};

var xmlSerializer = new XmlSerializer();
product.SetSerializer(xmlSerializer);
Console.WriteLine(product.Serialize());

/* Output:
<?xml version="1.0" encoding="utf-8"?>
<Product xmlns:xsi="http://www.w3.org/2001/XMLSchema-instance" xmlns:xsd="http://www.w3.org/2001/XMLSchema">
  <Id>8d31505e-c688-4177-b2bd-c574afa5c565</Id>
  <Name>Product 1</Name>
  <Sku>1234</Sku>
</Product>
*/
Using Dependency Injection
Dependency injection is a powerful technique that enables flexible and loosely coupled code. In this section, we’ll explore how to use dependency injection for implementing the Bridge Pattern.
Autofac
The code with dependency injection is available on GitHub
C#
We can use Dependency Injection to register the hierarchies, Abstraction and Implementor. In case we use an abstract factory for the Abstraction in order to get the proper Implementor instance we can register that also.
In the following example, we register the CsvSerializer as the default serializer. This can be achieved if we register CsvSerializer after all other Serializer registrations, or by providing a key for the other serializer registrations except the default one. This way, when we resolve a Serializer without specifying any additional property (like a key) we get the default registration.
Also, we register the Product with the XmlSerializer as its default serializer and we leave the Customer without a Serializer. The code with the registrations, resolve and usage is shown below:
var builder = new ContainerBuilder();

// Register customer without any serializer.
builder.RegisterType<Customer>().Keyed<Entity>("customer");

// Register Product with XmlSerializer as a default serializer.
builder.Register<Product>((c,p) => {
   var product = new Product();
   product.SetSerializer(c.ResolveKeyed<Serializer>("xml"));
   return product;
}).Keyed<Entity>("product");


// Register all serializers with a key.
builder.RegisterType<CsvSerializer>().Keyed<Serializer>("csv");
builder.RegisterType<JsonSerializer>().Keyed<Serializer>("json");
builder.RegisterType<XmlSerializer>().Keyed<Serializer>("xml");

// Register CsvSerializer as default serializer.
builder.RegisterType<CsvSerializer>().As<Serializer>();

var container = builder.Build(); // We are done with the registrations.


var customer = container.ResolveKeyed<Entity>("customer") as Customer;
customer.SetSerializer(container.Resolve<Serializer>()); // set to the customer the default serializer.

customer.Id = Guid.NewGuid().ToString();
customer.Firstname = "first name";
customer.Lastname = "last name";

var customerAsJson = customer.Serialize();
Console.WriteLine(customerAsJson);
/*
Output:
first name,last name,3cdeeaf9-a36b-4673-9935-e89939bed623
*/

// The resolved product will have the XmlSerializer as Serializer by default.
var product = container.ResolveKeyed<Entity>("product") as Product;
product.Id = "product id";
product.Sku = "1234";
product.Name = "a product";
var productAsXml = product.Serialize();
Console.WriteLine(productAsXml);
/*
Output:
<?xml version="1.0" encoding="utf-8"?>
<Product xmlns:xsi="http://www.w3.org/2001/XMLSchema-instance" xmlns:xsd="http://www.w3.org/2001/XMLSchema">
  <Id>product id</Id>
  <Name>a product</Name>
  <Sku>1234</Sku>
</Product>
*/
Related Patterns
Abstract Factory can create and configure a particular Bridge.
Decorator can also be used in order to provide additional functionality to a class or hierarchy without inheritance.
Further Reading
Looking to dive deeper into design patterns and take your programming skills to the next level? Check out the following highly recommended books:
* This site contains product affiliate links. We may receive a commission if you make a purchase after clicking on one of these links.