

In this article we use code that can be found on GitHub. The Math.Core and Math.Advanced assemblies are created and used in order to demonstrate the various concepts explored in this article.
In this article we explore the most basic unit of deployment in .NET, the Assembly. We delve into the different components that make up an Assembly in .NET, covering topics such as versioning, the mechanics of resolution, localization and satellite assemblies, strong naming, the process of signing an assembly, and more.
What is an Assembly
An Assembly is the result of the compilation process of a .NET project. Whenever you create a project in .NET, such as a Dynamic Linked Library (DLL), the end result is an Assembly in the form of a DLL or EXE file.
What’s Inside an Assembly
A .NET Assembly contains several artifacts, including compiled types with their Intermediate Language (IL), resources and an assembly manifest, which acts as a directory for resources, types, dependencies and other information such as assembly name, version and the public key of the assembly.
These artifacts are contained inside a Module. The module layer exists in both the .NET Framework and .NET Core / .NET5+. However, in .NET Framework, each module is a physical file containing the assembly’s contents, allowing an assembly to span multiple files. This feature is not supported in .NET Core / .NET 5+ versions.
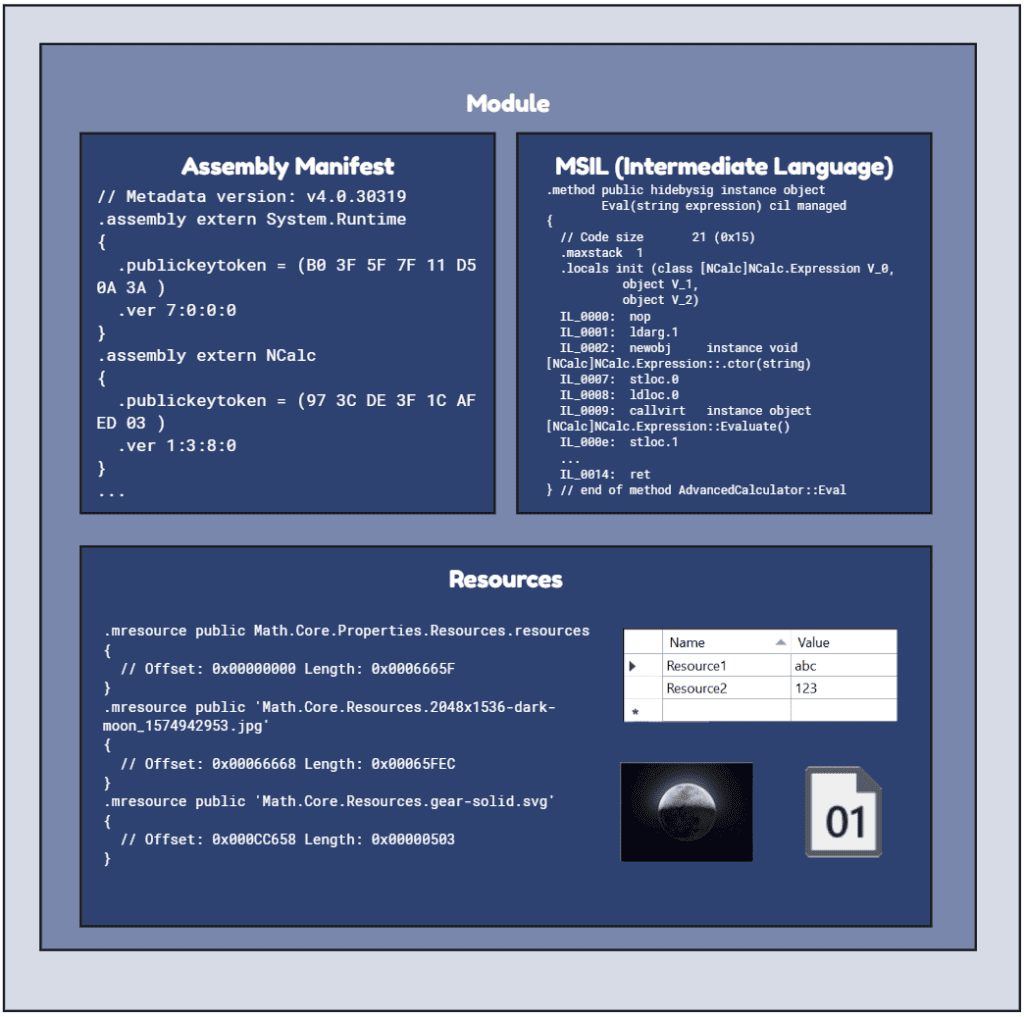
Assembly Manifest
The assembly manifest contains all the information needed in order to describe the assembly. Specifically, it contains the following information:
- Assembly simple name
- Version – defaults to 0.0.0.0 if not set.
- Public Key/token – null if not signed.
- Referenced Assemblies
- Compiled Types
- Culture – mandatory for satellite assemblies, defaults to ‘neutral’ otherwise.
Moreover, the manifest can store additional information like title, description, and company name. As a result, consumers of the Assembly can access all necessary information about its types, functions, and properties without requiring additional files, making the assembly a self-describing asset. The manifest is essential and used by the Common Language Runtime (CLR).
The Assembly Manifest is not something you add to the file explicitly, it is embedded automatically in the .dll or .exe file during the compilation process.
Inspecting the Assembly Manifest
To inspect an assembly’s manifest, we can use tools like the IL DASM, which is included with the Visual Studio installation, Jetbrain DotPeek or the IL Spy tool.
For instance, if you’re using the Visual Studio Developer Command Prompt, type ildasm to open the IL DASM user interface.
Next, select the DLL file you want to inspect. Here, we’ll demonstrate the inspection of Autofac.dll.
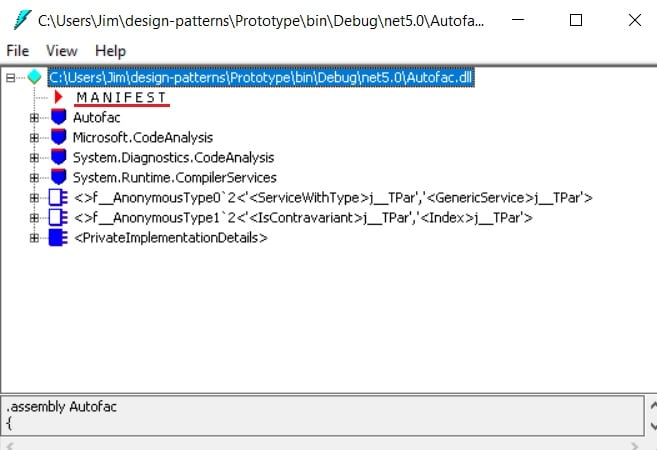
In the previous image, we can see the different entries for the Autofac.dll Assembly. One of these entries, highlighted in the image, corresponds to the manifest. By selecting this entry, we can view the entire manifest, part of it is shown in the code below:
// Metadata version: v4.0.30319
.assembly extern netstandard
{
.publickeytoken = (CC 7B 13 FF CD 2D DD 51 ) // .{...-.Q
.ver 2:1:0:0
}
.assembly extern System.Diagnostics.DiagnosticSource
{
.publickeytoken = (CC 7B 13 FF CD 2D DD 51 ) // .{...-.Q
.ver 4:0:5:0
}
.assembly Autofac
{
.custom instance void [netstandard]System.Runtime.CompilerServices.ExtensionAttribute::.ctor() = ( 01 00 00 00 )
.custom instance void [netstandard]System.Runtime.CompilerServices.CompilationRelaxationsAttribute::.ctor(int32) = ( 01 00 08 00 00 00 00 00 )
.custom instance void [netstandard]System.Runtime.CompilerServices.RuntimeCompatibilityAttribute::.ctor() = ( 01 00 01 00 54 02 16 57 72 61 70 4E 6F 6E 45 78 // ....T..WrapNonEx
63 65 70 74 69 6F 6E 54 68 72 6F 77 73 01 ) // ceptionThrows.
// --- The following custom attribute is added automatically, do not uncomment -------
// .custom instance void [netstandard]System.Diagnostics.DebuggableAttribute::.ctor(valuetype [netstandard]System.Diagnostics.DebuggableAttribute/DebuggingModes) = ( 01 00 02 00 00 00 00 00 )
.custom instance void [netstandard]System.Runtime.CompilerServices.InternalsVisibleToAttribute::.ctor(string) = ( 01 00 81 58 41 75 74 6F 66 61 63 2E 54 65 73 74 // ...XAutofac.Test
2C 20 50 75 62 6C 69 63 4B 65 79 3D 30 30 32 34 // , PublicKey=0024
30 30 30 30 30 34 38 30 30 30 30 30 39 34 30 30 // 0000048000009400
30 30 30 30 30 36 30 32 30 30 30 30 30 30 32 34 // 0000060200000024
30 30 30 30 35 32 35 33 34 31 33 31 30 30 30 34 // 0000525341310004
30 30 30 30 30 31 30 30 30 31 30 30 38 37 32 38 // 0000010001008728
34 32 35 38 38 35 65 66 33 38 35 65 30 34 39 32 // 425885ef385e0492
36 31 62 31 38 38 37 38 33 32 37 64 66 61 61 66 // 61b18878327dfaaf
30 64 36 36 36 64 65 61 33 62 64 32 62 30 65 34 // 0d666dea3bd2b0e4
66 31 38 62 33 33 39 32 39 61 64 34 65 35 66 62 // f18b33929ad4e5fb
63 39 30 38 37 65 37 65 64 61 33 63 31 32 39 31 // c9087e7eda3c1291
64 32 64 65 35 37 39 32 30 36 64 39 62 34 32 39 // d2de579206d9b429
32 34 35 36 61 62 66 66 62 65 38 62 65 36 63 37 // 2456abffbe8be6c7
30 36 30 62 33 36 64 61 30 63 33 33 62 38 38 33 // 060b36da0c33b883
65 33 38 37 38 65 61 66 37 63 38 39 66 64 64 66 // e3878eaf7c89fddf
32 39 65 36 65 32 37 64 32 34 35 38 38 65 38 31 // 29e6e27d24588e81
65 38 36 66 33 61 32 32 64 64 37 62 31 61 32 39 // e86f3a22dd7b1a29
36 62 35 66 30 36 66 62 66 62 35 30 30 62 62 64 // 6b5f06fbfb500bbd
37 34 31 30 66 61 61 37 32 31 33 65 66 34 65 32 // 7410faa7213ef4e2
63 65 37 36 32 32 61 65 66 63 30 33 31 36 39 62 // ce7622aefc03169b
30 33 32 34 62 63 64 33 30 63 63 66 65 39 61 63 // 0324bcd30ccfe9ac
38 32 30 34 65 34 39 36 30 62 65 36 00 00 ) // 8204e4960be6..
.custom instance void [netstandard]System.CLSCompliantAttribute::.ctor(bool) = ( 01 00 00 00 00 )
.custom instance void [netstandard]System.Runtime.InteropServices.ComVisibleAttribute::.ctor(bool) = ( 01 00 00 00 00 )
.custom instance void [netstandard]System.Runtime.Versioning.TargetFrameworkAttribute::.ctor(string) = ( 01 00 19 2E 4E 45 54 53 74 61 6E 64 61 72 64 2C // ....NETStandard,
56 65 72 73 69 6F 6E 3D 76 32 2E 31 01 00 54 0E // Version=v2.1..T.
14 46 72 61 6D 65 77 6F 72 6B 44 69 73 70 6C 61 // .FrameworkDispla
79 4E 61 6D 65 11 2E 4E 45 54 20 53 74 61 6E 64 // yName..NET Stand
61 72 64 20 32 2E 31 ) // ard 2.1
.custom instance void [netstandard]System.Reflection.AssemblyCompanyAttribute::.ctor(string) = ( 01 00 07 41 75 74 6F 66 61 63 00 00 ) // ...Autofac..
.custom instance void [netstandard]System.Reflection.AssemblyConfigurationAttribute::.ctor(string) = ( 01 00 07 52 65 6C 65 61 73 65 00 00 ) // ...Release..
.custom instance void [netstandard]System.Reflection.AssemblyCopyrightAttribute::.ctor(string) = ( 01 00 26 43 6F 70 79 72 69 67 68 74 20 C2 A9 20 // ..&Copyright ..
32 30 31 35 20 41 75 74 6F 66 61 63 20 43 6F 6E // 2015 Autofac Con
74 72 69 62 75 74 6F 72 73 00 00 ) // tributors..
.custom instance void [netstandard]System.Reflection.AssemblyDescriptionAttribute::.ctor(string) = ( 01 00 80 A9 41 75 74 6F 66 61 63 20 69 73 20 61 // ....Autofac is a
6E 20 49 6F 43 20 63 6F 6E 74 61 69 6E 65 72 20 // n IoC container
66 6F 72 20 4D 69 63 72 6F 73 6F 66 74 20 2E 4E // for Microsoft .N
45 54 2E 20 49 74 20 6D 61 6E 61 67 65 73 20 74 // ET. It manages t
68 65 20 64 65 70 65 6E 64 65 6E 63 69 65 73 20 // he dependencies
62 65 74 77 65 65 6E 20 63 6C 61 73 73 65 73 20 // between classes
73 6F 20 74 68 61 74 20 61 70 70 6C 69 63 61 74 // so that applicat
69 6F 6E 73 20 73 74 61 79 20 65 61 73 79 20 74 // ions stay easy t
6F 20 63 68 61 6E 67 65 20 61 73 20 74 68 65 79 // o change as they
20 67 72 6F 77 20 69 6E 20 73 69 7A 65 20 61 6E // grow in size an
64 20 63 6F 6D 70 6C 65 78 69 74 79 2E 00 00 ) // d complexity...
.custom instance void [netstandard]System.Reflection.AssemblyFileVersionAttribute::.ctor(string) = ( 01 00 07 37 2E 30 2E 31 2E 30 00 00 ) // ...7.0.1.0..
.custom instance void [netstandard]System.Reflection.AssemblyInformationalVersionAttribute::.ctor(string) = ( 01 00 2E 37 2E 30 2E 31 2B 32 37 65 31 38 33 32 // ...7.0.1+27e1832
39 31 31 37 33 39 65 31 36 39 62 61 31 64 63 65 // 911739e169ba1dce
37 39 62 31 31 31 32 32 38 36 33 66 64 63 64 30 // 79b11122863fdcd0
34 00 00 ) // 4..
.custom instance void [netstandard]System.Reflection.AssemblyProductAttribute::.ctor(string) = ( 01 00 07 41 75 74 6F 66 61 63 00 00 ) // ...Autofac..
.custom instance void [netstandard]System.Reflection.AssemblyTitleAttribute::.ctor(string) = ( 01 00 07 41 75 74 6F 66 61 63 00 00 ) // ...Autofac..
.custom instance void [netstandard]System.Reflection.AssemblyMetadataAttribute::.ctor(string,
string) = ( 01 00 0D 52 65 70 6F 73 69 74 6F 72 79 55 72 6C // ...RepositoryUrl
22 68 74 74 70 73 3A 2F 2F 67 69 74 68 75 62 2E // "https://github.
63 6F 6D 2F 61 75 74 6F 66 61 63 2F 41 75 74 6F // com/autofac/Auto
66 61 63 00 00 ) // fac..
.custom instance void [netstandard]System.Resources.NeutralResourcesLanguageAttribute::.ctor(string) = ( 01 00 05 65 6E 2D 55 53 00 00 ) // ...en-US..
.publickey = (00 24 00 00 04 80 00 00 94 00 00 00 06 02 00 00 // .$..............
00 24 00 00 52 53 41 31 00 04 00 00 01 00 01 00 // .$..RSA1........
87 28 42 58 85 EF 38 5E 04 92 61 B1 88 78 32 7D // .(BX..8^..a..x2}
FA AF 0D 66 6D EA 3B D2 B0 E4 F1 8B 33 92 9A D4 // ...fm.;.....3...
E5 FB C9 08 7E 7E DA 3C 12 91 D2 DE 57 92 06 D9 // ....~~.<....W...
B4 29 24 56 AB FF BE 8B E6 C7 06 0B 36 DA 0C 33 // .)$V........6..3
B8 83 E3 87 8E AF 7C 89 FD DF 29 E6 E2 7D 24 58 // ......|...)..}$X
8E 81 E8 6F 3A 22 DD 7B 1A 29 6B 5F 06 FB FB 50 // ...o:".{.)k_...P
0B BD 74 10 FA A7 21 3E F4 E2 CE 76 22 AE FC 03 // ..t...!>...v"...
16 9B 03 24 BC D3 0C CF E9 AC 82 04 E4 96 0B E6 ) // ...$............
.hash algorithm 0x00008004
.ver 7:0:1:0
}
.mresource public Autofac.Builder.BuildCallbackServiceResources.resources
{
// Offset: 0x00000000 Length: 0x0000011F
}
/* Code omitted */
.mresource public Autofac.Util.EnforceResources.resources
{
// Offset: 0x000063A0 Length: 0x00000259
}
.mresource public Autofac.Util.FallbackDictionaryResources.resources
{
// Offset: 0x00006600 Length: 0x00000108
}
.mresource public Autofac.Util.ReflectionExtensionsResources.resources
{
// Offset: 0x00006710 Length: 0x00000293
}
.module Autofac.dll
// MVID: {E9B0B2D2-327E-4FA8-A904-B2F52955B19F}
.custom instance void System.Runtime.CompilerServices.RefSafetyRulesAttribute::.ctor(int32) = ( 01 00 0B 00 00 00 00 00 )
.imagebase 0x10000000
.file alignment 0x00000200
.stackreserve 0x00100000
.subsystem 0x0003 // WINDOWS_CUI
.corflags 0x00000009 // ILONLY
// Image base: 0x052D0000
Inside the manifest, we can see the Autofac assembly’s dependencies, check if it’s signed (by examining the public key entry), identify different resources it contains, and find other associated attributes.
Assembly Attributes
Assembly attributes are properties located inside the Assembly manifest that describe the Assembly.
Assembly Name
One of the most important assembly attributes is its name. The fully qualified name of an assembly comprises four 4 parts:
Simple name – This comes from the assembly’s file name, without the extension.
Version – Described in the Versioning section, it consists of major.minor.build.revision. If not specified, the default value is 0.0.0.0.
Culture – This can be set using the AssemblyCulture attribute and is applicable only to satellite assemblies. For non-satellite assemblies, it defaults to neutral, representing no specific culture.
Public Key Token – The public key token is a 8-byte attribute that comes from signing/strong naming the assembly. Signing gives the assembly a strong name. If the assembly isn’t signed, it defaults to null.
When all four parts are provided, the assembly’s fully qualified name has the following format:
simple-name, Version=version, Culture=culture, PublicKeyToken=public-keyFor example, the fully qualified name of the Math.Advanced assembly is the following:
Math.Advanced, Version=2.0.0.0, Culture=neutral, PublicKeyToken=9a6e2ec23b9a60eaHow to set assembly attributes
You can set the most commonly used attributes, as mentioned in earlier sections, in the following ways:
Using Visual Studio:
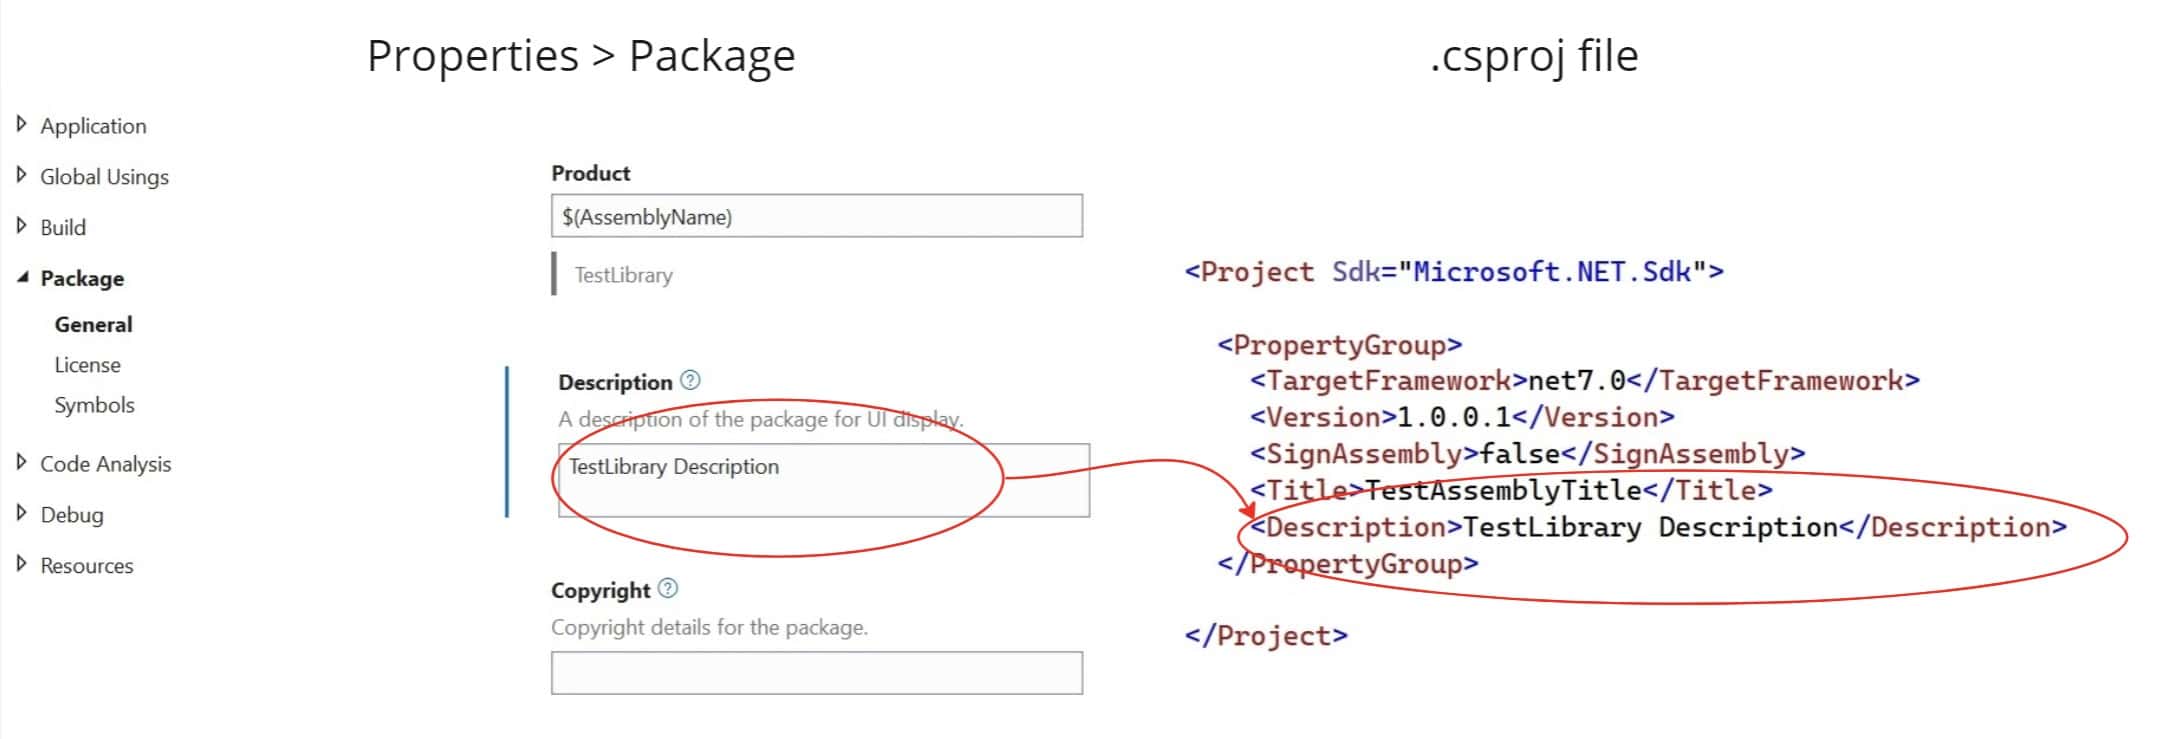
Navigate to the Properties of the assembly project (e.g., a Library project or console application) and edit the sections in the Package tab. This will modify the .csproj file of the project by adding the new properties in XML format.
Editing certain properties, like Versioning, will result in changes to the AssemblyInfo.cs file with the specified values.
Adding an AssemblyInfo.cs file:
Another method to set Assembly attributes is by creating an AssemblyInfo.cs file within the assembly project. This file should contain only using statements and attributes that define the desired properties. Below is an example with the syntax of the file:
using System.Diagnostics;
using System.Reflection;
using System.Runtime.CompilerServices;
using System.Runtime.InteropServices;
using System.Runtime.Versioning;

[assembly: Guid("93b4af14-b569-4bd9-a409-dabb06023837")]
[assembly: AssemblyCompany("TestLibrary")]
[assembly: AssemblyConfiguration("Debug")]
[assembly: AssemblyDescription("TestLibrary Description")]
[assembly: AssemblyFileVersion("1.0.0.1")]
[assembly: AssemblyInformationalVersion("1.0.0.1")]
[assembly: AssemblyProduct("TestLibrary")]
[assembly: AssemblyTitle("TestLibrary")]
[assembly: AssemblyVersion("1.0.0.1")]
The AssemblyInfo can be edited automatically by Visual Studio when you edit the properties of the project or by updating the .csproj file of a project. If you override the auto-generated AssemblyInfo.cs file and do manual changes to it, you must also add a setting to prevent the auto-generation of an AssemblyInfo.cs file, as it may lead to conflicts.
<Project Sdk="Microsoft.NET.Sdk">
  <PropertyGroup>
    <GenerateAssemblyInfo>false</GenerateAssemblyInfo>
  </PropertyGroup>
</Project>
Compiled Types
Within the assembly, code exists in the form of Intermediate Language (IL). IL is created in order to enable portability across different languages in the .NET ecosystem, such as C#, Visual Basic and F#. Consequently, code written in C# or F# is first translated into IL code. This IL code can be executed on any machine with the Common Language Runtime (CLR). This way, we don’t have to consider the target machine’s architecture and other low-level details, which are handled by the Just In Time Compiler (JIT). The JIT compiler compiles the IL into its final executable form, tailored to the specific machine’s architecture and characteristics.
The IL Code is in a binary format, making it unreadable for humans. However, we can write IL Assembly and convert it to IL Code by using the ILAsm tool. Similarly, we can convert binary IL Code into IL Assembly and be able to read it. Next, we will show the IL Assembly for a snippet of code from our Math.Advanced assembly.
namespace AdvancedMath
{
   public class AdvancedCalculator
   {
      public object Eval(string expression)
      {
         NCalc.Expression expr = new NCalc.Expression(expression);
         var res = expr.Evaluate();
         return res;
      }
   }
}
The previous code is a simple class with a method that creates an object from an external assembly and calls its Evaluate method to evaluate a string expression to a result. We can get the equivalent IL Assembly code from decompiling the assembly containing the previous snippet, by using the ILDASM tool. The IL Assembly code is shown below:
.assembly extern System.Runtime
{
  .publickeytoken = (B0 3F 5F 7F 11 D5 0A 3A )                         // .?_....:
  .ver 7:0:0:0
}
.assembly extern NCalc
{
  .publickeytoken = (97 3C DE 3F 1C AF ED 03 )                         // .<.?....
  .ver 1:3:8:0
}
.assembly Math.Advanced
{
  .custom instance void [System.Runtime]System.Runtime.CompilerServices.CompilationRelaxationsAttribute::.ctor(int32) = ( 01 00 08 00 00 00 00 00 )
  .custom instance void [System.Runtime]System.Runtime.CompilerServices.RuntimeCompatibilityAttribute::.ctor() = ( 01 00 01 00 54 02 16 57 72 61 70 4E 6F 6E 45 78   // ....T..WrapNonEx
                                                                                                                   63 65 70 74 69 6F 6E 54 68 72 6F 77 73 01 )       // ceptionThrows.
  // --- The following custom attribute is added automatically, do not uncomment -------
  //  .custom instance void [System.Runtime]System.Diagnostics.DebuggableAttribute::.ctor(valuetype [System.Runtime]System.Diagnostics.DebuggableAttribute/DebuggingModes) = ( 01 00 07 01 00 00 00 00 )

  .custom instance void [System.Runtime]System.Runtime.Versioning.TargetFrameworkAttribute::.ctor(string) = ( 01 00 18 2E 4E 45 54 43 6F 72 65 41 70 70 2C 56   // ....NETCoreApp,V
                                                                                                              65 72 73 69 6F 6E 3D 76 37 2E 30 01 00 54 0E 14   // ersion=v7.0..T..
                                                                                                              46 72 61 6D 65 77 6F 72 6B 44 69 73 70 6C 61 79   // FrameworkDisplay
                                                                                                              4E 61 6D 65 08 2E 4E 45 54 20 37 2E 30 )          // Name..NET 7.0
  .custom instance void [System.Runtime]System.Reflection.AssemblyCompanyAttribute::.ctor(string) = ( 01 00 11 53 6F 66 74 77 61 72 65 50 61 72 74 69   // ...SoftwareParti
                                                                                                      63 6C 65 73 00 00 )                               // cles..
  .custom instance void [System.Runtime]System.Reflection.AssemblyConfigurationAttribute::.ctor(string) = ( 01 00 05 44 65 62 75 67 00 00 )                   // ...Debug..
  .custom instance void [System.Runtime]System.Reflection.AssemblyDescriptionAttribute::.ctor(string) = ( 01 00 22 63 6F 6E 74 61 69 6E 73 20 61 64 76 61   // .."contains adva
                                                                                                          6E 63 65 64 20 6D 61 74 68 20 6F 70 65 72 61 74   // nced math operat
                                                                                                          69 6F 6E 73 2E 00 00 )                            // ions...
  .custom instance void [System.Runtime]System.Reflection.AssemblyFileVersionAttribute::.ctor(string) = ( 01 00 07 32 2E 30 2E 30 2E 30 00 00 )             // ...2.0.0.0..
  .custom instance void [System.Runtime]System.Reflection.AssemblyInformationalVersionAttribute::.ctor(string) = ( 01 00 05 32 2E 30 2E 30 00 00 )                   // ...2.0.0..
  .custom instance void [System.Runtime]System.Reflection.AssemblyProductAttribute::.ctor(string) = ( 01 00 0D 4D 61 74 68 2E 41 64 76 61 6E 63 65 64   // ...Math.Advanced
                                                                                                      00 00 )
  .custom instance void [System.Runtime]System.Reflection.AssemblyTitleAttribute::.ctor(string) = ( 01 00 0D 4D 61 74 68 2E 41 64 76 61 6E 63 65 64   // ...Math.Advanced
                                                                                                    00 00 )
  .publickey = (00 24 00 00 04 80 00 00 94 00 00 00 06 02 00 00   // .$..............
                00 24 00 00 52 53 41 31 00 04 00 00 01 00 01 00   // .$..RSA1........
                F9 95 A3 4F C4 82 1D 4E 04 DB 34 B0 06 1C 86 18   // ...O...N..4.....
                EB 76 7C EB 10 D6 9C 62 C2 84 19 1F 7E AE 89 30   // .v|....b....~..0
                59 22 75 E6 B7 EB 4F C6 11 C1 B0 E4 14 2C 7B E8   // Y"u...O......,{.
                08 FF 22 EB 59 17 3A 7C 73 75 08 A3 8C 89 70 DE   // ..".Y.:|su....p.
                3A DC 93 4A 15 A2 E7 69 A1 B7 2C 37 DC 1C 3F 74   // :..J...i..,7..?t
                7F 1D 58 19 DF 7F 5B D4 DA FA BC A9 48 61 7C C9   // ..X...[.....Ha|.
                67 D6 7A 11 15 AC E7 82 FD 48 9F 09 DE 3B E1 89   // g.z......H...;..
                E6 76 15 55 5F 10 DB 7C 36 68 B5 95 EA 29 82 D7 ) // .v.U_..|6h...)..
  .hash algorithm 0x00008004
  .ver 2:0:0:0
}
.module Math.Advanced.dll
// MVID: {2A6CEF4D-FCD4-42FD-ACD9-42FAB5DE7B40}
.custom instance void System.Runtime.CompilerServices.RefSafetyRulesAttribute::.ctor(int32) = ( 01 00 0B 00 00 00 00 00 )
.imagebase 0x10000000
.file alignment 0x00000200
.stackreserve 0x00100000
.subsystem 0x0003       // WINDOWS_CUI
.corflags 0x00000009    //  ILONLY
// Image base: 0x0A030000

// =============== CLASS MEMBERS DECLARATION ===================

.class private auto ansi sealed beforefieldinit Microsoft.CodeAnalysis.EmbeddedAttribute
       extends [System.Runtime]System.Attribute
{
  .custom instance void [System.Runtime]System.Runtime.CompilerServices.CompilerGeneratedAttribute::.ctor() = ( 01 00 00 00 )
  .custom instance void Microsoft.CodeAnalysis.EmbeddedAttribute::.ctor() = ( 01 00 00 00 )
  .method public hidebysig specialname rtspecialname
          instance void  .ctor() cil managed
  {
    // Code size       8 (0x8)
    .maxstack  8
    IL_0000:  ldarg.0
    IL_0001:  call       instance void [System.Runtime]System.Attribute::.ctor()
    IL_0006:  nop
    IL_0007:  ret
  } // end of method EmbeddedAttribute::.ctor

} // end of class Microsoft.CodeAnalysis.EmbeddedAttribute

.class private auto ansi sealed beforefieldinit System.Runtime.CompilerServices.RefSafetyRulesAttribute
       extends [System.Runtime]System.Attribute
{
  .custom instance void [System.Runtime]System.Runtime.CompilerServices.CompilerGeneratedAttribute::.ctor() = ( 01 00 00 00 )
  .custom instance void Microsoft.CodeAnalysis.EmbeddedAttribute::.ctor() = ( 01 00 00 00 )
  .custom instance void [System.Runtime]System.AttributeUsageAttribute::.ctor(valuetype [System.Runtime]System.AttributeTargets) = ( 01 00 02 00 00 00 02 00 54 02 0D 41 6C 6C 6F 77   // ........T..Allow
                                                                                                                                     4D 75 6C 74 69 70 6C 65 00 54 02 09 49 6E 68 65   // Multiple.T..Inhe
                                                                                                                                     72 69 74 65 64 00 )                               // rited.
  .field public initonly int32 Version
  .method public hidebysig specialname rtspecialname
          instance void  .ctor(int32 A_1) cil managed
  {
    // Code size       15 (0xf)
    .maxstack  8
    IL_0000:  ldarg.0
    IL_0001:  call       instance void [System.Runtime]System.Attribute::.ctor()
    IL_0006:  nop
    IL_0007:  ldarg.0
    IL_0008:  ldarg.1
    IL_0009:  stfld      int32 System.Runtime.CompilerServices.RefSafetyRulesAttribute::Version
    IL_000e:  ret
  } // end of method RefSafetyRulesAttribute::.ctor

} // end of class System.Runtime.CompilerServices.RefSafetyRulesAttribute

.class public auto ansi beforefieldinit AdvancedMath.AdvancedCalculator
       extends [System.Runtime]System.Object
{
  .method public hidebysig instance object
          Eval(string expression) cil managed
  {
    // Code size       21 (0x15)
    .maxstack  1
    .locals init (class [NCalc]NCalc.Expression V_0,
             object V_1,
             object V_2)
    IL_0000:  nop
    IL_0001:  ldarg.1
    IL_0002:  newobj     instance void [NCalc]NCalc.Expression::.ctor(string)
    IL_0007:  stloc.0
    IL_0008:  ldloc.0
    IL_0009:  callvirt   instance object [NCalc]NCalc.Expression::Evaluate()
    IL_000e:  stloc.1
    IL_000f:  ldloc.1
    IL_0010:  stloc.2
    IL_0011:  br.s       IL_0013

    IL_0013:  ldloc.2
    IL_0014:  ret
  } // end of method AdvancedCalculator::Eval

  .method public hidebysig specialname rtspecialname
          instance void  .ctor() cil managed
  {
    // Code size       8 (0x8)
    .maxstack  8
    IL_0000:  ldarg.0
    IL_0001:  call       instance void [System.Runtime]System.Object::.ctor()
    IL_0006:  nop
    IL_0007:  ret
  } // end of method AdvancedCalculator::.ctor

} // end of class AdvancedMath.AdvancedCalculator
The IL Assembly displayed above is a part of the decompiled IL Code inside the Math.Advanced assembly. To decompile an assembly using the ILDASM, you can load the assembly file into the tool, then select File > Dump and choose a file to save the IL Assembly.
Additionally, you can recompile IL Assembly language back into IL Code using the ILAsm tool in the Developer Command Prompt for Visual Studio.
ilasm path_to_code.ilWhile this article doesn’t dive into the IL code details, we’ll provide explanations for some lines of the previous IL Assembly code:
IL Comments – In IL, comments start the same way as in C#, with // for single-line comments and /**/ for multiline comments.
.assembly extern <external assembly> – This instruction tells IL to import the libraries System.Runtime and NCalc. Inside the { .. } we also specify the public key and version of these assemblies. The extern keyword indicates that the assembly is an externally pre-compiled one.
.assembly <assembly name> – Using the assembly directive followed by a name (Math.Advanced in this case), we define information about our assembly. This includes the assembly’s name, AssemblyFileVersionAttribute, AssemblyDescriptionAttribute attributes, its version, and its public key, all enclosed in curly braces.
.module <module name> – Every assembly should contain at least one module within it. We define this module with the .module directive, providing a name.
.class – The .class directive is used to define a class within the assembly. In this example, the AdvancedMath.AdvancedCalculator class is defined using this directive. Inside the { … }, we specify all relevant information about that class, including its methods.
.method – The .method directive allows us to define methods that exist within classes. For example, the Eval method of the AdvancedCalculator class is defined using the .method directive, and inside its curly braces, the body of the method is defined as well.
If you’re interested in learning more about IL Code, you can refer to this Introduction-to-IL-Assembly-Language.
Extracting Public Key Token
The public key token is part of the fully qualified name of the assembly in case the assembly is singed. If the assembly is not signed, the public key token is null.
You can extract the public key token of an Assembly using the Strong Name tool, which can be accessed through Developer Command Prompt for VS. By opening a prompt in administrator mode, you can retrieve the public key token of an assembly using the following command:
sn -T <PathToYourDll>In our case we use the Math.Advanced library, developed for this article, to retrieve its public key token as shown below:
C:\Users\Jimfi\repos\assemblyplayground\Math.Advanced\bin\Debug\net7.0>sn -T Math.Advanced.dll

Microsoft (R) .NET Framework Strong Name Utility  Version 4.0.30319.0
Copyright (c) Microsoft Corporation.  All rights reserved.

Public key token is 9a6e2ec23b9a60ea
Application Manifest
The application manifest, different from the assembly manifest, is an XML file that contains information about the Assembly for the operating system. Typically, it is embedded into the startup executable (.exe) or DLL files as a Win32 resource during the build process or placed alongside the assembly file in the same directory. The application manifest’s name should match the name of the .exe or .DLL file but with a .manifest extension.
If present, the operating system first reads the application manifest, applies any instructions within it, and then reads the assembly manifest. For example, an application manifest can contain instructions on whether to run the code with administrative rights.
The application manifest file has a root element called assembly with the XML namespace (xmlns) urn:schemas-microsoft-com:asm.v1, as shown below:
<?xml version="1.0" encoding="utf-8"?>
<assembly manifestVersion="1.0" xmlns="urn:schemas-microsoft-com:asm.v1">
   <!-- contents of manifest -->
</assembly>
Next, we present an application manifest that instructs the OS to require administration access before running the application:
<?xml version="1.0" encoding="utf-8"?>
<assembly manifestVersion="1.0" xmlns="urn:schemas-microsoft-com:asm.v1">
   <trustInfo xmlns="urn:schemas-microsoft-com:asm.v2">
      <security>
         <requestedPrivileges>
            <requestedExecutionLevel level="requireAdministrator" />
         </requestedPrivileges>
      </security>
   </trustInfo>
</assembly>
Similarly, the following application manifest specifies the supported OS versions for the assembly:
<?xml version="1.0" encoding="utf-8"?>
<assembly xmlns="urn:schemas-microsoft-com:asm.v1" manifestVersion="1.0">
   <compatibility xmlns="urn:schemas-microsoft-com:compatibility.v1">
      <application>
         <!-- Windows 10 and Windows 11 -->
         <supportedOS Id="{8e0f7a12-bfb3-4fe8-b9a5-48fd50a15a9a}"/>
         <!-- Windows 8.1 -->
         <supportedOS Id="{1f676c76-80e1-4239-95bb-83d0f6d0da78}"/>
         <!-- Windows 8 -->
         <supportedOS Id="{4a2f28e3-53b9-4441-ba9c-d69d4a4a6e38}"/>
         <!-- Windows 7 -->
         <supportedOS Id="{35138b9a-5d96-4fbd-8e2d-a2440225f93a}"/>
         <!-- Windows Vista -->
         <supportedOS Id="{e2011457-1546-43c5-a5fe-008deee3d3f0}"/>
      </application>
   </compatibility>
</assembly>
Versioning
The assembly version has the following format:
major.minor.build.revision
This format consists of four distinct numbers, each changed for specific reasons. Here’s a summary of when to update each version number:
| Version Part | Reason to increase/change |
|---|---|
| major | New features are added, there’s a major rewrite or refactoring. Backward compatibility isn’t guaranteed with different major versions. |
| minor | Smaller features are added that does not require braking changes from the users. Backward compatibility should be assumed. Smaller enhancements, optimizations or performance issues. |
| build | Increased when the source code is recompiled. Also, when the processor, platform or compiler changes. Backwards compatibility and no braking changes can be assumed. |
| revision | Small bug fixes or enhancements or hotfixes. Assemblies with the same version but different revision number should be considered interchangeable. |
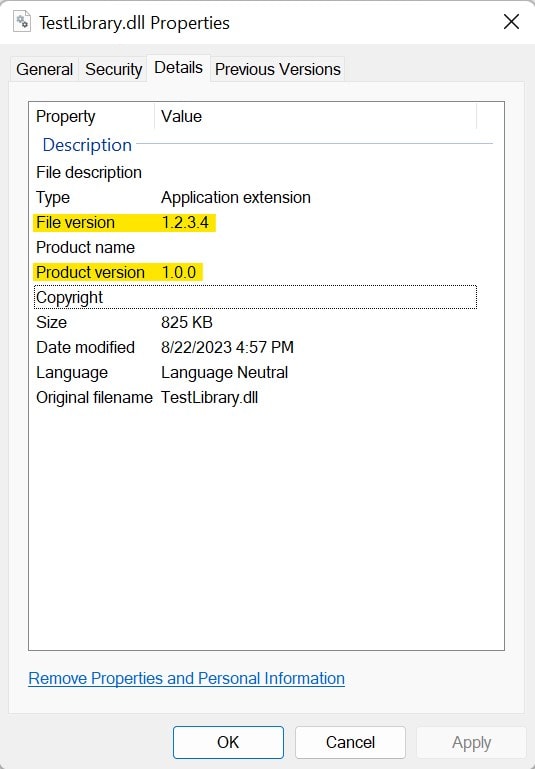
We can specify the assembly version using these assembly attributes:
[assembly: AssemblyVersion("1.0.0.1")]
[assembly: AssemblyFileVersion("1.2.3.4")]
[assembly: AssemblyInformationalVersion("1.0.0")]
The AssemblyVersionAttribute sets the version of the assembly that is embedded in its manifest, and is part of its identity (fully qualified name). Is used by the .NET runtime during assembly resolving.
The AssemblyFileVersionAttribute is used by the operating system to determine the version of the DLL file. It usually has the same value as AssemblyVersionAttribute, but it’s not necessary.
The AssemblyInformationalVersion attribute shows up in the operating system as the product version and its not used by the .NET.
Another way to set the version for a .NET project is via Visual Studio by selecting Properties of the desired project and then configuring the values in the version fields, as shown below:
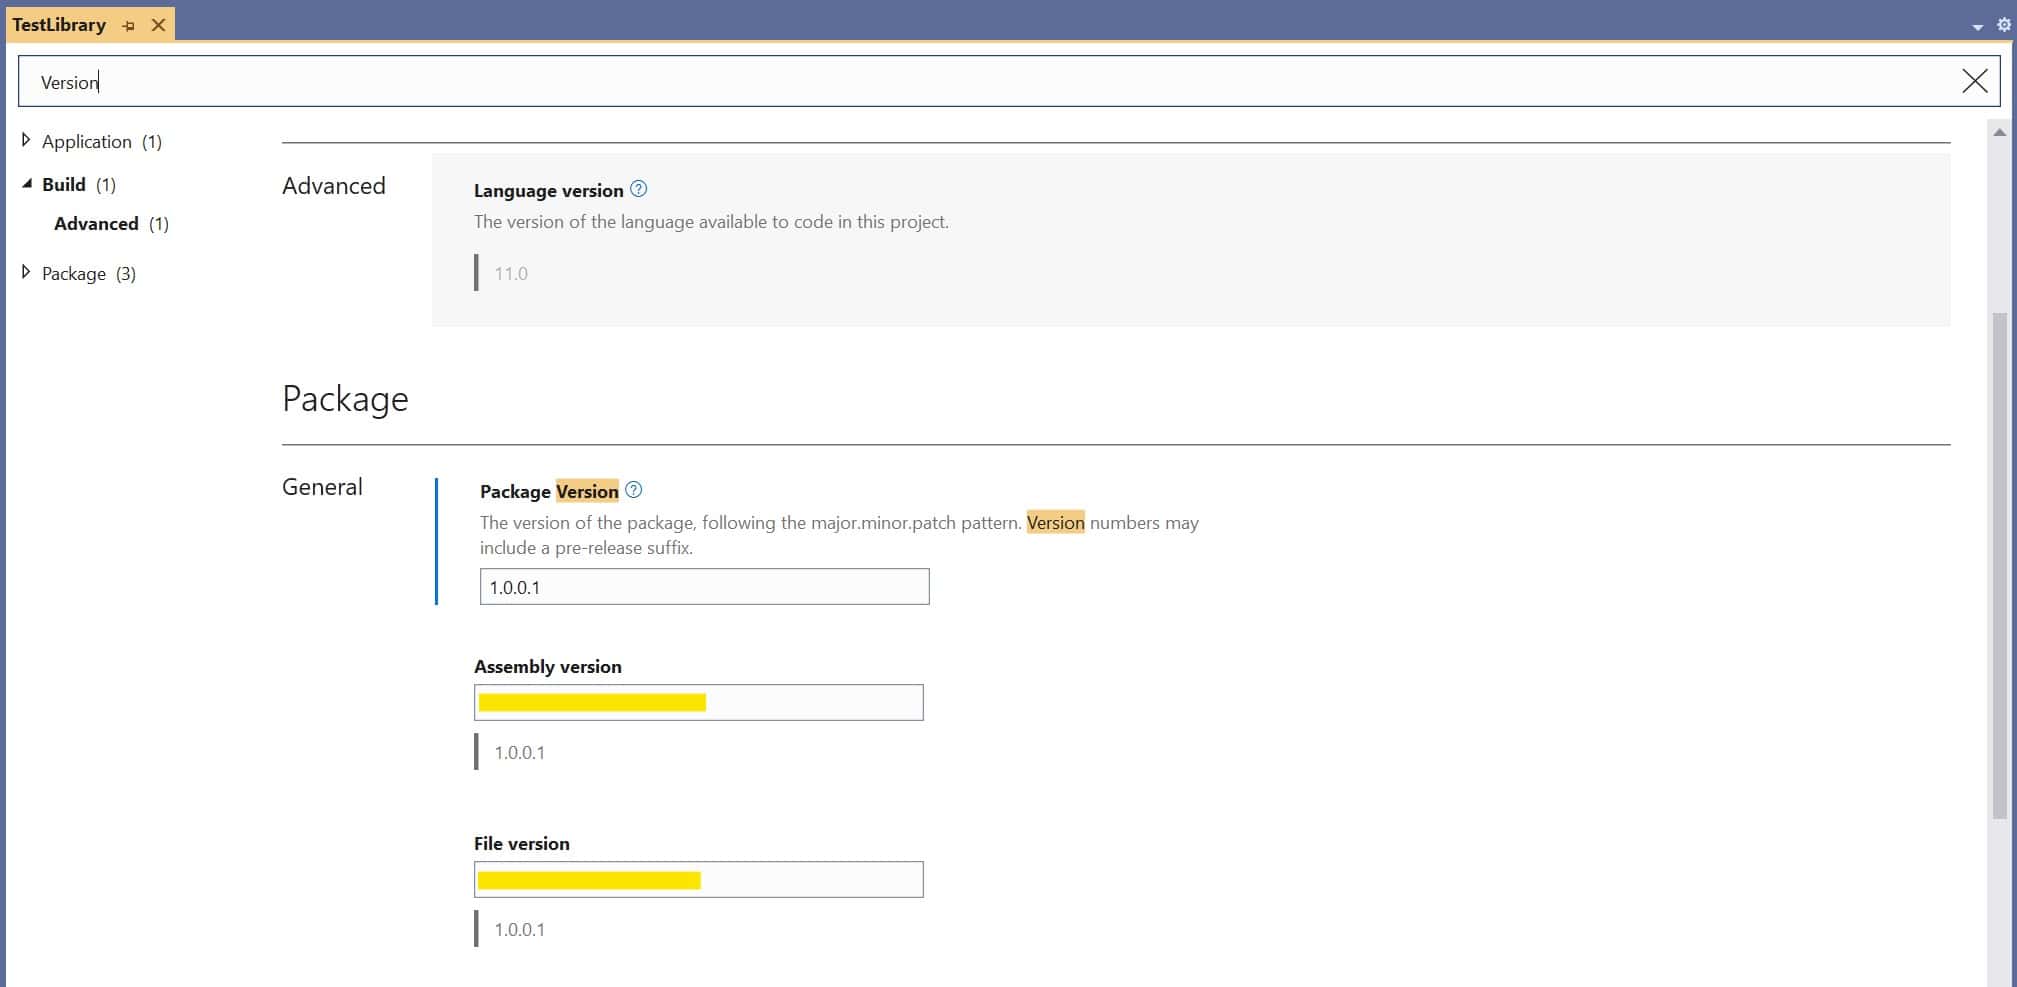
Alternatively, you can manually edit the project’s .csproj file to populate the desired version fields.
<Project Sdk="Microsoft.NET.Sdk">
  <PropertyGroup>
    <TargetFramework>net7.0</TargetFramework>
    <Version>1.0.0.1</Version>
    <InformationalVersion>1.0.0-beta1</InformationalVersion>
    <SignAssembly>True</SignAssembly>
    <Title>TestAssemblyTitle</Title>
    <Description>TestLibrary Description</Description>
  </PropertyGroup>
<Project Sdk="Microsoft.NET.Sdk">
This action will auto-generate the AssemblyInfo.cs file with the updated values.
Specify Custom Assembly Attributes
You can update or specify assembly attributes in Visual Studio’s project properties, including details like company, description, and version. If you need to define additional custom properties, you can create an AssemblyInfo.cs file within the assembly’s project. This file allows you to specify various custom properties as needed.
Global Assembly Cache
The Global Assembly Cache (GAC) is a central repository for assemblies that can be shared across different .NET applications. Prior to .NET Core / .NET5, signing an assembly and giving it a strong name was one of the requirements for adding an assembly to the GAC. However, in .NET Core / .NET5+ the GAC no longer exist.
There are two versions of the GAC that can be found on a machine. The 2.0 GAC and the 4.0. The 2.0 GAC is located at %WINDIR%/assembly, where the %WINDIR% typically is the C:/Windows directory. Inside that directory the contents are organized by their architecture as shown below with a dir command:
C:>cd C:\Windows\assembly

C:\Windows\assembly>dir

09/07/2023  07:41 PM    <DIR>          GAC
09/07/2023  07:41 PM    <DIR>          GAC_32
09/07/2023  07:41 PM    <DIR>          GAC_64
09/07/2023  07:41 PM    <DIR>          GAC_MSIL
09/08/2023  09:56 AM    <DIR>          NativeImages_v2.0.50727_32
09/08/2023  09:56 AM    <DIR>          NativeImages_v4.0.30319_32
05/07/2022  09:11 AM    <DIR>          NativeImages_v4.0.30319_64
09/07/2023  07:41 PM    <DIR>          temp
09/07/2023  07:41 PM    <DIR>          tmp
For example, the System.Runtime.Serialization can be found in the following location:
C:\Windows\assembly\GAC_MSIL\System.Runtime.Serialization\3.0.0.0__b77a5c561934e089\System.Runtime.Serialization.dllThe 4.0 GAC can be located under C:\Windows\Microsoft.NET\assembly, with assemblies organized into subdirectories based on architecture. Similarly running a dir command will have the following result:
C:\>cd Windows\Microsoft.NET\assembly

C:\Windows\Microsoft.NET\assembly>dir

09/07/2023  07:41 PM    <DIR>          GAC_32
09/07/2023  07:41 PM    <DIR>          GAC_64
09/07/2023  07:41 PM    <DIR>          GAC_MSIL
Global Assembly Cache Tool
By using the gacutil.exe tool you can check whether or not an assembly is present in the GAC by running the following command:
gacutil /l <assemblyname>Replace <assemblyname> with the simple name of the assembly. For instance, below we check if System.Runtime is in the GAC:
C:>gacutil /l System.Runtime
Microsoft (R) .NET Global Assembly Cache Utility.  Version 4.0.30319.0
Copyright (c) Microsoft Corporation.  All rights reserved.

The Global Assembly Cache contains the following assemblies:
  System.Runtime, Version=4.0.0.0, Culture=neutral, PublicKeyToken=b03f5f7f11d50a3a, processorArchitecture=MSIL

Number of items = 1
To register an assembly in the GAC, use the following command:
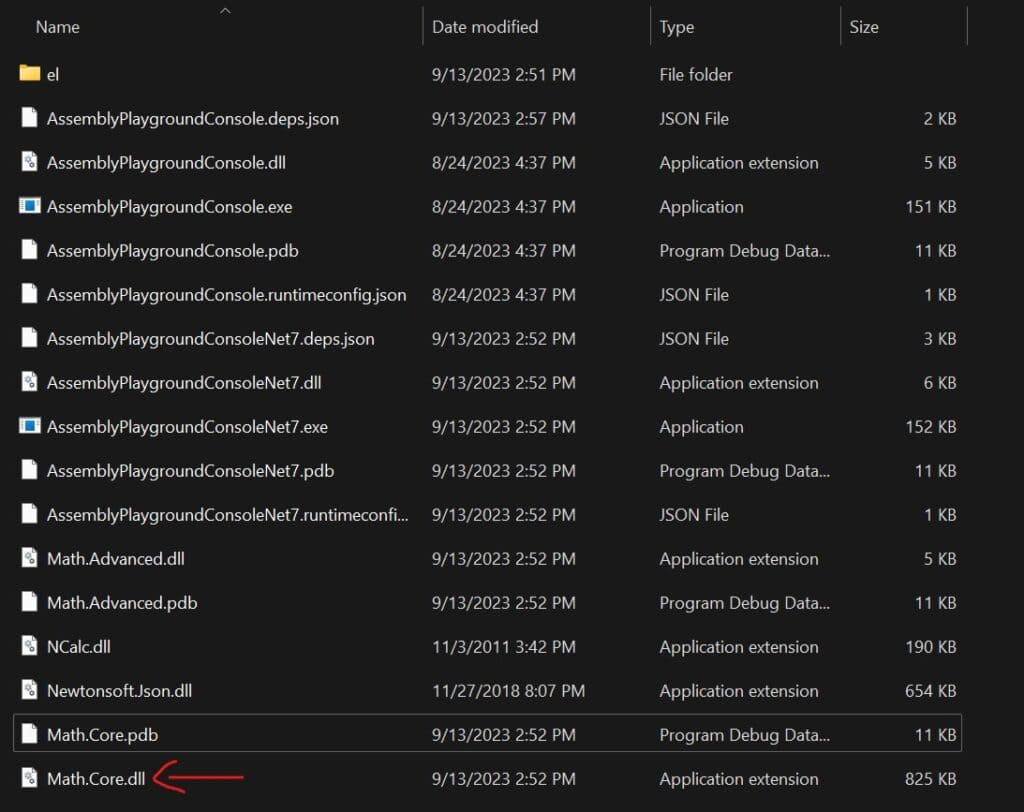
gacutil /i <assemblypath>For example, in our case we can register the Math.Core assembly we have created for this article, as long as it is signed and have a strong name.
C:>gacutil /i C:\Users\Jimfi\repos\assemblyplayground\Math.Core\bin\Debug\net461\Math.Core.dll
Microsoft (R) .NET Global Assembly Cache Utility.  Version 4.0.30319.0
Copyright (c) Microsoft Corporation.  All rights reserved.

Assembly successfully added to the cache
Now we are able to check if the Math.Core is present in the GAC by using the following command:
C:>gacutil /l Math.Core
Microsoft (R) .NET Global Assembly Cache Utility.  Version 4.0.30319.0
Copyright (c) Microsoft Corporation.  All rights reserved.

The Global Assembly Cache contains the following assemblies:
  Math.Core, Version=1.0.0.1, Culture=neutral, PublicKeyToken=9a6e2ec23b9a60ea, processorArchitecture=MSIL

Number of items = 1
To unregister an assembly from the GAC, use the /u option:
gacutil /u <assemblyname>Once an assembly is in the GAC, you can load it in C# by specifying its simple name using the static function Load of the Assembly class.
Resources and Satellite Assemblies
In addition to code and assembly information, such as name and version, assemblies typically include resources like text and images. Resources are mainly used for localizing strings and for content that cannot be embedded directly in the code. With resources, you can reference and use various types of content like images within an assembly.
As shown below, when inspecting an Assembly containing resources, we can find these resources are stored as byte streams with names. For example, when using ILDASM to examine the Autofac.dll assembly, you can identify different resources, some of which are listed below:
.mresource public Autofac.Builder.BuildCallbackServiceResources.resources
{
  // Offset: 0x00000000 Length: 0x0000011F
}
.mresource public Autofac.Builder.RegistrationBuilderResources.resources
{
  // Offset: 0x00000128 Length: 0x00000131
}
.mresource public Autofac.ContainerBuilderResources.resources
{
  // Offset: 0x00000260 Length: 0x00000201
}
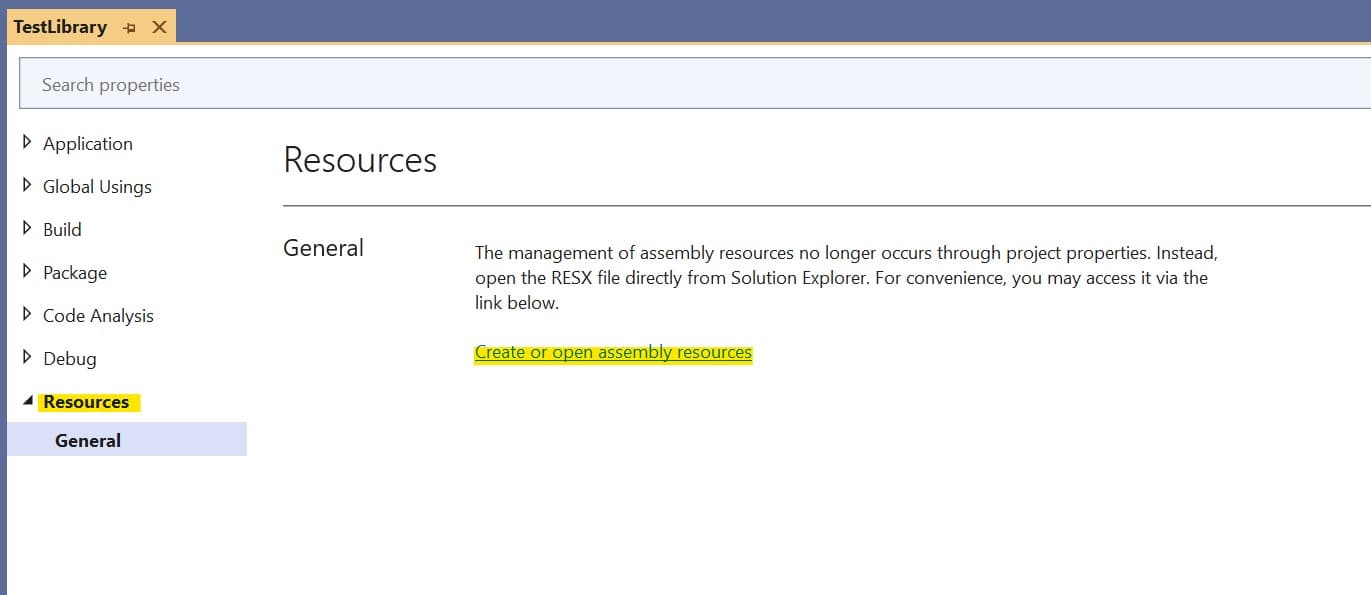
How to Create Resources for an Assembly
We can add resources to an assembly using Visual Studio by selecting Project > (right click) > Properties and then Create or open assembly resources (in case .resx file doesn’t exist.)
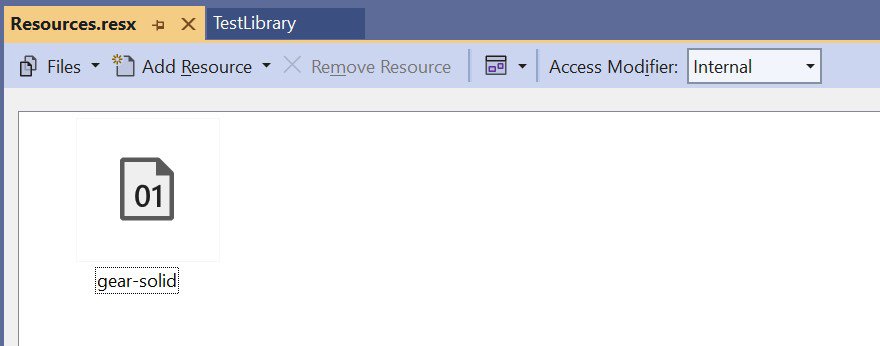
This will open a user interface for editing the Resources.resx file, which allows you to insert key-value string resources, including localizable text.

You can change the type of resources you want to add by selecting a different value from the dropdown menu, as shown below:
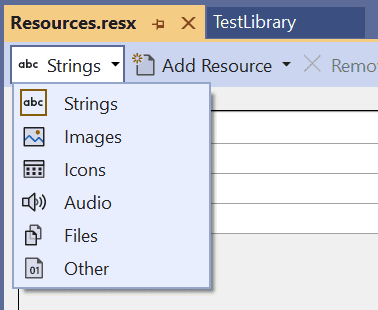
For instance, you can add an image resource by simply dragging and dropping the image into the Resources.resx designer. Later, you can access the image as a byte array by referencing its name.
Once you’ve added the resources, you can inspect the assembly using ILSpy to view the resources contained within it.
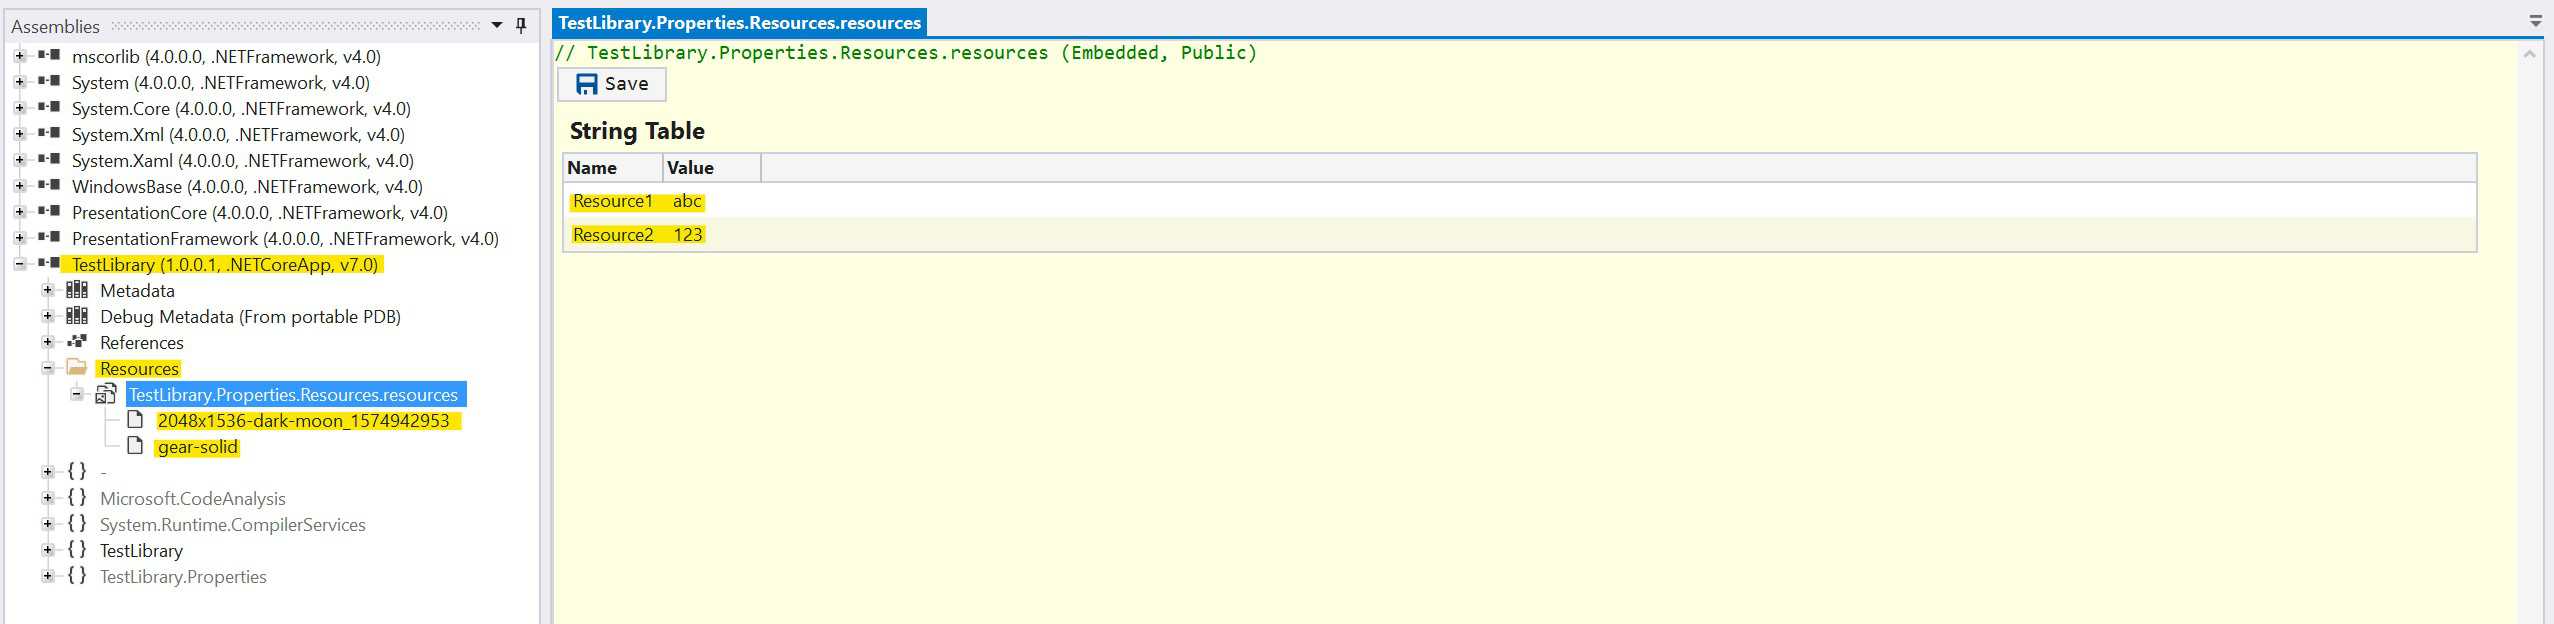
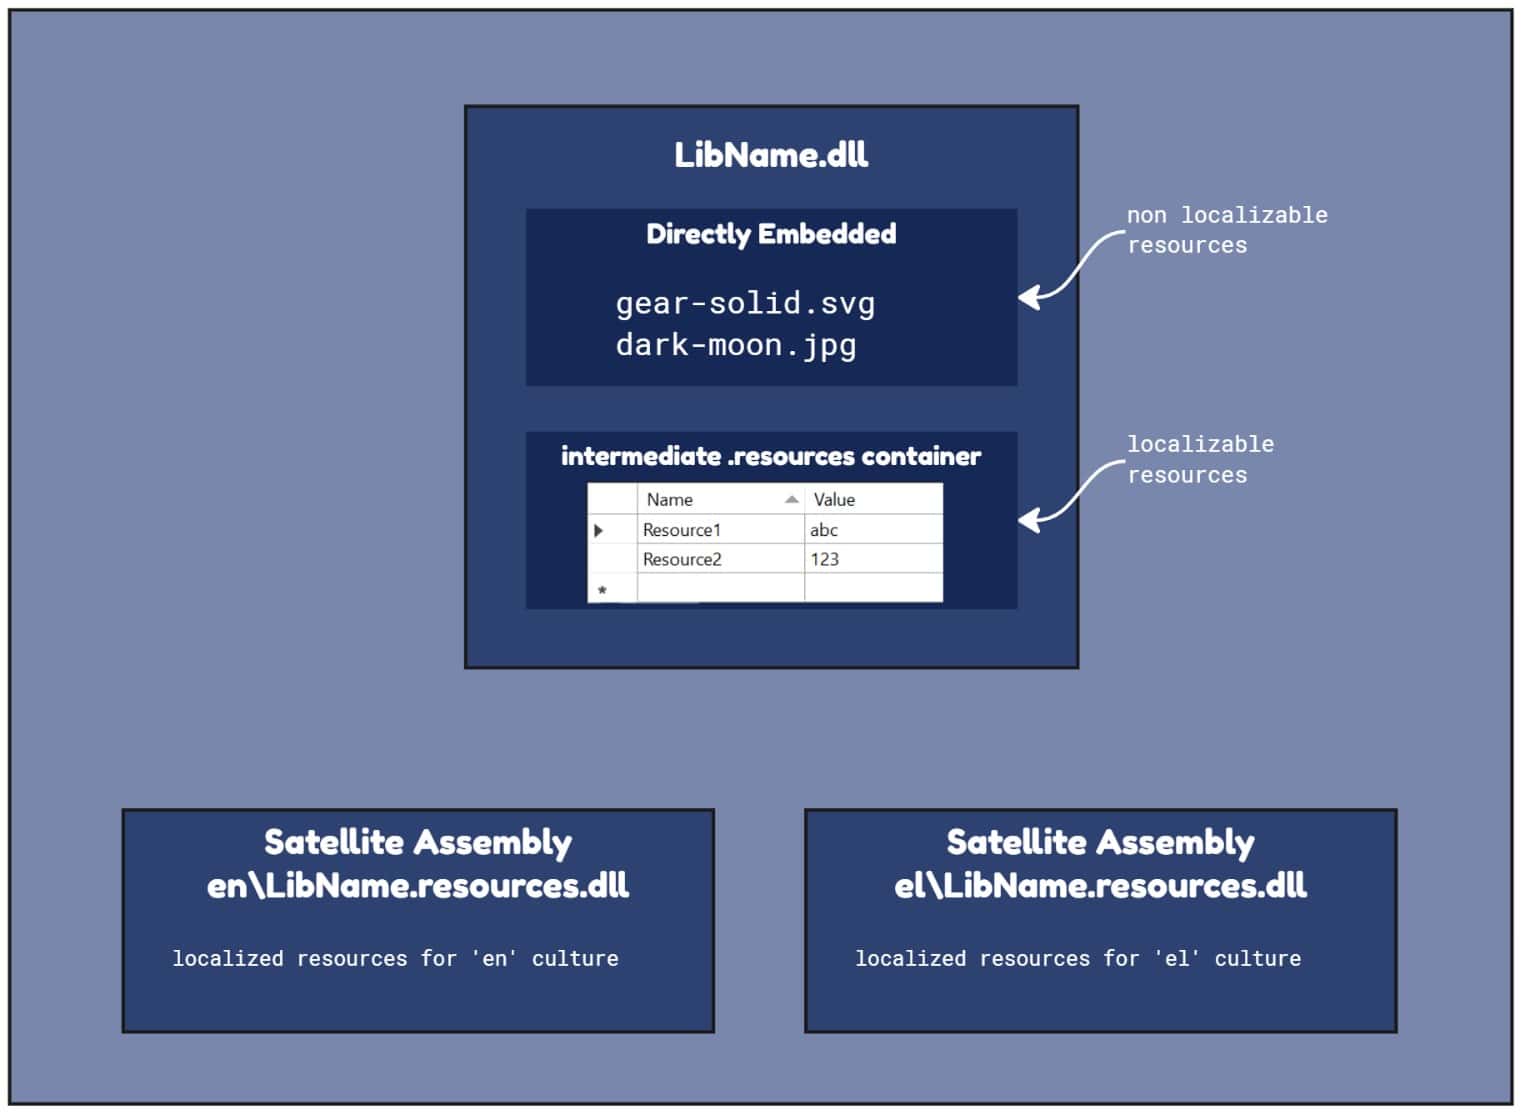
As shown in the image above, we have two string resources with their names and values and also two images, all inside the Resources container. These are referred to as intermediate .resources containers, and they are used when we want the resources to be translated into other languages. In case the resources are not localizable, we can directly embedded (as their own embedded resource) by adding the resource file to the project and setting its Build Action property to Embedded resource.
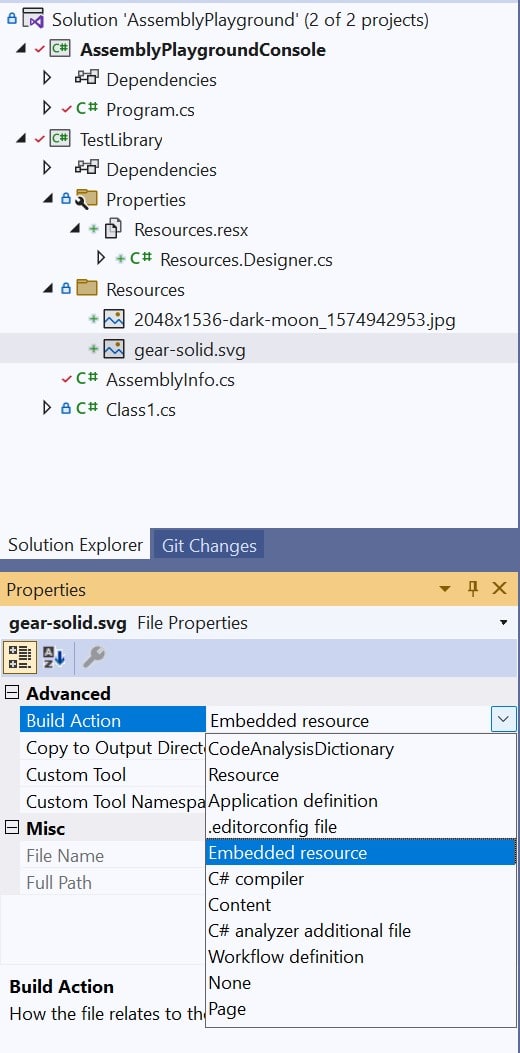
By embedding images in this way, you can confirm that they are separate resources by inspecting the assembly manifest and checking for different resource entries, as shown below:
.mresource public TestLibrary.Properties.Resources.resources
{
  // Offset: 0x00000000 Length: 0x0006665F
}
.mresource public 'TestLibrary.Resources.2048x1536-dark-moon_1574942953.jpg'
{
  // Offset: 0x00066668 Length: 0x00065FEC
}
.mresource public 'TestLibrary.Resources.gear-solid.svg'
{
  // Offset: 0x000CC658 Length: 0x00000503
}
Localized resources can be translated into various languages and retrieved at runtime using satellite assemblies, which we’ll discuss later.
Access Resources of an Assembly
An assembly resource is a pair of key and value, where the key is the name and the value is also a string or byte array. We can access a resource by using its key. However, there are some scenarios to consider. If we are in the same assembly as the resources, we can access them by using the Properties.Resources class and specify the resource name we want. For example, in Math.Core assembly we can access the Resource1 string resource like this:
Math.Core.Properties.Resources.Resource1In case we are in a different assembly from where the resources are located, we have a couple of options. We can use the ResourceManager or the GetManifestResourceStream method of the Assembly class. For example, if we want to access an image from the Math.Core assembly from another application, we can do it like this:
var assembly = typeof(Calculator).Assembly; // Get the assembly that contains the resources

using Stream s = assembly.GetManifestResourceStream("Math.Core.Resources.2048x1536-dark-moon_1574942953.jpg");
var image = Image.FromStream(s);
Console.WriteLine($"Image[read using GetManifestResourceStream] dark-moon:{image.Size}");
Notice that the argument of the GetManifestResourceStream consists of the namespace and the folder where the resources are located. Another option is to use the ResourceManager and access any resources we need, like this:
ResourceManager rm = new ResourceManager("Math.Core.Properties.Resources", assembly);
var darkMoonBytes = (byte[])rm.GetObject("2048x1536-dark-moon_1574942953");
using var ms = new MemoryStream(darkMoonBytes);
image = Image.FromStream(ms);
Console.WriteLine($"Image[read using ResourceManager] dark-moon:{image.Size}");

// Access string resources using the ResourceManager.
var resource1 = rm.GetString("Resource1");
var resource2 = rm.GetString("Resource2");
Console.WriteLine($"Resource1:{resource1}, Resource2:{resource2}");
To list all available resources in an assembly, you can use GetResourceSet from the ResourceManager and then iterate through all the entries, as shown below:
ResourceSet resourceSet = rm.GetResourceSet(CultureInfo.CurrentUICulture, true, true);
foreach (System.Collections.DictionaryEntry entry in resourceSet)
   Console.WriteLine(entry.Key);
Output:
Resource2
Resource1
2048x1536-dark-moon_1574942953
gear-solid
An example of how to retrieve resources is available on GitHub
Localization with Satellite Assemblies
Satellite Assemblies are special assemblies that store resources without any code. Each satellite assembly corresponds to a specific culture and is located in a subdirectory with a name matching that culture.
Satellite assemblies are deployed in the same directory of the main assembly they want to localize. Typically, you would want to have resources in the main assembly as default (or fallback in case you don’t have localizable resources for a specific culture) and let the satellite assemblies provide the correct localizable resources depending on the selected culture of the machine running the application. This structure enables the Common Language Runtime (CLR) to automatically locate and load the appropriate satellite assembly based on the culture of the machine where your application is running without any manual work.
Let’s take an example of creating a satellite assembly for our Math.Core assembly to support the Greek culture (el). To do this, follow these steps:
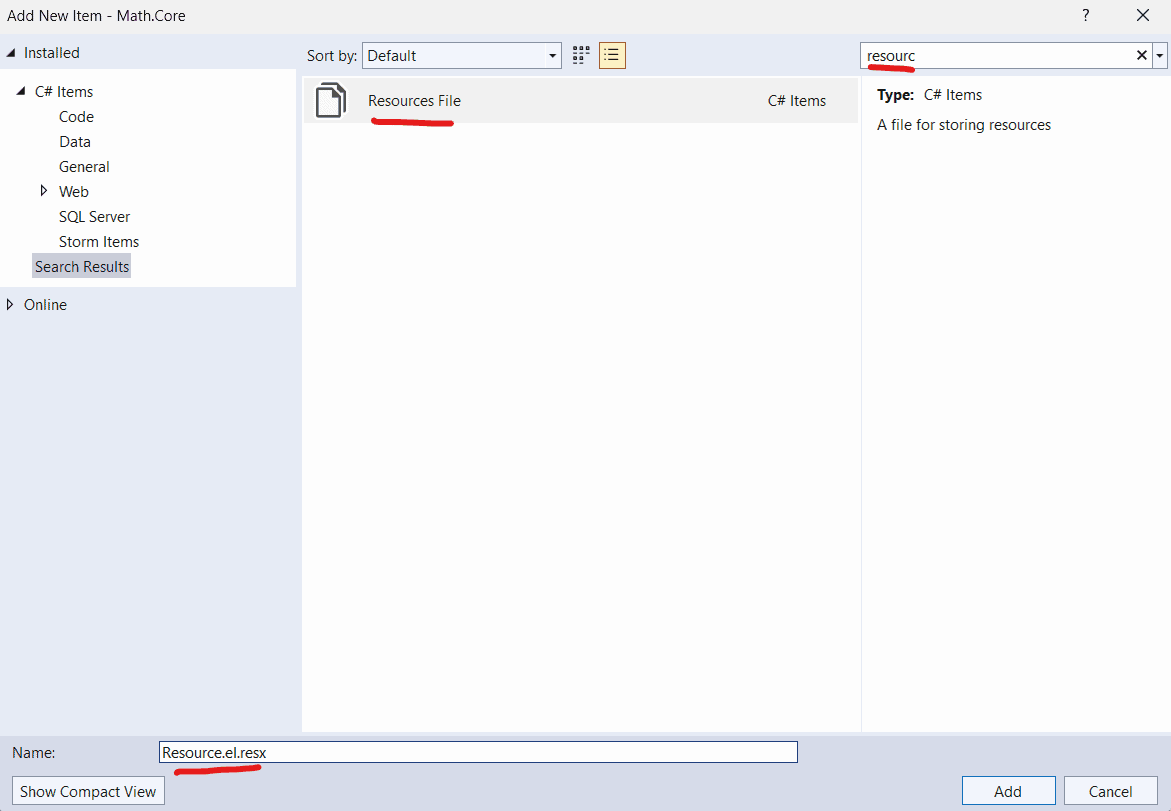
Add a new .resx file named Resources.el.resx by right-clicking on your project and selecting Add > New Item.
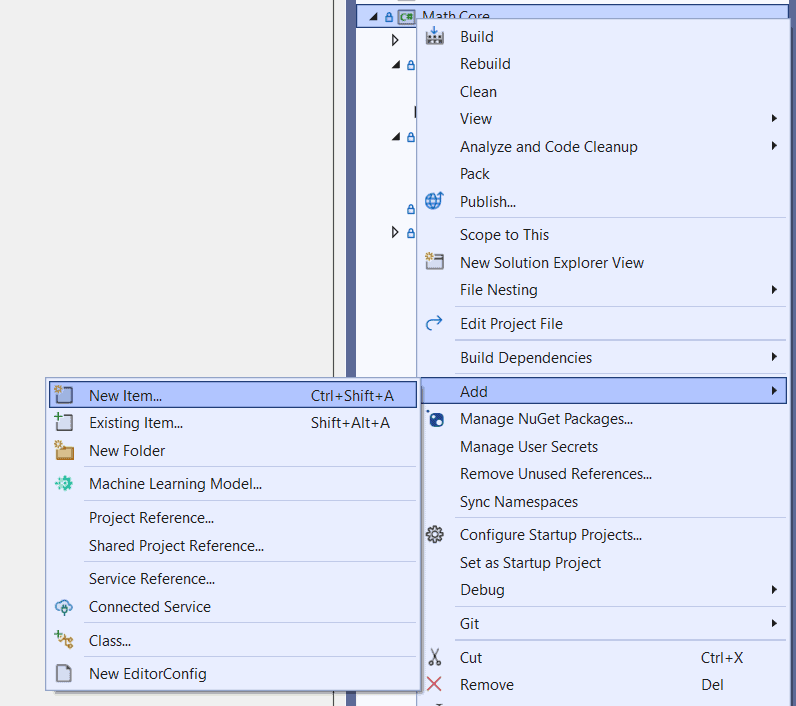
Then, create a new Resources.el.resx Resources File as shown below:
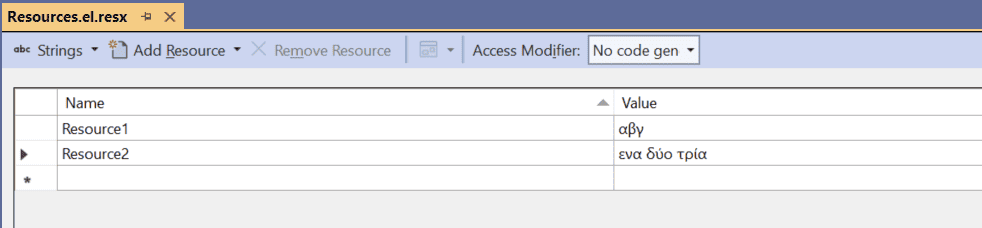
Open the resource designer by clicking on the Resources.el.resx file. Here, you can add new entries with keys that match those in the Resources.resx file.
After building the project, a new directory named el will be created in the output folder where the binaries are located. It will contain the Math.Core.resources.dll file.
<your path>assemblyplayground\Math.Core\bin\Debug\net7.0\el\Math.Core.resources.dllNow, the application can automatically select the correct resource values depending on the environment’s culture.
To test the satellite assembly, you can set the culture of the current thread like this:
System.Threading.Thread.CurrentThread.CurrentUICulture = new System.Globalization.CultureInfo ("el");As a result, you can retrieve the resources before and after changing the current culture to see the localized values:
ResourceManager rm = new ResourceManager("Math.Core.Properties.Resources", assembly);

// Access string resources using the ResourceManager.
var resource1 = rm.GetString("Resource1");
var resource2 = rm.GetString("Resource2");
Console.WriteLine($"Default culture => Resource1:{resource1}, Resource2:{resource2}");

// Change the current culture to el.
System.Threading.Thread.CurrentThread.CurrentUICulture = new System.Globalization.CultureInfo("el");

resource1 = rm.GetString("Resource1");
resource2 = rm.GetString("Resource2");
Console.WriteLine($"el culture => Resource1:{resource1}, Resource2:{resource2}");
Output:

Cultures
A culture can be divided into two parts: the primary culture, representing a specific language, and the subculture, indicating a regional variation of that language. Both parts consist of two characters and are separated by a dash (‘-‘). For example, English and German languages are denoted with en and de respectively. Also, Austrian German is denoted as de-AT and American English with en-US.
In .NET you can retrieve the language of the OS as follows:
System.Threading.Thread.CurrentThread.CurrentUICultureThe regional settings refer to the user’s region and include various settings such as currency formatting, and time zone. To retrieve the culture for regional settings, you can use the following:
System.Threading.Thread.CurrentThread.CurrentCultureThe ResourceManager examined before, uses the CurrentUICulture behind the scenes to determine which satellite assembly to load.
Strong Name
You can provide a unique identifier to an Assembly by giving it a strong name, which requires signing the Assembly with a key. Strong name is more important in .NET Framework (before .NET Core and .NET5) because they allowed you to add the Assembly to the Global Assembly Cache (GAC). However, the GAC no longer exists in NET Core / .NET5+ versions. Furthermore, in NET Core / .NET5+ versions, the runtime doesn’t validate the strong name signature or use the strong name for assembly binding.
Another reason for strong naming an assembly is that it enables the assembly to be referenced by other strong named assemblies. This requirement ensures that all assemblies must be signed, protecting them from tampering. As long as the private key is not leaked, no other entity can create an assembly with the same identity as yours. Strong naming assemblies also can prevent assembly conflicts.
By strong naming an assembly, we can verify whether assembly A and assembly B came from the same or different publishers. However, strong naming alone doesn’t reveal the identity of the publisher. To achieve this, Authenticode signing, which is explained in the Signing section, is used instead.
How to Strongly Name an Assembly
First, we have to have a public/private key pair. To generate a public/private key pair for strong naming, you can use the sn.exe tool from the Developer Command Prompt for VS with the following command:
sn.exe -k MyKeyPair.snkThen, you can enable Assembly signing by navigating to Project > Properties to Sign the Assembly and set the produced .snk file to the Strong name key file field.

By inspecting the resulting Assembly using tools like ILDASM or ILSpy, you’ll notice that the public key has a non-null value, indicating a strong name signature, as shown below:
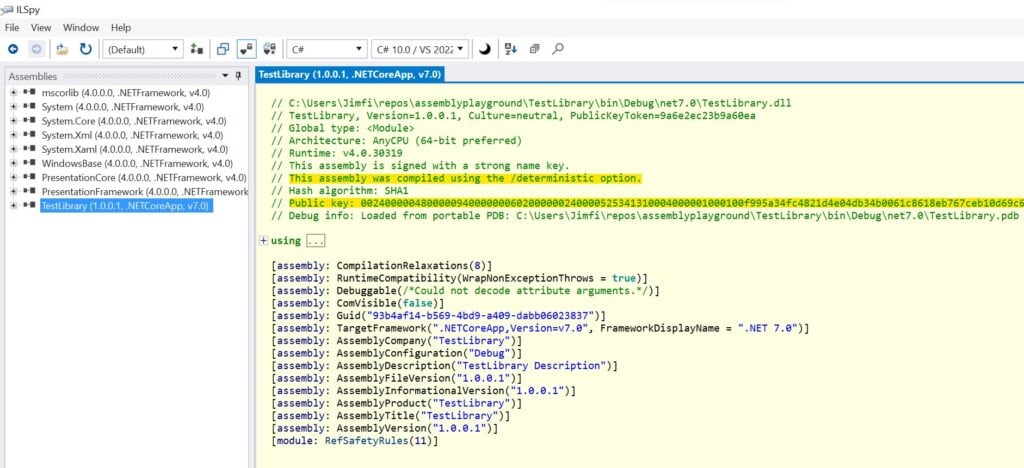
The fully qualified name of the assembly will contain a non-null value for the PublicKeyToken part.
simple-name, Version=version, Culture=culture, PublicKeyToken=public-key-token
Signing
To sign an assembly, we will use Authenticode. Authenticode is a Microsoft code-signing technology specifically created for this purpose. Signing an assembly involves providing it with a signature that verifies the identity of the publisher. Unlike strong naming, which confirms that all assemblies come from the same entity without revealing the identity, with Authenticode we can also tell who the entity is.
The first step to sign an assembly using this technology is to obtain a certificate. To do this, you must contact with a Certificate Authority (CA) and provide your personal or your company’s identity documents. After that, the CA will issue to you a X.509 code-signing certificate. This enables you to use the signtool to sign your assemblies with that certificate. The signature that will be inserted in the assembly is not treated as part of the assembly’s identity from the CLR. Moreover, in case you also want to strong name the assembly, you must do it before signing the assembly, because any changes to the assembly after signing are considered tampering.
Alternatively, if you want to test and prototype without obtaining an official certificate, you can use a self-signed certificate. You can create one using the makecert (deprecated) or the New-SelfSignedCertificate PowerShell utility. However, to verify the signing, the certificate must be installed on all machines where the assembly will be used.
After obtaining the certificate, you can install it using the Certificate Manager in Windows. While on Certificate Manager, navigate to Certificates – Local Computer > Personal > Certificates > (right click) > All Tasks > Import and select your certificate.
To sign an assembly with Authenticode, you can use the signtool utility available also in Developer Command Prompt in VS.
* If signtool is not available as a command then you can add it to the environment variable PATH. Usually signtool is located under C:\Program Files (x86)\Microsoft SDKs\ClickOnce\SignTool\signtool.exe
Here’s an example of creating a self-signed certificate using the New-SelfSignedCertificate PowerShell utility:
PS C:\Users\Jimfi> New-SelfSignedCertificate -Subject softwareparticles -DnsName www.softwareparticles.com -CertStoreLocation cert:\LocalMachine\My


   PSParentPath: Microsoft.PowerShell.Security\Certificate::LocalMachine\My

Thumbprint                                Subject
----------                                -------
A9CA57CD2B0B5886FF86DB742601A741DC3D3347  CN=softwareparticles
The DnsName is the name of a server (which can differ from the current hostname). The Subject parameter serves as a unique label for the certificate that distinguishes it from the other certificates, and CertStoreLocation is the local certificate store in which the generated certificate will be placed.
You can view the installed certificate in Windows Certificate Manager:
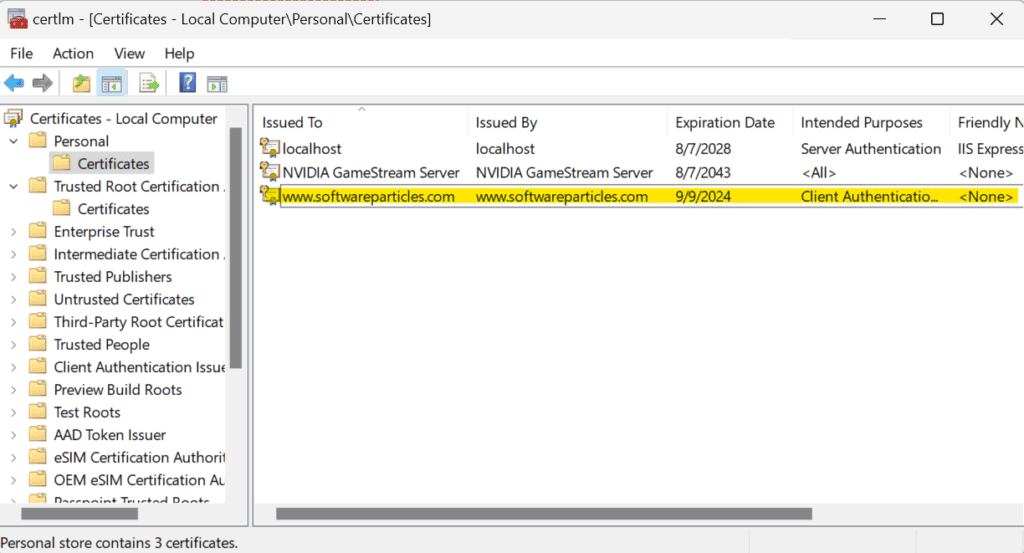
The certificate is typically valid for a year, but this duration can be adjusted.
In order to get the properties of a certificate we can use the Get-ChildItem PowerShell command giving the thumbprint of the certificate. For the previously created certificate the command is shown below:
Get-ChildItem -Path "Cert:\LocalMachine\My" | Where-Object Thumbprint -eq A9CA57CD2B0B5886FF86DB742601A741DC3D3347 | Select-Object *To create and export a certificate as a pfx file, we first need to generate a certificate as before by using the New-SelfSignedCertificate, set a SecureString password, and then use the Export-PfxCertificate PowerShell utility to export it. Here’s a general example:
$certname = "{Your cert name}"
$cert = New-SelfSignedCertificate -CertStoreLocation Cert:\CurrentUser\My -Type CodeSigningCert  -Subject "CN=$certname" -KeyExportPolicy Exportable -KeySpec Signature -KeyLength 2048 -KeyAlgorithm RSA -HashAlgorithm SHA256
$pwd = ConvertTo-SecureString -String <password> -Force -AsPlainText
Export-PfxCertificate -Cert $cert -FilePath "<certificatebasepath>\<certificatename>.pfx" -Password $pwd
For instance, below we create and export a new certificate using the following command:
PS C:\Users\Jimfi> $certname = "softwareparticles"
PS C:\Users\Jimfi> $cert = New-SelfSignedCertificate -CertStoreLocation Cert:\CurrentUser\My -Type CodeSigningCert -Subject "CN=$certname" -KeyExportPolicy Exportable -KeySpec Signature -KeyLength 2048 -KeyAlgorithm RSA -HashAlgorithm SHA256
PS C:\Users\Jimfi> $pwd = ConvertTo-SecureString -String 1234 -Force -AsPlainText
PS C:\Users\Jimfi> Export-PfxCertificate -Cert $cert -FilePath "C:\Users\Jimfi\repos\assemblyplayground\spcert.pfx" -Password $pwd
Directory: C:\Users\Jimfi\repos\assemblyplayground
Mode LastWriteTime Length Name
---- ------------- ------ ----
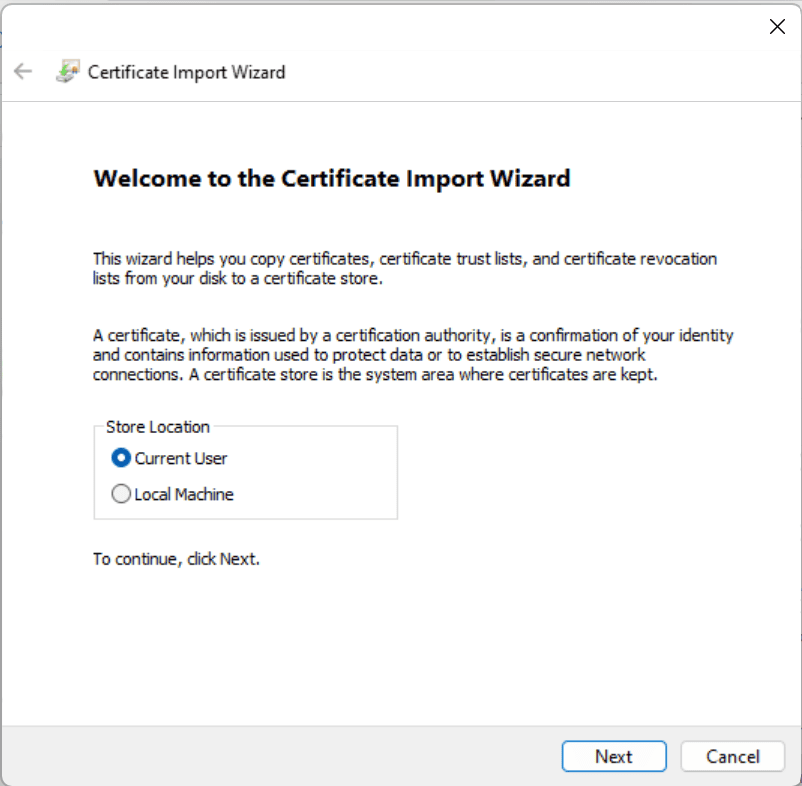
-a---- 9/9/2023 4:19 PM 2620 spcert.pfxAfter creating and exporting the certificate, we can install the exported certificate by double clicking on it. Select Current User or Local Machine based on whether you want to include the certificate for all users of the machine.
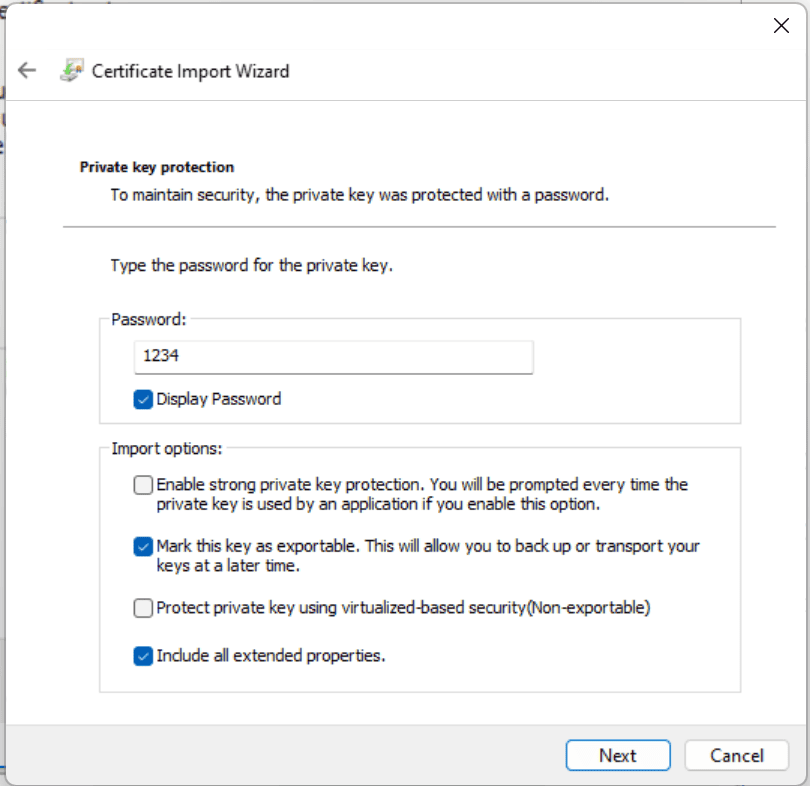
Provide the password and also mark the key as exportable and include all extended properties:
Add the certificate to the Trusted Root Certification Authorities:

Once the certificate is installed, you can sign an assembly DLL using the signtool as shown below:
signtool sign /f <pathtoyourcert>\<certname>.pfx /p 1234 /fd SHA256 <pathtoassembly>For instance, below we sign the Math.Core.dll assembly:
PS C:\Users\Jimfi> signtool sign /f spcert.pfx /p 1234 /fd SHA256 "C:\Users\Jimfi\repos\assemblyplayground\Math.Core\bin\Debug\net7.0\Math.Core.dll"
Done Adding Additional Store
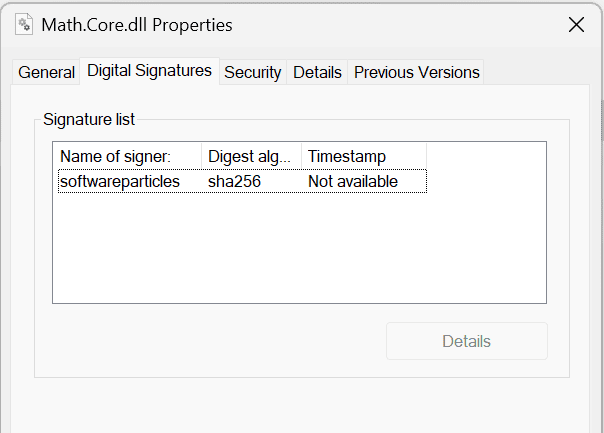
Successfully signed: C:\Users\Jimfi\repos\assemblyplayground\Math.Core\bin\Debug\net7.0\Math.Core.dllFinally, you can view the signature in the assembly file properties, which includes a Digital Signatures tab in the properties panel of the assembly file.
Identify who is the publisher of the assembly
Authenticode-signing is also commonly used in scenarios where you need to verify the authenticity of an application before downloading and installing it on your machine. It ensures that the application hasn’t been tampered with and originates from a trusted and specific entity or company. All this is possible by utilizing digital signatures and the infrastructure of trusted entities (Certificate Authorities (CAs)).
The signtool is used in order to verify the signature of an assembly as shown below:
signtool verify <path to assembly dll>Replace <path to assembly dll> with the path to the assembly DLL you want to verify.
Binding Redirect
Binding redirect refers to the redirection of the compile-time references an application has. This means we can control the versions of assemblies an application uses, overriding the default assembly binding mechanism provided by .NET Framework. This mechanism is applied to .NET versions prior to .NET5 and .NET Core. For .NET Core / .NET5+ the AssemblyLoadContext is used instead.
By default, .NET loads assemblies that match the runtime version. For example, if your application is built on .NET 4 and references System.IO, then it contains static references to the System.IO assembly that ships with runtime version 4. However, binding redirect enables you to load a different version of System.IO, even if it doesn’t match the runtime version. This behavior applies to third-party libraries as well.
Redirecting References in .NET Framework
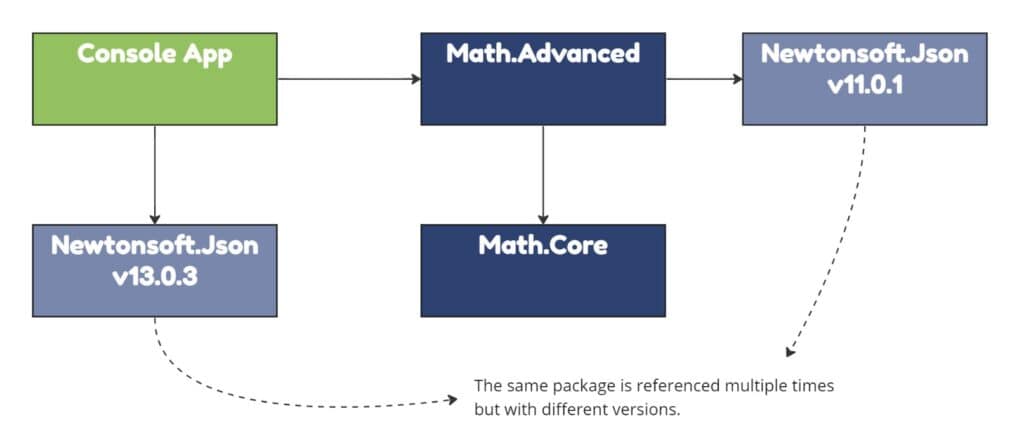
Let’s illustrate this with an example. Imagine we have a console application in .NET 4.6.2 that references the Math.Advanced assembly for calculations and Newtonsoft.Json version 13.0.3 for formatting. The code might look like this:
internal class Program
{
   static void Main(string[] args)
   {
      // AdvancedCalculator is located in Math.Advanced.dll
      AdvancedCalculator calculator = new AdvancedCalculator();
      var res = calculator.Eval("1+1");

      // We use the v13.0.3 of Newtonsoft.Json.dll
      var objResult = JsonConvert.DeserializeObject(res);
      Console.WriteLine(objResult);

      Console.ReadKey();
   }
}
The issue arises because the Math.Advanced assembly also references Newtonsoft.Json, but it’s an older version, v11.0.1.
When we run the application, we encounter this error:
Unhandled Exception: System.IO.FileLoadException: Could not load file or assembly
'Newtonsoft.Json, Version=11.0.0.0, Culture=neutral, PublicKeyToken=30ad4fe6b2a6aeed'
or one of its dependencies. The located assembly's manifest definition does not match
the assembly reference. (Exception from HRESULT: 0x80131040)
   at AdvancedMath.AdvancedCalculator.Eval(String expression)
   at AssemblyPlayground.BindingRedirectConsoleApp.Program.Main(String[] args)
This error occurs because, at runtime, when the code hits calculator.Eval("1+1");, it tries to load Newtonsoft.Json.dll v11.0.1, as specified by the Math.Advanced library. However, your application directory contains Newtonsoft.Json.dll v13.0.3, not v11.0.1, resulting in a FileLoadException.
When examining the assembly manifests in the output directory including AssemblyPlayground.BindingRedirectConsoleApp.exe, Math.Advanced.dll and the Newtonsoft.Json.dll assembly within the app, we can see they have the following dependencies:
// ------------ AssemblyPlayground.BindingRedirectConsoleApp.exe assembly manifest part.
.assembly extern Math.Advanced
{
  .publickeytoken = (9A 6E 2E C2 3B 9A 60 EA )                         // .n..;.`.
  .ver 2:0:0:0
}
.assembly extern Newtonsoft.Json
{
  .publickeytoken = (30 AD 4F E6 B2 A6 AE ED )                         // 0.O.....
  .ver 13:0:0:0
}

// --------- Math.Advanced.dll assembly manifest part. ------------
.assembly extern NCalc
{
  .publickeytoken = (97 3C DE 3F 1C AF ED 03 )                         // .<.?....
  .ver 1:3:8:0
}
.assembly extern Math.Core
{
  .publickeytoken = (9A 6E 2E C2 3B 9A 60 EA )                         // .n..;.`.
  .ver 1:0:0:1
}
.assembly extern Newtonsoft.Json
{
  .publickeytoken = (30 AD 4F E6 B2 A6 AE ED )                         // 0.O.....
  .ver 11:0:0:0
}

// ------------ Newtonsoft.Json.dll assembly manifest part. ------------
.assembly Newtonsoft.Json
{
   // ...
  .hash algorithm 0x00008004
  .ver 13:0:0:0
}
The build process has produced Newtonsoft.Json.dll v13.0.0 in the output directory. While Math.Advanced references v11.0.1, the console application references v13.0.1.
One approach to this problem is to downgrade the version of the Newtonsoft.Json assembly on our console application.

Although this would solve the problem, downgrading or in general changing versions of assemblies for no functional or business reasons, could result in vulnerabilities to be introduced, features to be missing or in general breaking code that worked before. Furthermore, in complex scenarios where multiple assemblies reference different versions of Newtonsoft.Json, downgrading might not even be an option.
This is where binding redirect comes to solve this problem. It allows us to override the runtime’s default assembly binding mechanism, ensuring all versions of a particular assembly redirect to a specific one.
To achieve this, we can edit the application’s configuration manually and add a redirect from a version (or range of version) to a target version. Here’s a general format for a binding redirect entry:
<runtime>
   <assemblyBinding xmlns:urn:schemas-microsoft-com:asm.v1>
      <dependentAssembly>
         <assemblyIdentity name="<assemblyname>" publicKeyToken="<token>"
            culture="<culture>" />
         <bindingRedirect oldVersion="<from>" newVersion="<to>" />
      </dependentAssembly>
   </assemblyBinding>
</runtime>
In our case, we can edit the AssemblyPlayground.BindingRedirectConsoleApp.exe.config file in the application’s directory (alongside the executable) and add the following entry to instruct the runtime to redirect Newtonsoft.Json v11.0.1 references to v13.0.0.0:
<runtime>
   <assemblyBinding xmlns="urn:schemas-microsoft-com:asm.v1">
      <dependentAssembly>
         <assemblyIdentity name="Newtonsoft.Json" publicKeyToken="30ad4fe6b2a6aeed" culture="neutral" />
         <bindingRedirect oldVersion="0.0.0.0-13.0.0.0" newVersion="13.0.0.0" />
      </dependentAssembly>
   </assemblyBinding>
</runtime>
With this configuration in place, the application can run smoothly. The runtime will redirect any requests for Newtonsoft.Json v11.0.1 from the Math.Advanced library to v13.0.0.0, which exists in the output directory.
Enable Binding Redirect by default
Although adding entries of binding redirects can mitigate the different versions problem, maintaining them, finding the public key token of each assembly you want to redirect, requires a lot of manual effort. Fortunately, there’s a feature that allows us to enable binding redirects automatically and generate these entries for us. To enable binding redirect, you can simply add the following entry to your .csproj file within the calling project:
<AutoGenerateBindingRedirects>true</AutoGenerateBindingRedirects>In our case, we’ve included this entry in the AssemblyPlayground.BindingRedirectConsoleApp.csproj file as shown below:
<?xml version="1.0" encoding="utf-8"?>
<Project ToolsVersion="15.0" xmlns="http://schemas.microsoft.com/developer/msbuild/2003">
  <Import Project="$(MSBuildExtensionsPath)\$(MSBuildToolsVersion)\Microsoft.Common.props" Condition="Exists('$(MSBuildExtensionsPath)\$(MSBuildToolsVersion)\Microsoft.Common.props')" />
  <PropertyGroup>
    <Configuration Condition=" '$(Configuration)' == '' ">Debug</Configuration>
    <Platform Condition=" '$(Platform)' == '' ">AnyCPU</Platform>
    <ProjectGuid>{5E3EB375-8F95-4D19-96AE-D391ED92A059}</ProjectGuid>
    <OutputType>Exe</OutputType>
    <RootNamespace>AssemblyPlayground.BindingRedirectConsoleApp</RootNamespace>
    <AssemblyName>AssemblyPlayground.BindingRedirectConsoleApp</AssemblyName>
    <TargetFrameworkVersion>v4.6.2</TargetFrameworkVersion>
    <FileAlignment>512</FileAlignment>
    <Deterministic>true</Deterministic>
    <AutoGenerateBindingRedirects>true</AutoGenerateBindingRedirects>
  </PropertyGroup>
  <!--More entries... -->
</Project>
With this configuration in place we can run our application without any problem.
Extract Information from Assemblies Using Reflection
Using the Assembly class in System.Reflection, we can access various details about an Assembly, just like we did with assembly inspection tools.
We can get the assembly of a specific type by using the Assembly property of that type. For instance, the AdvancedCalculator is a class and we can find its assembly by using the following code:
var mathAdvancedAssembly = typeof(AdvancedCalculator).Assembly; // Gets the assembly of the AdvancedCalculator type.To retrieve the currently executing assembly, we can use:
var executingAssembly = Assembly.GetExecutingAssembly();the GetExecutingAssembly() is a static method of the Assembly class.
Once we have the Assembly object, we can access its fully qualified name:
var fullName = mathAdvancedAssembly.FullName; // the fully qualified name. 'Math.Advanced, Version=2.0.0.0, Culture=neutral, PublicKeyToken=9a6e2ec23b9a60ea'We can also get the name of an assembly as an AssemblyName object.
AssemblyName assemblyName = mathAdvancedAssembly.GetName(); // The fully qualified as AssemblyName object.Inside the AssemblyName object, we can access various attributes from the assembly’s fully qualified name, including its simple name, version, public key token, and more:
var simpleName = assemblyName.Name; // Math.Advanced
var fullyQualifiedName = assemblyName.FullName; // Math.Advanced, Version=2.0.0.0, Culture=neutral, PublicKeyToken=9a6e2ec23b9a60ea
var version = assemblyName.Version; // 2.0.0.0
var cultureInfo = assemblyName.CultureInfo; // if not a satellite assembly => empty.
var publicKey = assemblyName.GetPublicKey();
string publicKeyAsString = string.Empty;
for (int i = 0; i < publicKey.GetLength(0); i++)
	publicKeyAsString += string.Format("{0:x2}", publicKey[i]);

var publicKeyToken = assemblyName.GetPublicKeyToken(); // 9a6e2ec23b9a60ea
string publicKeyTokenAsString = string.Empty; // 9a6e2ec23b9a60ea
for (int i = 0; i < publicKeyToken.GetLength(0); i++)
	publicKeyTokenAsString += string.Format("{0:x2}", publicKeyToken[i]);
Furthermore, we can determine the location of an assembly:
var location = mathAdvancedAssembly.Location; // The location of the Assembly file.Finally, we can dynamically load any desired assembly by specifying its simple name, fully qualified name, or location:
// This operation performs an assembly resolution because the location of the assembly
// must be found from its simple name.
var loadedAssembly = Assembly.Load("Math.Advanced");

// Same as the previous operation, this time providing the full name
// of the assembly.
var loadedAssemblyWithFullName = Assembly.Load("Math.Advanced, Version=2.0.0.0, Culture=neutral, PublicKeyToken=9a6e2ec23b9a60ea");
Assembly Loading / Resolving
When we load an assembly from a known location, then we do an assembly loading. However, if we load an assembly by only knowing its full or simple name, this process is called assembly resolution. Assembly resolution is the process of locating the assembly’s location.
The following operation performs an assembly resolution. AssemblyName is either the full or simple name of the assembly:
Assembly.Load(assemblyName);In general, the .NET runtime does a lazy loading for assemblies, meaning it loads an assembly only when it’s required. Let’s do a walkthrough of a simple application and debug it to see exactly when assemblies are loaded.
In this scenario, we will use a console application in .NET7 with two library references: Math.Core and Math.Advanced. Math.Advanced also has a reference to the NCalc assembly. We will use the Modules window in debugging (Debug > Windows > Modules) to monitor which assemblies are loaded and when, providing snapshots of the debugging session.
We will ignore other assemblies loaded by the runtime as they are unrelated to our custom assemblies and are loaded initially.
Our initial execution step is within the Main method, before the MathCoreClient constructor is invoked.
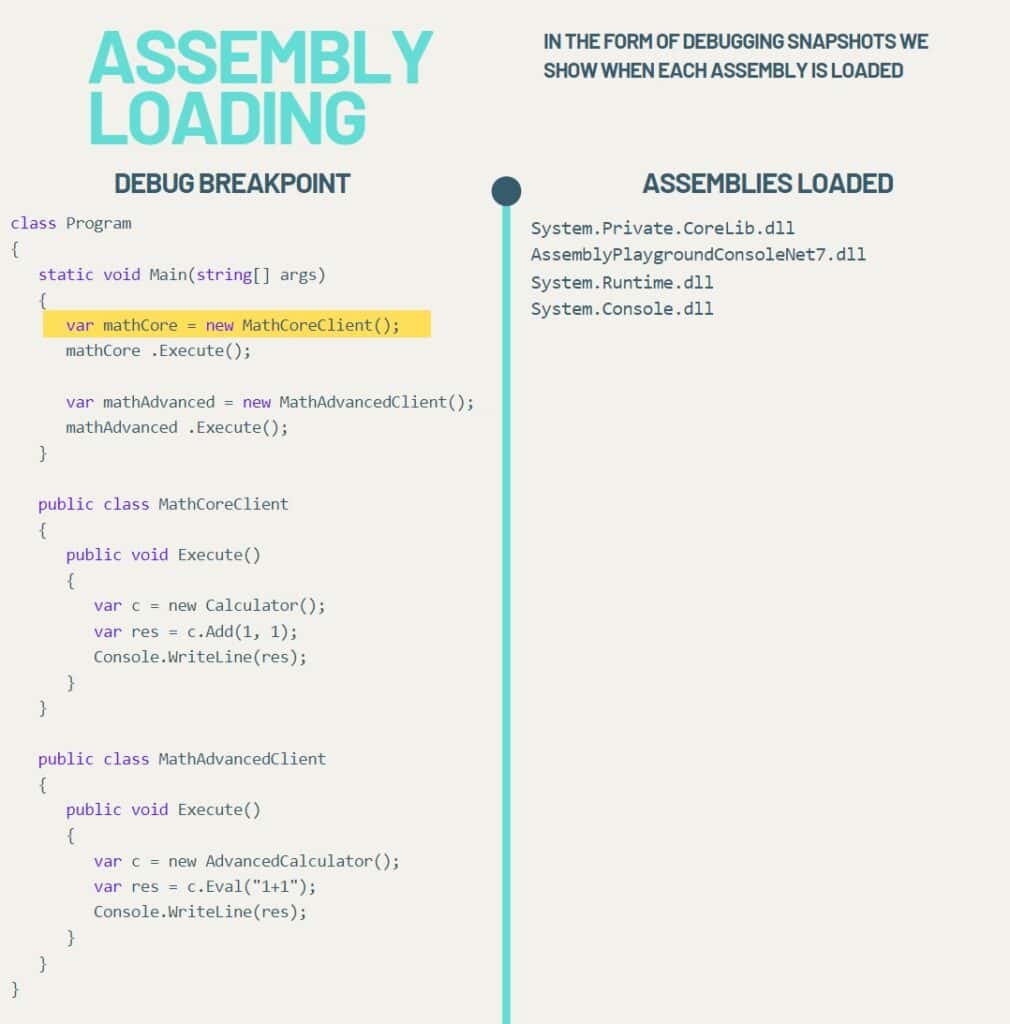
At this stage, even though the Calculator and AdvancedCalculator types are used inside the Program class, their assemblies have not been loaded yet.
As we step into the Execute method and create an object of type Calculator, the runtime loads its assembly, Math.Core.dll.
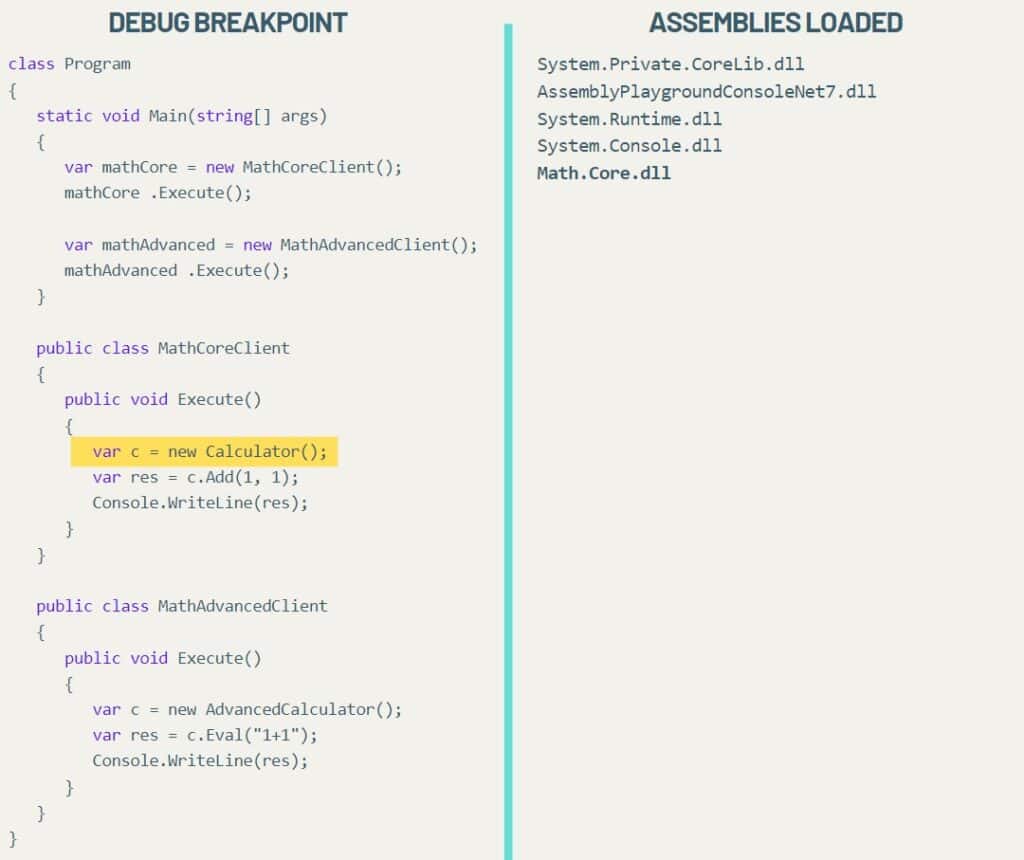
At this point, the Math.Advanced.dll is still not loaded, where the AdvancedCalculator class is located.
Continuing, similarly, as we step into another Execute method (inside the MathAdvancedClient class), the Math.Advanced.dll assembly is loaded. However, its dependencies (such as NCalc) are not loaded yet.
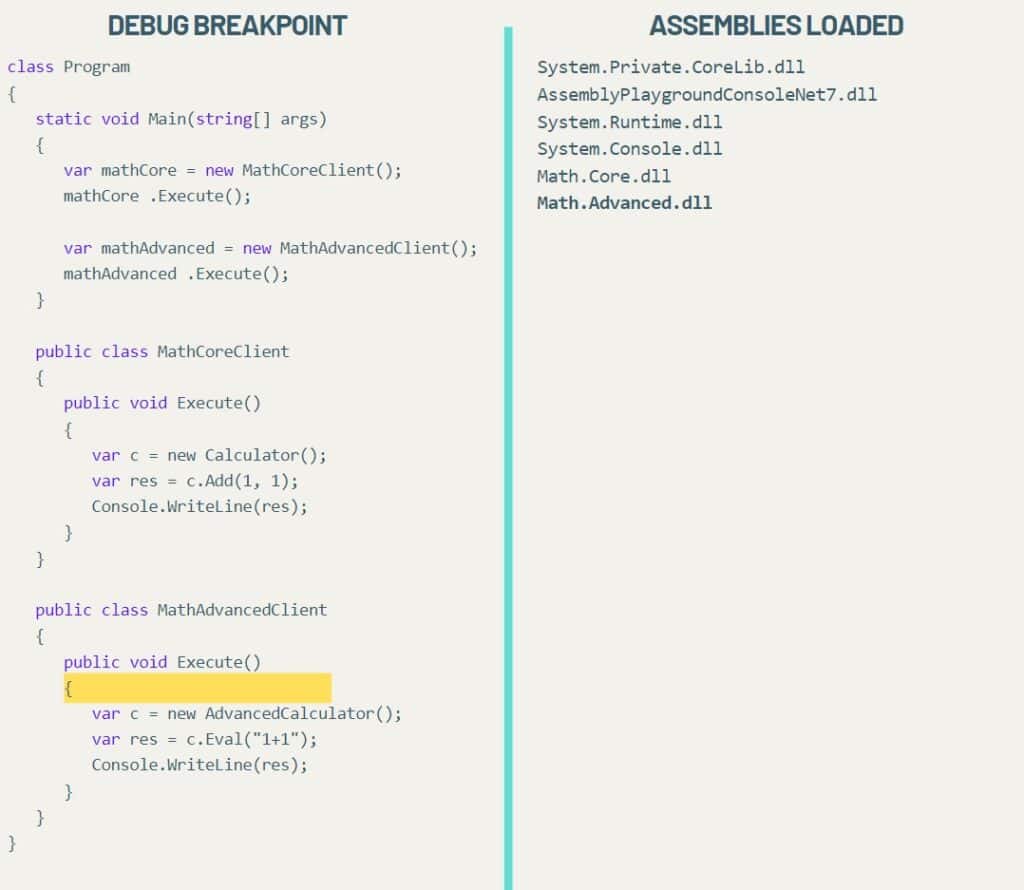
It’s only after executing the Eval(“1+1”) method that the NCalc assembly is loaded, as we see in the last snapshot:
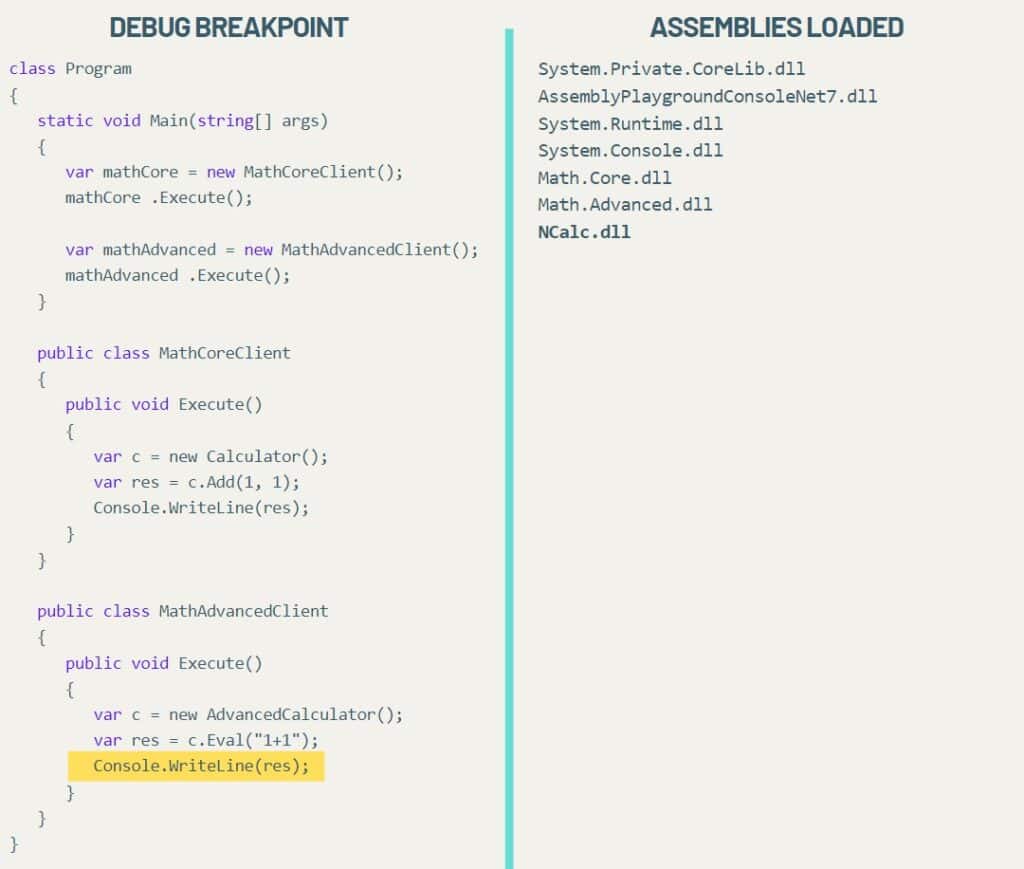
This walkthrough illustrates step-by-step the lazy loading behavior of the .NET runtime.
.NET Core/.NET5+ Assembly Resolution
In .NET Core/.NET5+, assembly loading and resolution is done by using an Assembly Load Context (ALC). The AssemblyLoadContext class is responsible for resolving assembly dependencies. You can override and extent its core functionality, but it already comes with a default implementation of the AssemblyLoadContext that you can obtain as follows:
var defaultAssemblyLoadContext = AssemblyLoadContext.Default;The default ALC will look first for a deps.json file (located along side the executable) to find the dependencies location. If no location is specified, it then searches in the application’s directory.
Add a new Assembly Resolution Path
As an example, we will add a new probing path for the ALC to resolve our assemblies. First, for a console application with references to Math.Core and Math.Advanced, the ALC will look for them in the application’s directory.
If we manually delete the Math.Core.dll file from the application’s directory, we will encounter the following error:
Unhandled exception. System.IO.FileNotFoundException: Could not load file or assembly
'Math.Core, Version=1.0.0.1, Culture=neutral, PublicKeyToken=9a6e2ec23b9a60ea'.
The system cannot find the file specified.
File name: 'Math.Core, Version=1.0.0.1, Culture=neutral, PublicKeyToken=9a6e2ec23b9a60ea'
To add an additional probing path for the ALC to search for assemblies, we can edit the deps.json file and include the following lines:
"runtimeOptions": {
 "additionalProbingPaths": [
   "/Users/Jimfi/packages"
 ]
}
In the specified location, /Users/Jimfi/packages, we have placed the Math.Core.dll assembly.
Finally, when we run the application, even though Math.Core.dll does not exist in the application’s directory, the ALC successfully loads the assembly from the Users/Jimfi/packages directory.
How the Runtime knows which Assemblies to Resolve
The assemblies the runtime attempts to resolve are defined as references within the assembly manifest. For example, below we show the a section of the assembly manifest that defines the reference entries for the Math.Advanced library:
.assembly extern System.Runtime
{
  .publickeytoken = (B0 3F 5F 7F 11 D5 0A 3A )                         // .?_....:
  .ver 7:0:0:0
}
.assembly extern NCalc
{
  .publickeytoken = (97 3C DE 3F 1C AF ED 03 )                         // .<.?....
  .ver 1:3:8:0
}
.assembly extern Math.Core
{
  .publickeytoken = (9A 6E 2E C2 3B 9A 60 EA )                         // .n..;.`.
  .ver 1:0:0:1
}
As we can see from the previous snippet, an assembly reference consists of the simple name of the external assembly, its public key token (in case it is signed) and its version. In case of Math.Advanced assembly, there are three assembly references: System.Runtime, NCalc and Math.Core. These assemblies will be loaded by the runtime during execution when they are needed (lazy loading).
If an assembly is not found during execution (for example, if you delete the Math.Core.dll from the executable folder), the runtime will throw the following error:
Unhandled exception. System.IO.FileNotFoundException: Could not load file or assembly
'Math.Core, Version=1.0.0.1, Culture=neutral, PublicKeyToken=9a6e2ec23b9a60ea'.
The system cannot find the file specified.
The fact the runtime knows exactly the missing reference (Math.Core in this case) is because in the assembly manifest of the calling assembly there is a reference to the Math.Core assembly.
Resolving Precedence
The runtime locates assemblies in a specific order of precedence. It first searches in the application’s directory, then in a subdirectory of the application’s directory, and finally in the global assembly cache (GAC).
Resolve from External Directory
You can add a fallback event programmatically, which triggers when the runtime cannot find an assembly. In this event, you have the opportunity to locate the assembly in another directory, load it, and return it. If the assembly is not found, a null value is returned instead.
By using the AppDomain.CurrentDomain.AssemblyResolve event and providing an event handler, we can locate and return the requested assembly. Below, we demonstrate this approach by loading the Math.Core.dll library from a different application that does not have an explicit reference to that assembly. As a result, the AssemblyResolve event will fire, and inside the handler, we locate and return the assembly.
static void Main(string[] args)
{
   AppDomain.CurrentDomain.AssemblyResolve += CurrentDomain_AssemblyLoad;

   // This assembly is loaded only because we loaded from an external directory explicitly by using the CurrentDomain_AssemblyLoad event handler.
   var assembly = Assembly.Load("Math.Core");

   AppDomain.CurrentDomain.AssemblyResolve -= CurrentDomain_AssemblyLoad;

   string namespaceName = "Math.Core";
   string className = "Calculator";
   // Using reflection we can invoke the Add method of the Calculator object inside the Math.Core.dll assembly.
   var instance = assembly.CreateInstance($"{namespaceName}.{className}");
   var method = instance.GetType().GetMethod("Add");
   var res = method.Invoke(instance, new object[] { 1, 2 }); // res = 3
}

// This event will fire only when an assembly can not be resolved.
private static Assembly? CurrentDomain_AssemblyLoad(object? sender, ResolveEventArgs args)
{
   // This directory contains the assembly to be loaded Math.Core.dll
   string baseUrl = Path.Combine( Directory.GetCurrentDirectory(),"..\\..\\..\\..\\Math.Core\\bin\\Debug\\net7.0\\");
   var assemblyName = new AssemblyName(args.Name);
   var assemblyExternalLocation = Path.Combine(baseUrl, $"{assemblyName.Name}.dll");

   // Load file does an assembly loading, not resolving, so the event will not fire again.
   return Assembly.LoadFile(assemblyExternalLocation);
}
NuGet Packaging
A NuGet package is a zip file with a .nupkg extension and it contains various .NET assemblies as well as other files like images and text files. Inside the package, you’ll also find a manifest file, which describes details such as the package’s contents, version, package ID, author, and additional information.
A NuGet package can be deployed and used locally, in a private host, or it can be hosted publicly on NuGet.org.
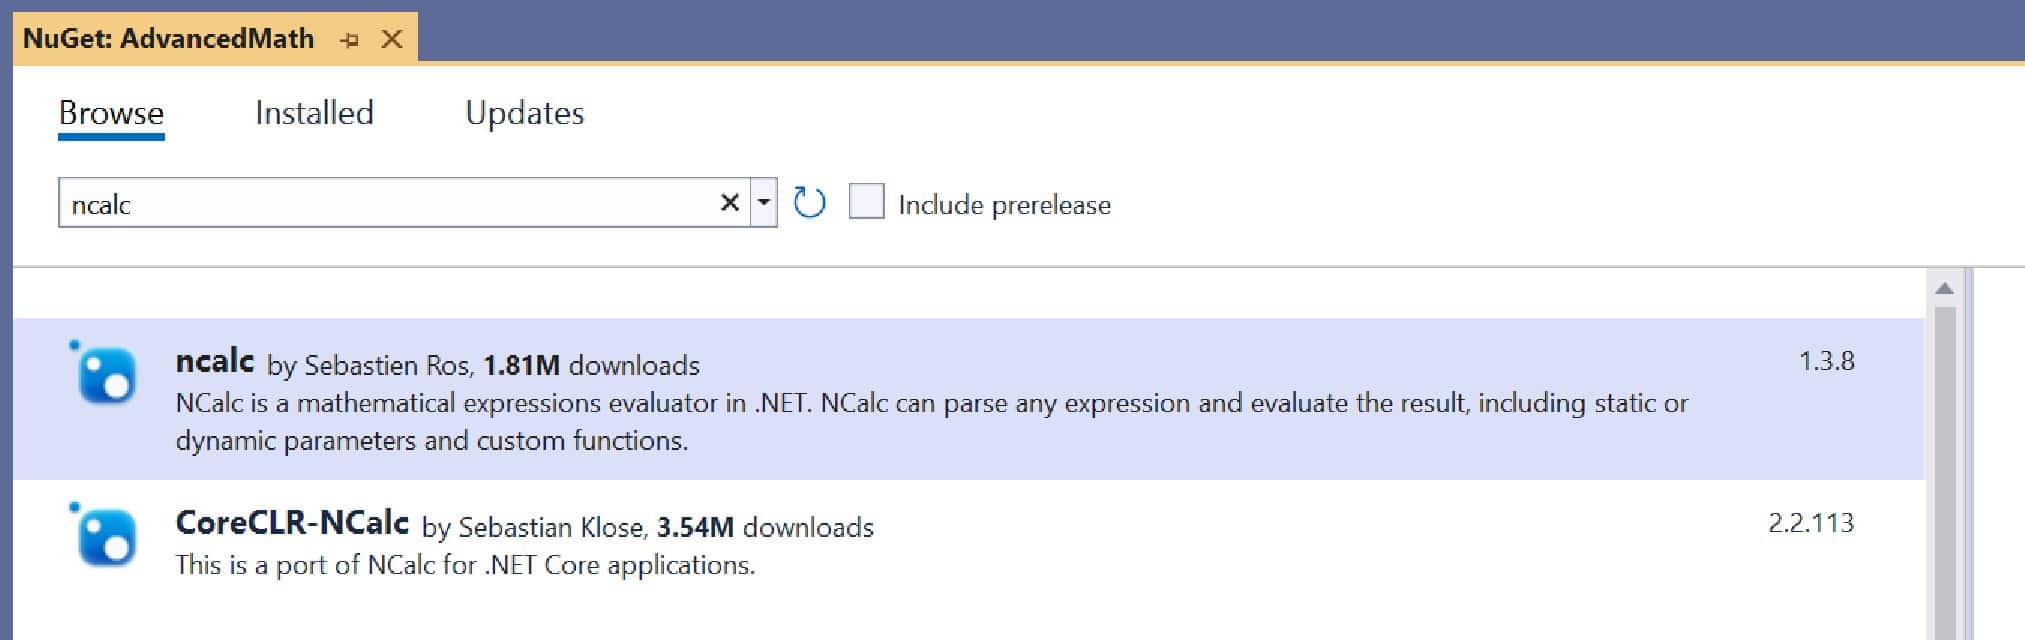
Adding a NuGet Reference to Your Project
You can easily add any NuGet package as a dependency to your project and use it. Start by selecting Manage NuGet Packages in your desired project, then search for and install the preferred NuGet package.
Creating a NuGet package from a .NET project
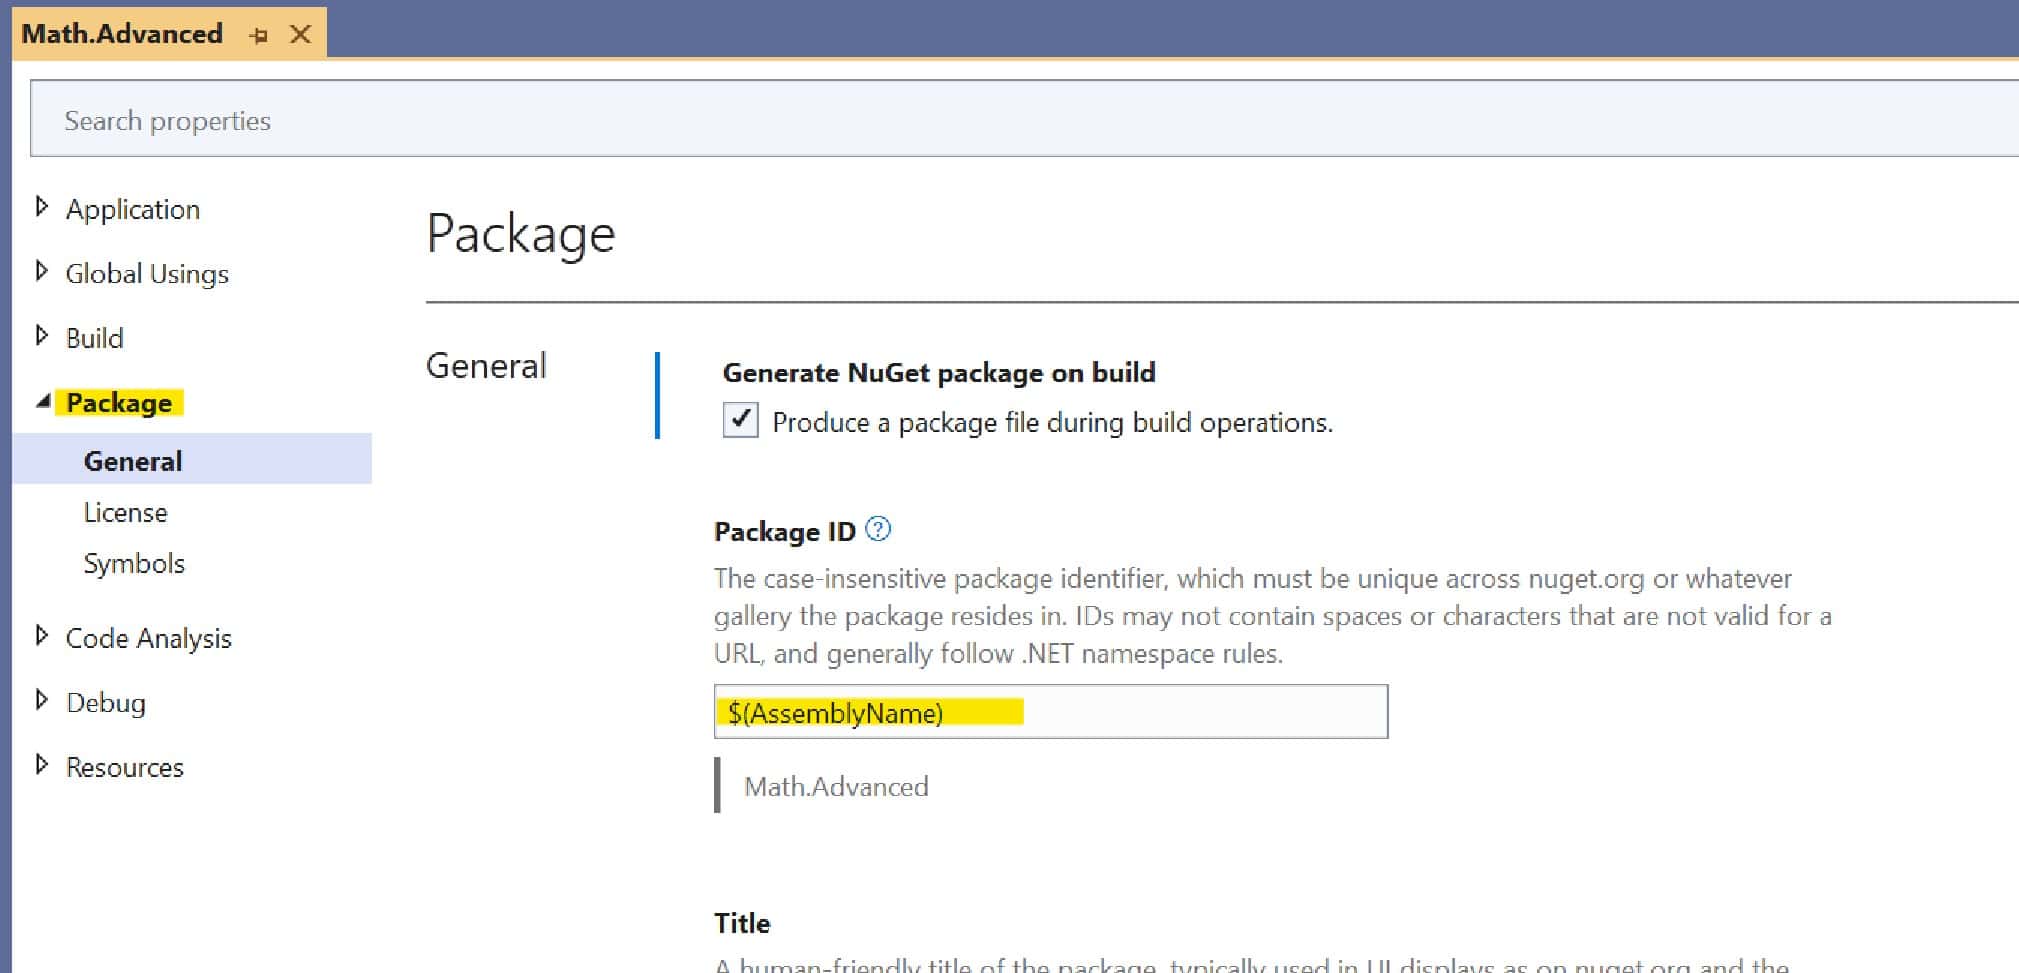
To create a .nupkg package for your project, simply right-click on the project and choose “Pack.” This action packages all the necessary files within it. Alternatively, you can set up the project properties to automatically generate a new .nupkg package each time you build the project by enabling the Generate NuGet package on build option.
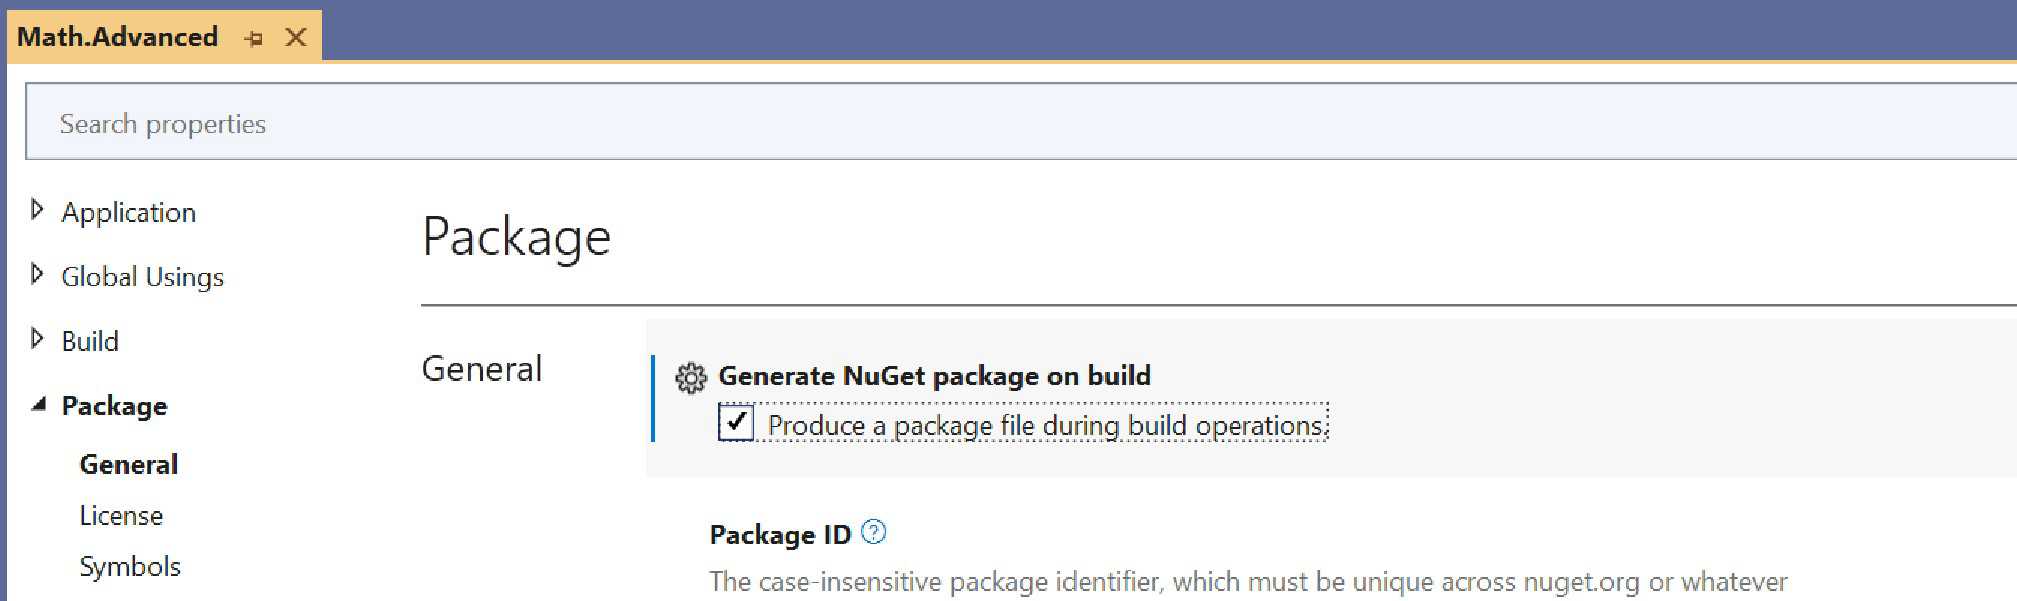
You can also configure various properties like the package ID and package version, directly from Visual Studio’s project properties.
Afterward, navigate to the {location of your project}\bin\Debug (or Release) directory, where you will find a package named {Project name}.{version}.nupkg. You can change its extension to .zip and open it to reveal the following files:
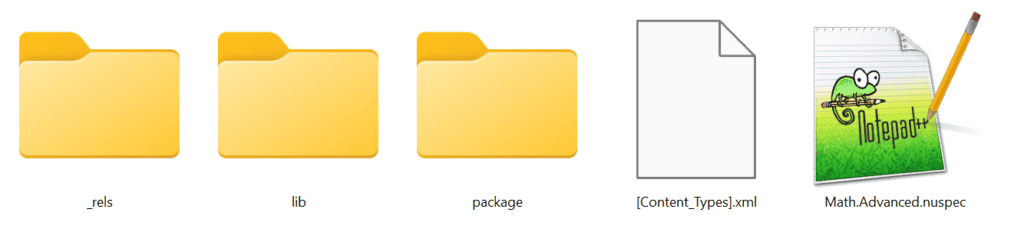
Inside the lib folder, you will find subfolders corresponding to each target framework that your assembly project supports. The Math.Advanced.nuspec file is the manifest of the NuGet package. It contains information such as the package ID, description, authors, and any dependencies the package might have.
In our sample project manifest:
<?xml version="1.0" encoding="utf-8"?>
<package xmlns="http://schemas.microsoft.com/packaging/2013/05/nuspec.xsd">
  <metadata>
    <id>Math.Advanced</id>
    <version>1.0.0</version>
    <authors>SoftwareParticles</authors>
    <description>contains advanced math operations.</description>
    <dependencies>
      <group targetFramework="net7.0">
        <dependency id="Math.Core" version="1.0.0.1" exclude="Build,Analyzers" />
        <dependency id="ncalc" version="1.3.8" exclude="Build,Analyzers" />
      </group>
    </dependencies>
  </metadata>
</package>
In this manifest we can see two depednencies. The first one, is Math.Core, which is a local project within the same solution, and the other is ncalc, which is another NuGet package. These dependencies are grouped by the target framework, which in this case is net7.0. If we had multiple target frameworks, these dependencies would appear within their respective groups.
Finally, you can specify the desired versions for the dependencies you need.
Targeting Multiple Framework for the Assembly Project
You can configure your assembly project to target multiple frameworks. To do this, modify the .csproj file of your project and change the TargetFramework tag to TargetFrameworks. Inside it, specify the target frameworks you need.
Below, we show the Math.Advanced library, which targets netstandard, net461 and net7.0 frameworks:
<Project Sdk="Microsoft.NET.Sdk">

  <PropertyGroup>
    <TargetFrameworks>netstandard2.1;net461;net7.0</TargetFrameworks>
    <ImplicitUsings>disable</ImplicitUsings>
    <Nullable>disable</Nullable>
    <GeneratePackageOnBuild>True</GeneratePackageOnBuild>
    <Authors>SoftwareParticles</Authors>
    <Description>contains advanced math operations.</Description>
    <PackageProjectUrl>softwareparticles.com</PackageProjectUrl>
  </PropertyGroup>

  <ItemGroup>
    <PackageReference Include="ncalc" Version="1.3.8" />
  </ItemGroup>

  <ItemGroup>
    <ProjectReference Include="..\Math.Core\Math.Core.csproj" />
  </ItemGroup>

</Project>
This configuration will result in the creation of multiple subdirectories in both the Debug and Release directories, one for each target framework. Inside each specific directory, you will find the assemblies supported by that particular framework. Similarly, if you Pack your project into a NuGet library and open the nupkg file, you will notice multiple subfolders inside the “lib” folder, one for each target framework.
Furthermore, the new nuspec/manifest of the NuGet package will have additional groups in order to reflect the multiple target frameworks, as shown below:
<?xml version="1.0" encoding="utf-8"?>
<package xmlns="http://schemas.microsoft.com/packaging/2013/05/nuspec.xsd">
  <metadata>
    <id>Math.Advanced</id>
    <version>1.0.0</version>
    <authors>SoftwareParticles</authors>
    <description>contains advanced math operations.</description>
    <dependencies>
      <group targetFramework=".NETFramework4.6.1">
        <dependency id="Math.Core" version="1.0.0.1" exclude="Build,Analyzers" />
        <dependency id="ncalc" version="1.3.8" exclude="Build,Analyzers" />
      </group>
      <group targetFramework="net7.0">
        <dependency id="Math.Core" version="1.0.0.1" exclude="Build,Analyzers" />
        <dependency id="ncalc" version="1.3.8" exclude="Build,Analyzers" />
      </group>
      <group targetFramework=".NETStandard2.1">
        <dependency id="Math.Core" version="1.0.0.1" exclude="Build,Analyzers" />
        <dependency id="ncalc" version="1.3.8" exclude="Build,Analyzers" />
      </group>
    </dependencies>
  </metadata>
</package>
By organizing the dependencies in this way, you can specify different versions for each dependency according to the target framework.
Setting Local NuGet Package Source
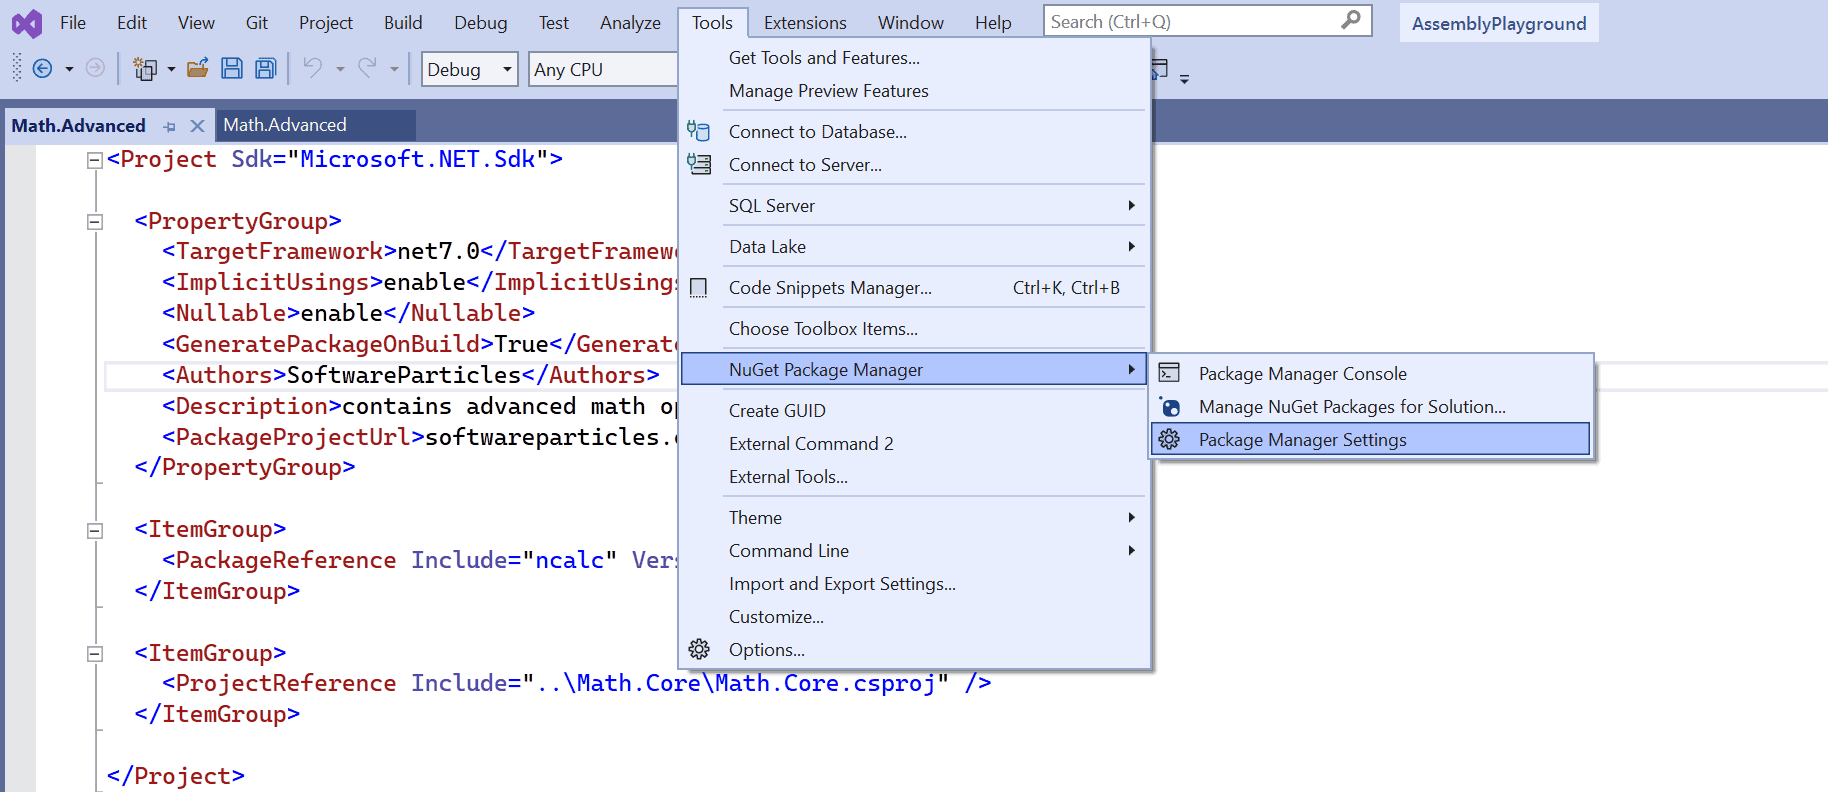
It is encouraged to install your package and verify that everything works as expected before uploading it to a repository like nuget.org. This can be easily done by using a custom package source in Visual Studio where your NuGet packages (.nupkg files) are located. Navigate to Tools > NuGet package Manager > Package Manager Settings as shown below:
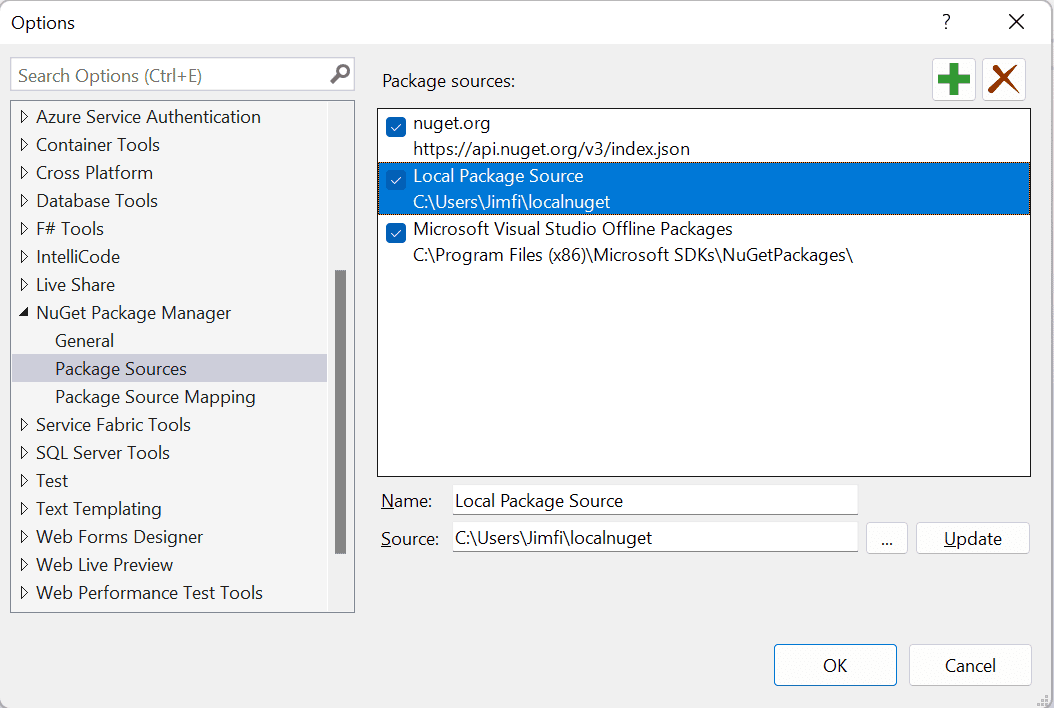
Then, go to NuGet Package Manager > Package Sources and add a new package source. Specify a name for the source and provide the local directory path where your NuGet packages are located.
Finlay, when referencing a new package, you can specify the source from which you want to retrieve the NuGet packages, and install the desired package as shown below:
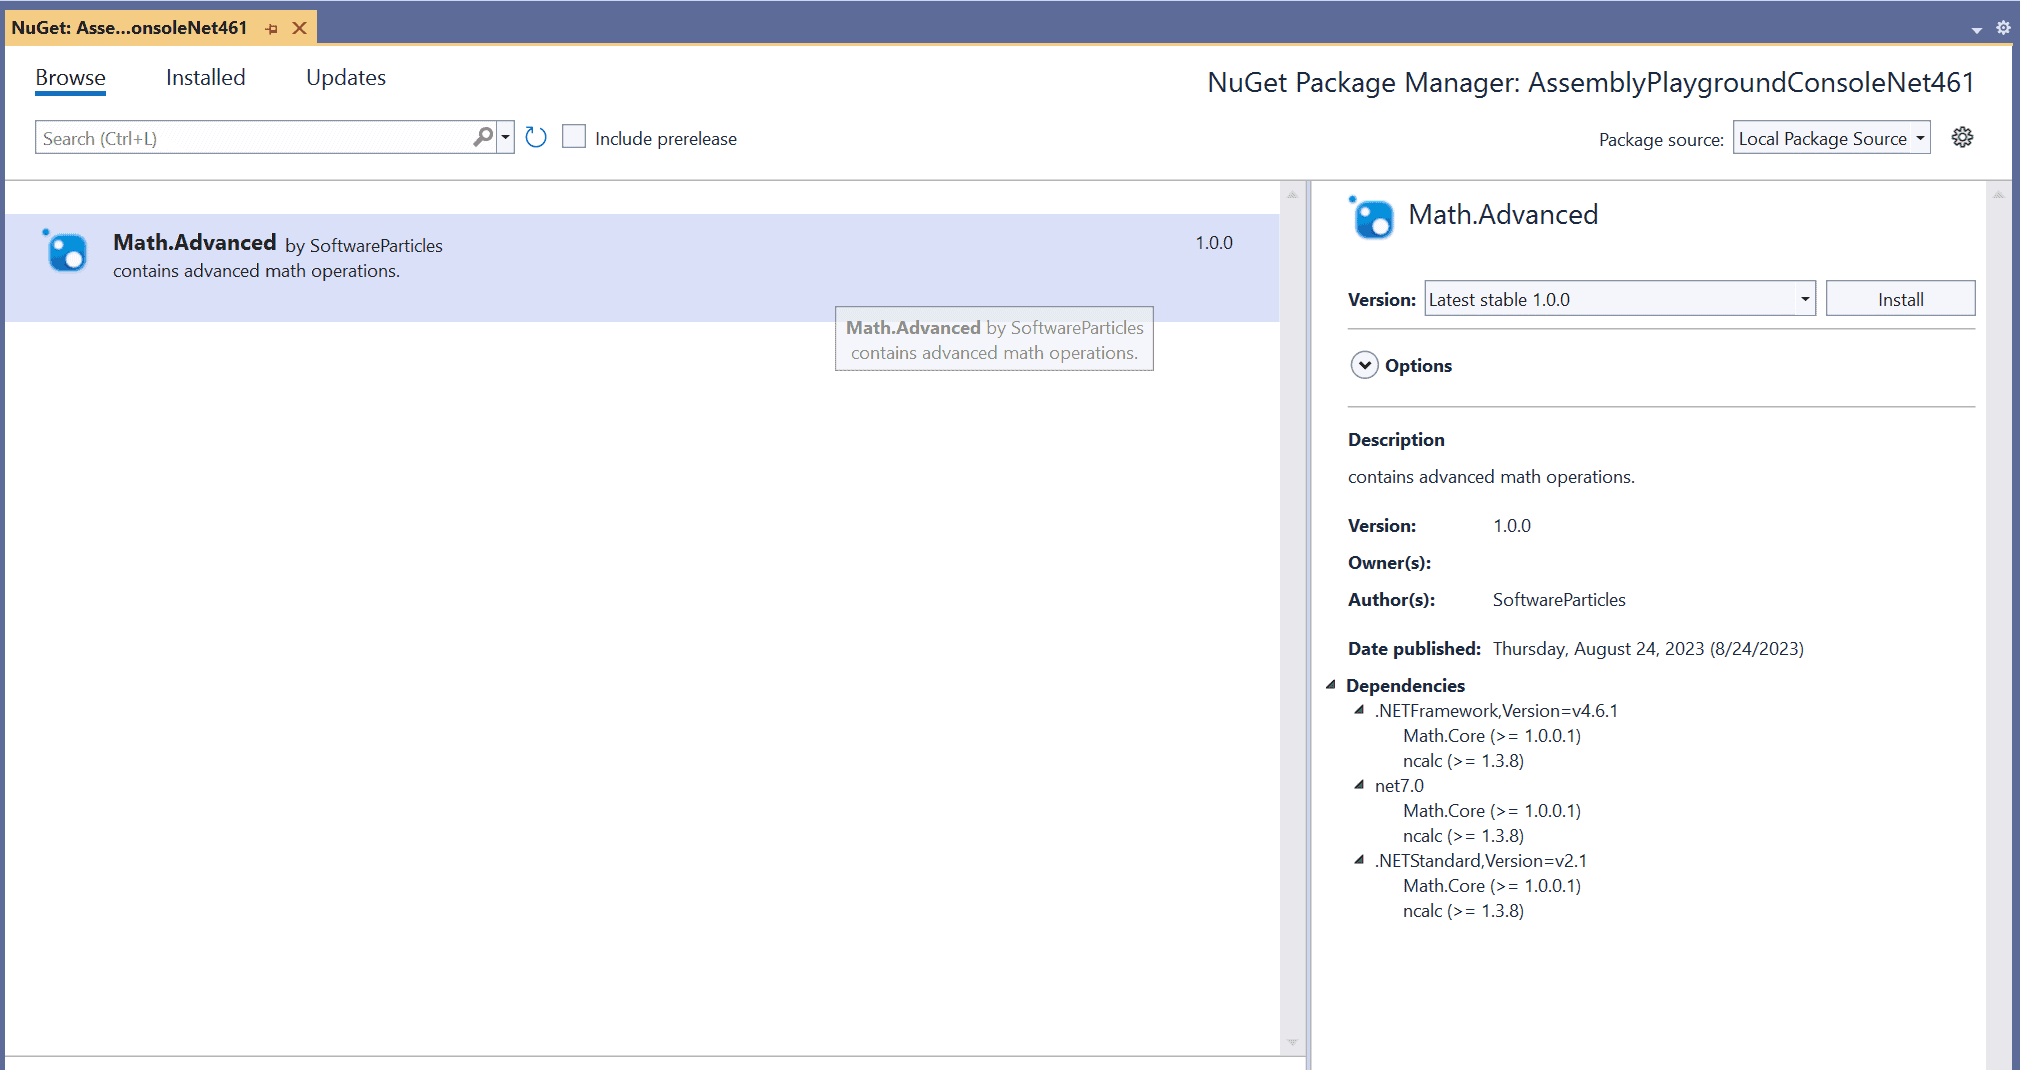
In the image above, you can also observe the target frameworks supported by the library on the right.
Once you’ve installed the package in your .NET 4.6.1 Console project, you can test it by calling one of its methods using the following code:
using AdvancedMath;
using System;

namespace AssemblyPlaygroundConsoleNet461
{
   internal class Program
   {
      static void Main(string[] args)
      {
         AdvancedCalculator calculator = new AdvancedCalculator();
         var res = calculator.Eval("1 + 1 - 2");
         Console.WriteLine(res); // Output: 0
      }
   }
}