

The code is available on GitHub
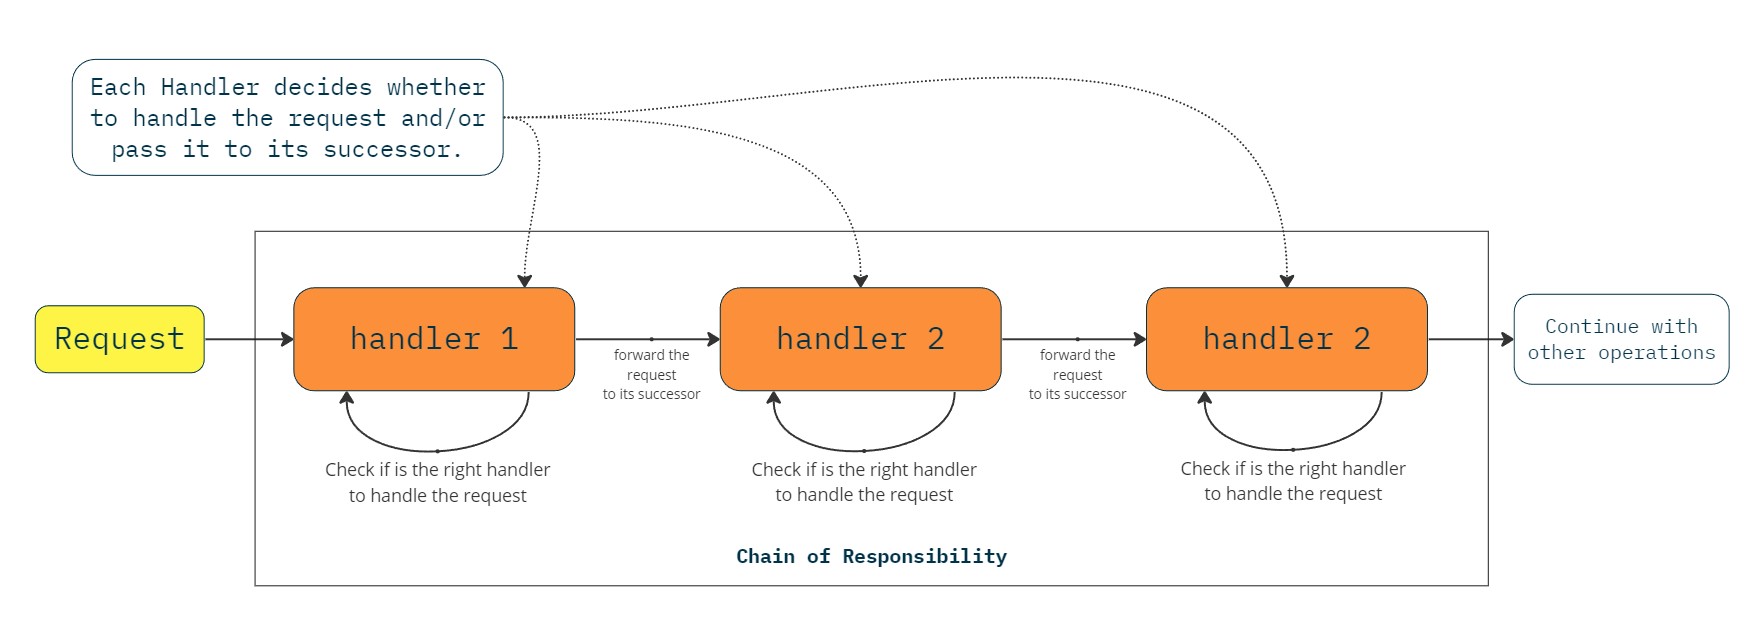
The Chain of Responsibility Pattern enables us to connect multiple handlers in a sequence. Each handler examines the request and passes it to the next handler in line until the appropriate one (or none) processes it. This approach allows us to use the right handler based on the request, without exposing the handler and its implementation, and easily expand the design by adding more handlers as required.
When to use
Use the Chain Of Responsibility Pattern when you need to handle a request using a specific handler from a group of handlers unknown at the beginning.
In case an application receives numerous requests with different handling requirements, using this pattern allows us to create the necessary handlers referencing each other with a “successor” property. Each handler inspects the request sequentially, determining if it’s the appropriate handler, otherwise, it delegates the request to its successor. This ensures the request gets handled by the suitable handler or not handled at all.
In some cases, the order of handlers in the chain may not matter, while in others, it’s essential. For optimal performance, consider placing the more specific handlers first and the most generic one last, or arrange them based on the likelihood of handling a request.
Use the Chain Of Responsibility Pattern when you want to trigger multiple handlers for a request in a specific order.
In scenarios where a request needs to pass through several handlers with distinct responsibilities, this pattern becomes valuable. A more complex behavior can emerge by using multiple handlers that each one do its part. This approach allows us to create a pipe and filter pattern, where data flows through, and each handler filters the data based on specific conditions.
Use the Chain Of Responsibility Pattern when you need to dynamically change handlers or their order for a request.
There are instances where we don’t know about which handlers should try to handle a request. Furthermore, there might be a need to add or remove handlers on the fly while the application is running, based on certain conditions. The order in which handlers pass the request to each other can also impact the final result. By introducing a handler before the others, we assign it a higher priority for handling the request.
For example, suppose we want to execute operations for a request with a specific order depending on conditions. The request contains an expression with operators that have a precedence. Constructing a chain of handlers, where each one evaluates an operator, implicitly sets the precedence of the operators.
In the code below, we model three handlers: a SumHandler that evaluates addition, a SubtractHandler that evaluates a subtraction and a MultiplyHandler that evaluates a multiplication. All of them extend the abstract class, the Handler, that contains common logic:
public class Request
{
   public string Expression { get; set; }
   public Request(string expression)
   {
      Expression = expression;
   }
}

public abstract class Handler
{
   public Handler Successor { get; set; }
   protected abstract string Operator { get; }

   public void Handle(Request request)
   {
      while(request.Expression.Contains(Operator))
      {
         var parts = request.Expression.Split(new string[] {" "}, StringSplitOptions.RemoveEmptyEntries);
         for (int i = 0; i < parts.Length; i++)
         {
            if (parts[i].Trim() == Operator)
            {
               decimal left = Convert.ToDecimal(parts[i - 1]);
               decimal right = Convert.ToDecimal(parts[i + 1]);
               var res = DoHandle(left, right);

               parts[i - 1] = "";
               parts[i] = res.ToString();
               parts[i + 1] = "";
               request.Expression = string.Join(" ", parts);
               break;
            }
         }
      }
      Successor?.Handle(request);
   }
   protected abstract decimal DoHandle(decimal left, decimal right);
}

public class SumHandler : Handler
{
   protected override string Operator => "+";
   protected override decimal DoHandle(decimal left, decimal right)
      => left + right;
}

public class SubtractHandler : Handler
{
   protected override string Operator => "-";
   protected override decimal DoHandle(decimal left, decimal right)
      => left - right;
}

public class MultiplyHandler : Handler
{
   protected override string Operator => "*";
   protected override decimal DoHandle(decimal left, decimal right)
      => left * right;
}
Now, we can create two chains with the same handlers but in different order. The first chain has the MultiplyHandler as the first handler, while the second has the SubtractHandler.
var request = new Request("1 + 2 * 10 - 5");
Handler chain = new MultiplyHandler()
{
   Successor = new SumHandler()
   {
      Successor = new SubtractHandler()
   }
};
chain.Handle(request); // Result: 16

request = new Request("1 + 2 * 10 - 5");
chain = new SubtractHandler()
{
   Successor = new SumHandler()
   {
      Successor = new MultiplyHandler()
   }
};
chain.Handle(request); // Result: 15
Visualizing the two cases, we obtain different outcomes depending on how we construct the chains:
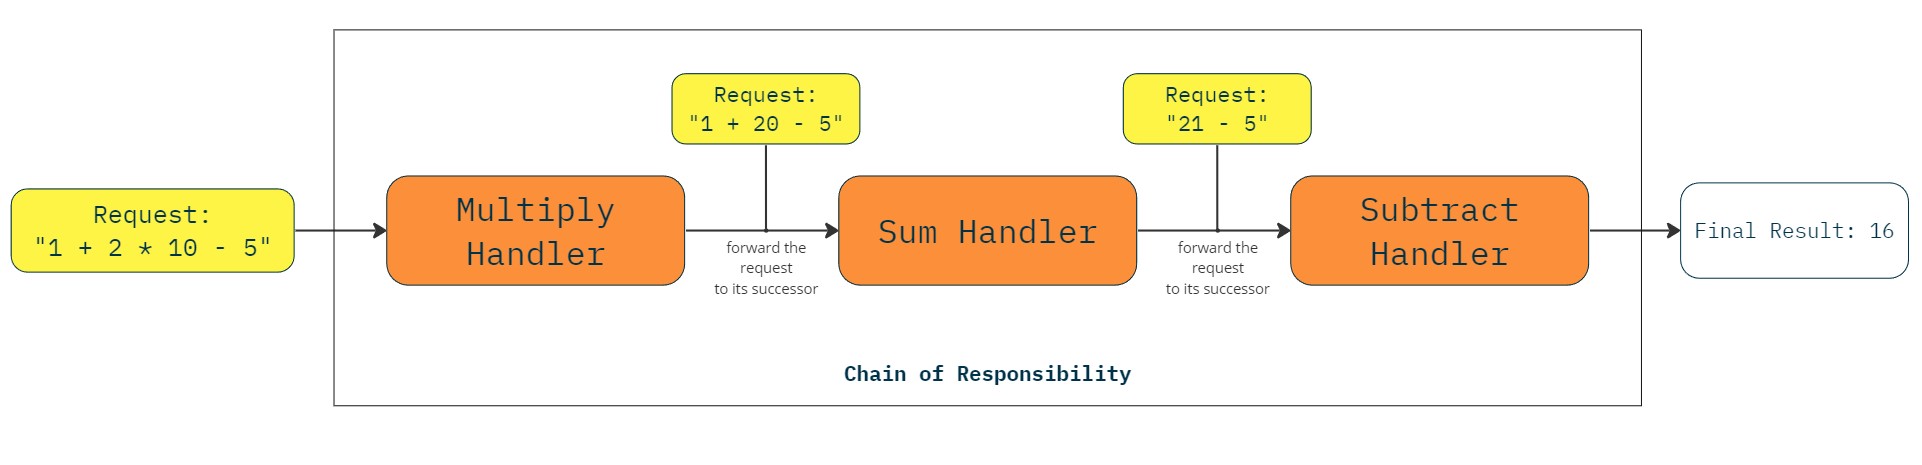
In the first scenario, with the multiplier as the first handler, the handlers execute their operations in a specific order, resulting in the final result of 16. In the second scenario, with a different order, the final result is completely different:
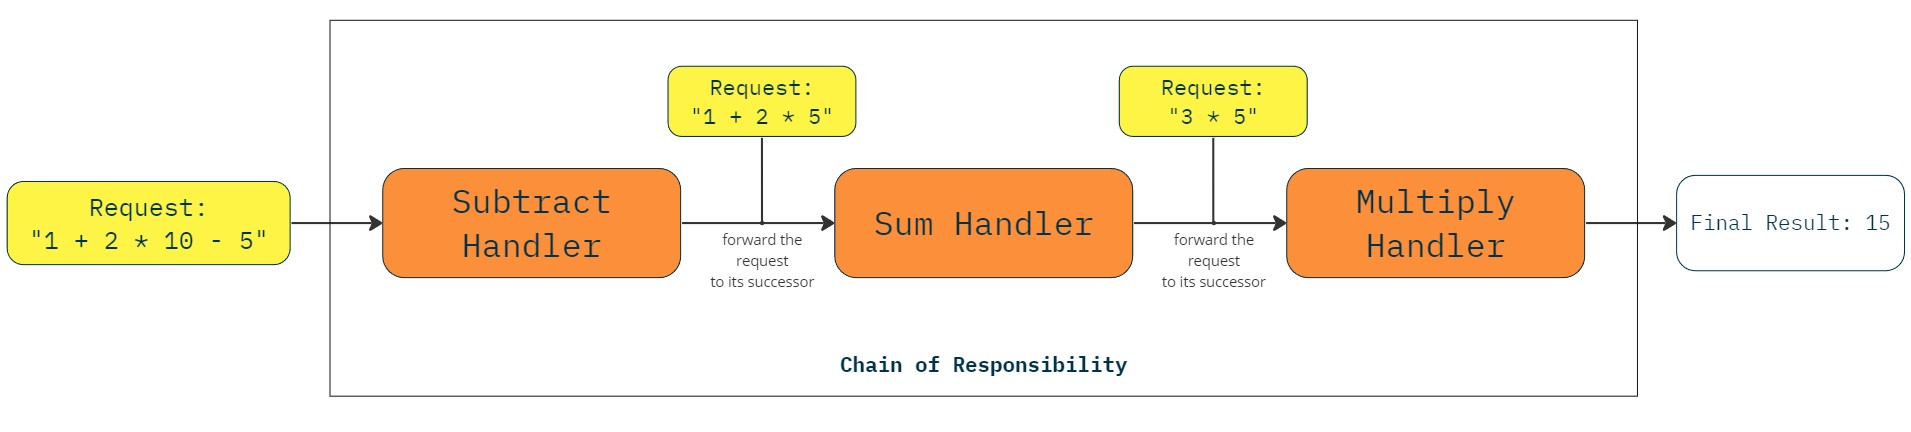
As demonstrated in the example, changing the order of the handlers can yield a completely different result. Such changes are easily made, even at runtime, using the Chain of Responsibility Pattern.
How to implement
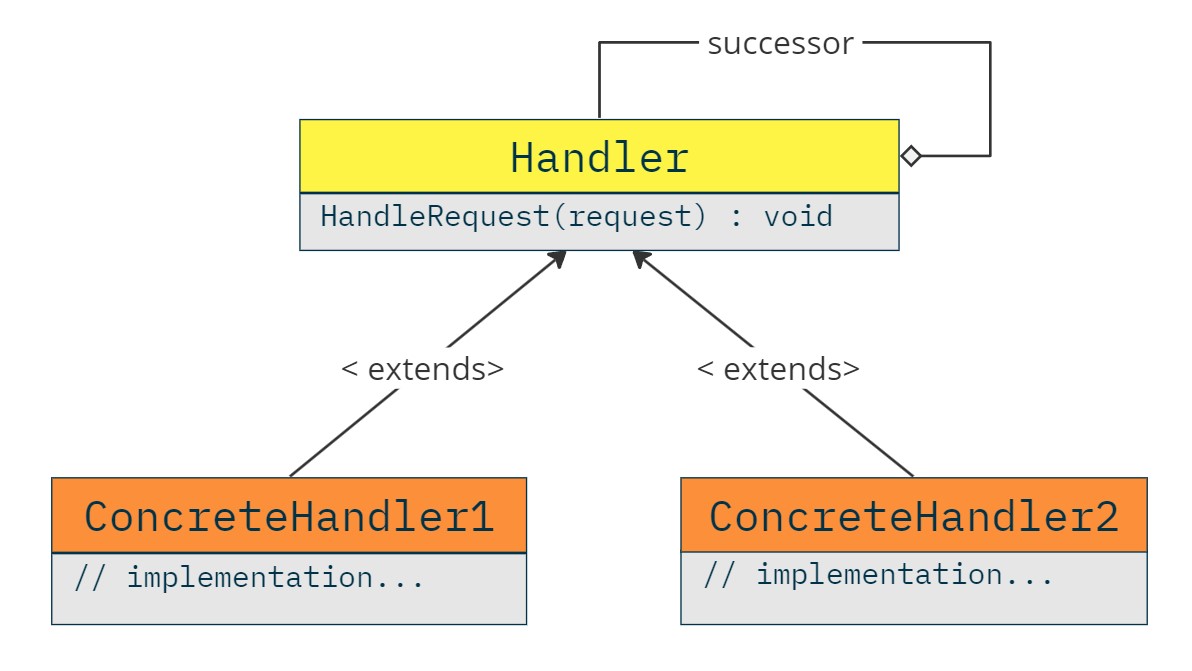
Define a Handler Abstraction.
To begin, create a Handler abstraction by defining an interface or an abstraction class. This abstraction will include a method for handling requests. Each concrete handler will implement this interface. In case you are using an abstract class, you can include a constructor that takes the successor of the handler as a parameter.
public abstract class Handler
{
   protected readonly Handler Successor;

   protected Handler(Handler successor)
   {
      Successor = successor;
   }

   public abstract void HandleRequest(object request);
}
Define the Concrete Handlers.
Next, create concrete handlers that implement the Handler abstraction and provide their own implementation for handling incoming requests. In Chain Of Responsibility, you can have one or more concrete handlers that handle the request. There is no rule indicating that at least one handler must handle the request, it could pass through the chain without being handled at all.
Each concrete handler can either handle the request, terminating the chain, or pass the request to its successor.
public class ConcreteHandler1 : Handler
{
   public ConcreteHandler1(Handler successor) : base(successor)
   {
   }

   public override void HandleRequest(object request)
   {
      // Handle the request
      // Or
      // Delegate to the successor
      Successor.HandleRequest(request);
   }
}

public class ConcreteHandler2 : Handler
{
   public ConcreteHandler2(Handler successor) : base(successor)
   {
   }

   public override void HandleRequest(object request)
   {
      // Handle the request
      // Or
      // Delegate to the successor
      Successor.HandleRequest(request);
   }
}
Additionally, you can include a terminal handler that implements the Null Pattern. This handler does not handle the request and has no other successor:
public class NullHandler : Handler
{
   public NullHandler() : base(null)
   {

   }

   public override void HandleRequest(object request)
   {
      Console.WriteLine("Request has reached the end of the chain.");
   }
}
Finally, you can build a chain by linking the concrete handlers and pass any request through it. Here’s an example:
var chain = new ConcreteHandler1(new ConcreteHandler2(new NullHandler()));
chain.HandleRequest(new { prop1 = 1, prop2 = 2 });
The chain will handle the request sequentially through the linked handlers, and it provides flexibility in adjusting the chain or adding new handlers without modifying the client code.
Chain Of Responsibility Pattern – Class diagram
Below we illustrate the class diagram of the pattern. The Handler abstract class has a reference. This reference is needed for enabling concrete handlers to call the next handler in the chain.
Pros and Cons
Pros
- Decoupling – Decouples the request from the receivers. Both sender and receiver have no explicit knowledge of each other. Additionally, any handler in the chain doesn’t know about the rest of the chain’s structure. This separation enhances the flexibility and maintainability of the codebase.
- Separation of Responsibility – One of the main advantages of the pattern is that you can distribute responsibilities among handlers effectively.
Cons
- Handling isn’t guaranteed – There is a chance that no handler will handle the request, this is not necessarily a drawback.
Real World Example – ASP.NET Web API Middleware
In ASP.NET Core Web API, there is a Middleware concept that allows us to incorporate multiple handlers into the HTTP pipeline. This enables us to intercept the request, perform operations, and then pass it along the chain before reaching the HTTP controller.
As the official documentation state, our handlers are part of a larger chain triggered after the Authorization step, as illustrated below:
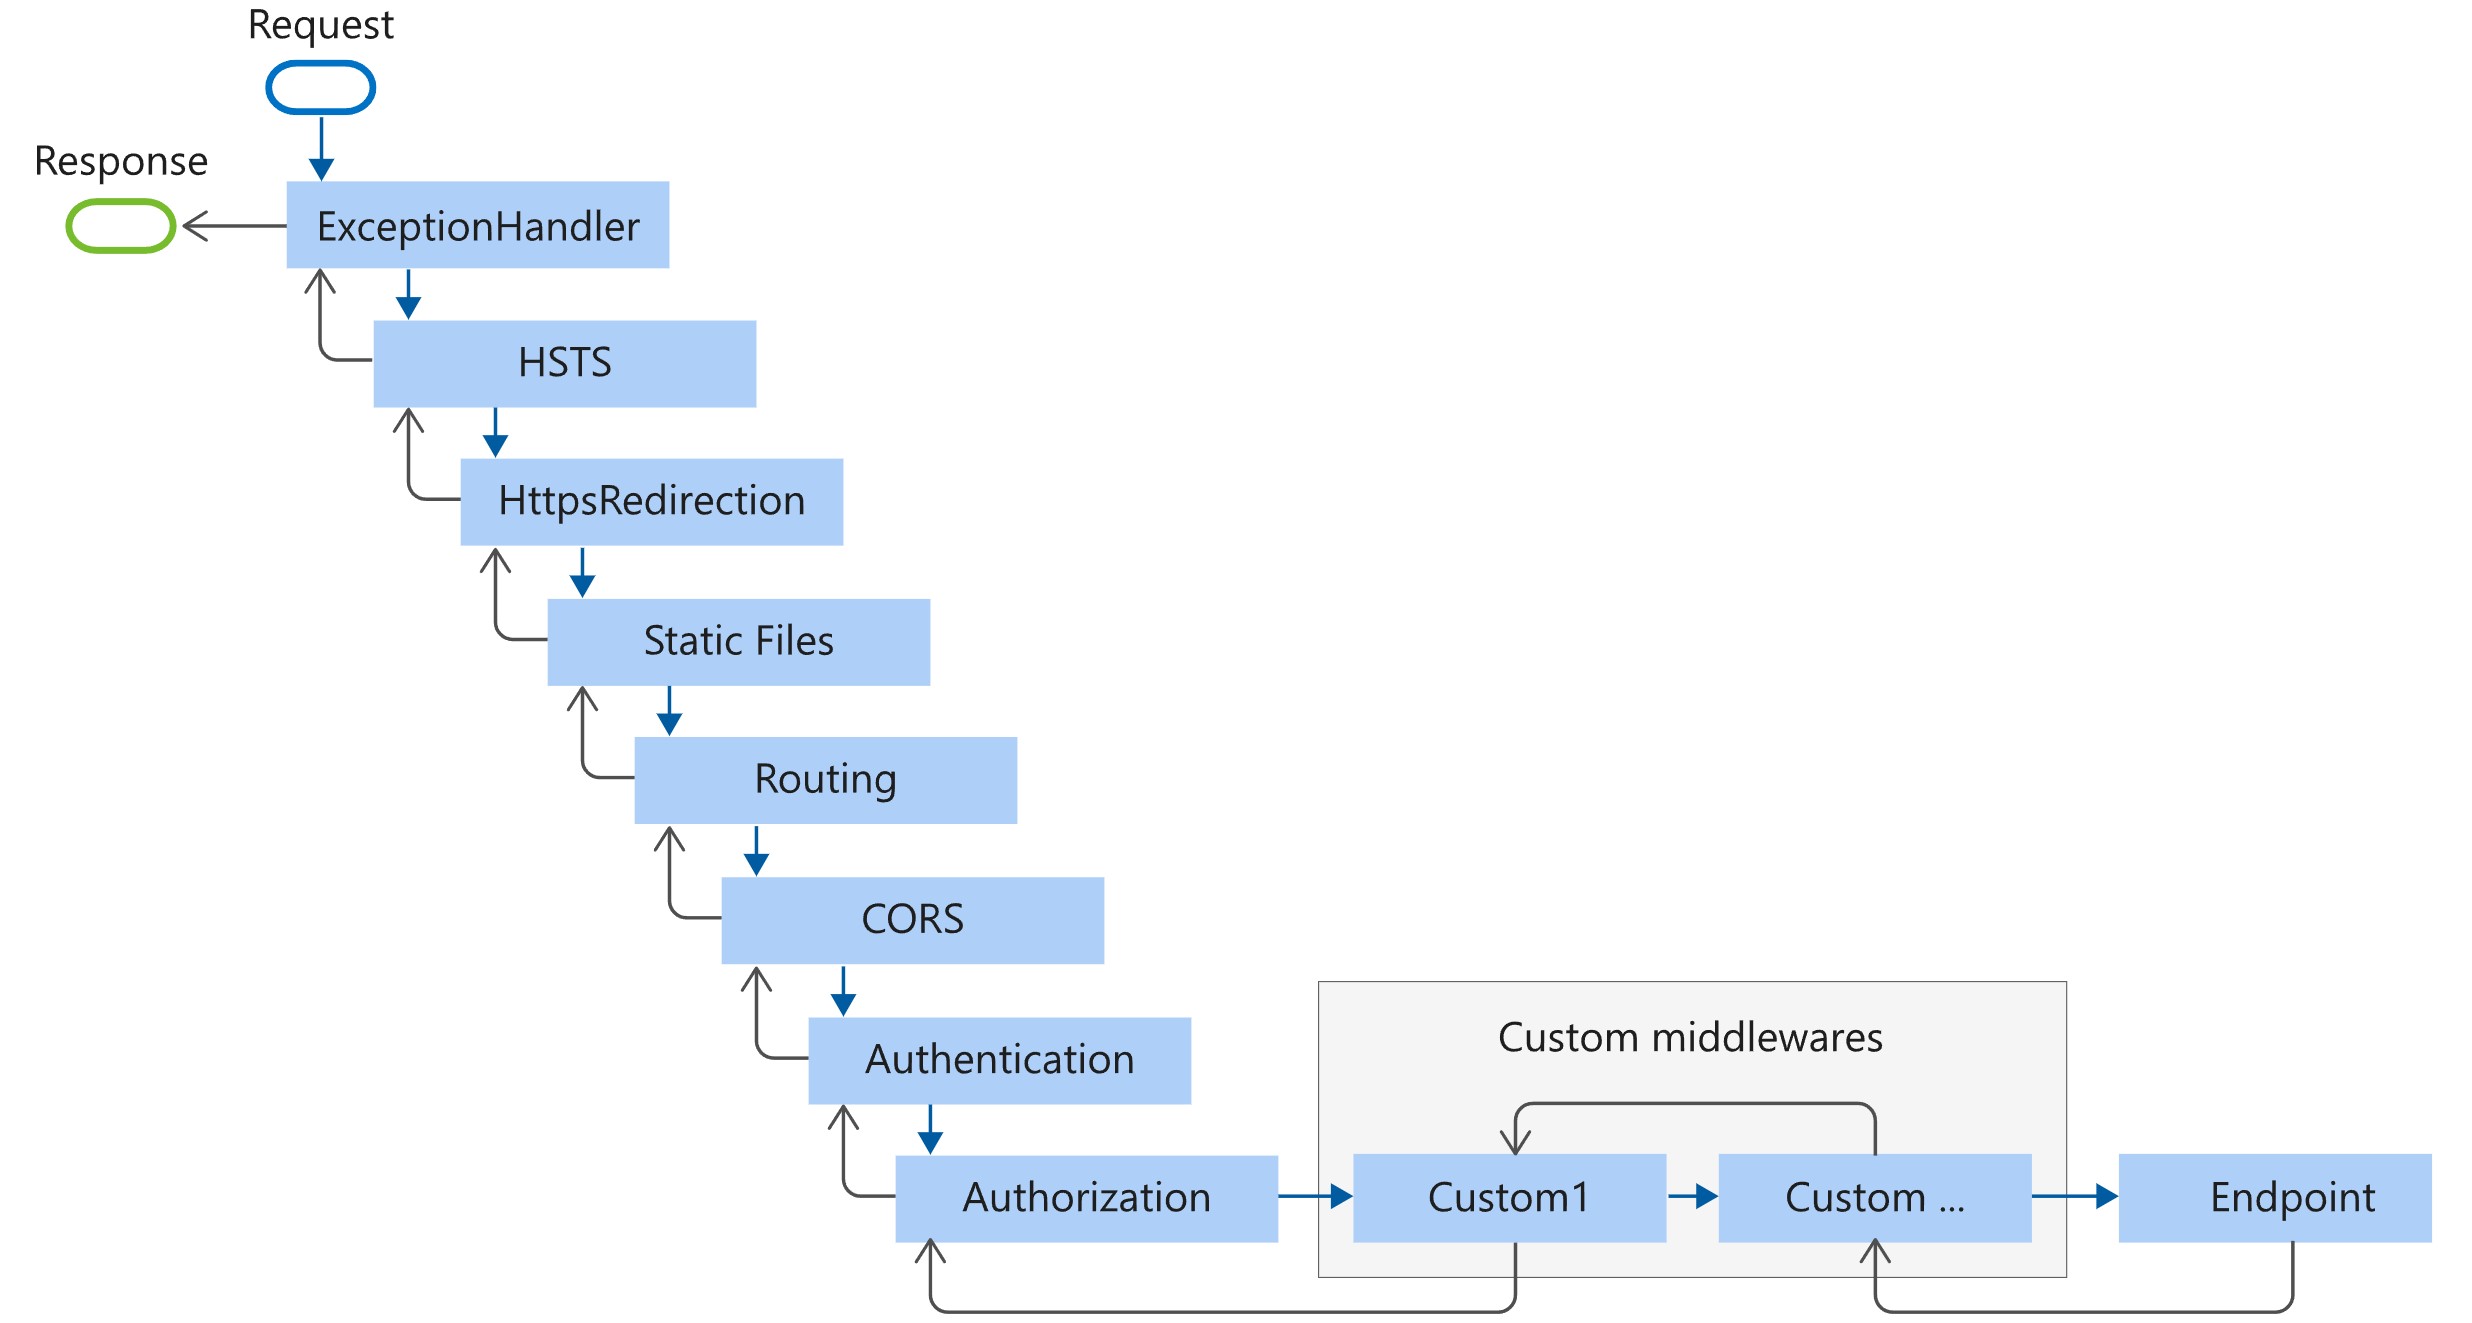
We can create two handlers and add them into the application’s pipeline, as demonstrated below:
public class ConcreteHandler1
{
   private readonly RequestDelegate _next;

   public ConcreteHandler1(RequestDelegate next)
   {
      _next = next;
   }

   public async Task InvokeAsync(HttpContext context)
   {
      // Custom logic to be executed before the next middleware
      // ...

      await _next(context);

      // Custom logic to be executed after the next middleware
      // ...
   }
}

public class ConcreteHandler2
{
   private readonly RequestDelegate _next;

   public ConcreteHandler2(RequestDelegate next)
   {
      _next = next;
   }

   public async Task InvokeAsync(HttpContext context)
   {
      // Custom logic to be executed before the next middleware
      // ...

      await _next(context);

      // Custom logic to be executed after the next middleware
      // ...
   }
}
In the previous code, each handler has a RequestDelegate, which is its successor in the chain of handlers.
Finally, the framework enables us to register our handlers inside the Program.cs as follows:
var app = builder.Build();

app.UseMiddleware<ConcreteHandler1>();
app.UseMiddleware<ConcreteHandler2>();
With every request to a controller in the Web API application, the framework initially calls the InvokeAsync method of ConcreteHandler1 (registered first) and then forwards the request to its successor, ConcreteHandler2, before reaching the specific controller method.
Note that in this example, the handlers do not extend a specific class. This can be considered an implementation detail that differs from the strict implementation of the pattern. Nevertheless, they must have an InvokeAsync method with a HttpContext as parameter.
This way, the ASP.NET Core Web API utilizes the Chain of Responsibility Pattern, also called as a pipeline in the context of HTTP, making it easier to extend its behavior without modifying any existing code within the framework.
Example – Change Dispenser Machine
In this section, we apply the Chain of Responsibility Pattern to create a change dispenser application. The goal is to generate change using 50 cents, 100 cents, 10 euros, and other bills for a specific amount of money.
We use the Amount of Money as the request, which is divided into smaller bills. The request passes through separate handlers, each representing a specific bill/coin (e.g., 50 cents). Each handler checks if the money can be divided by its value, adds the appropriate number of divisions, and passes the remaining amount to the next handler.
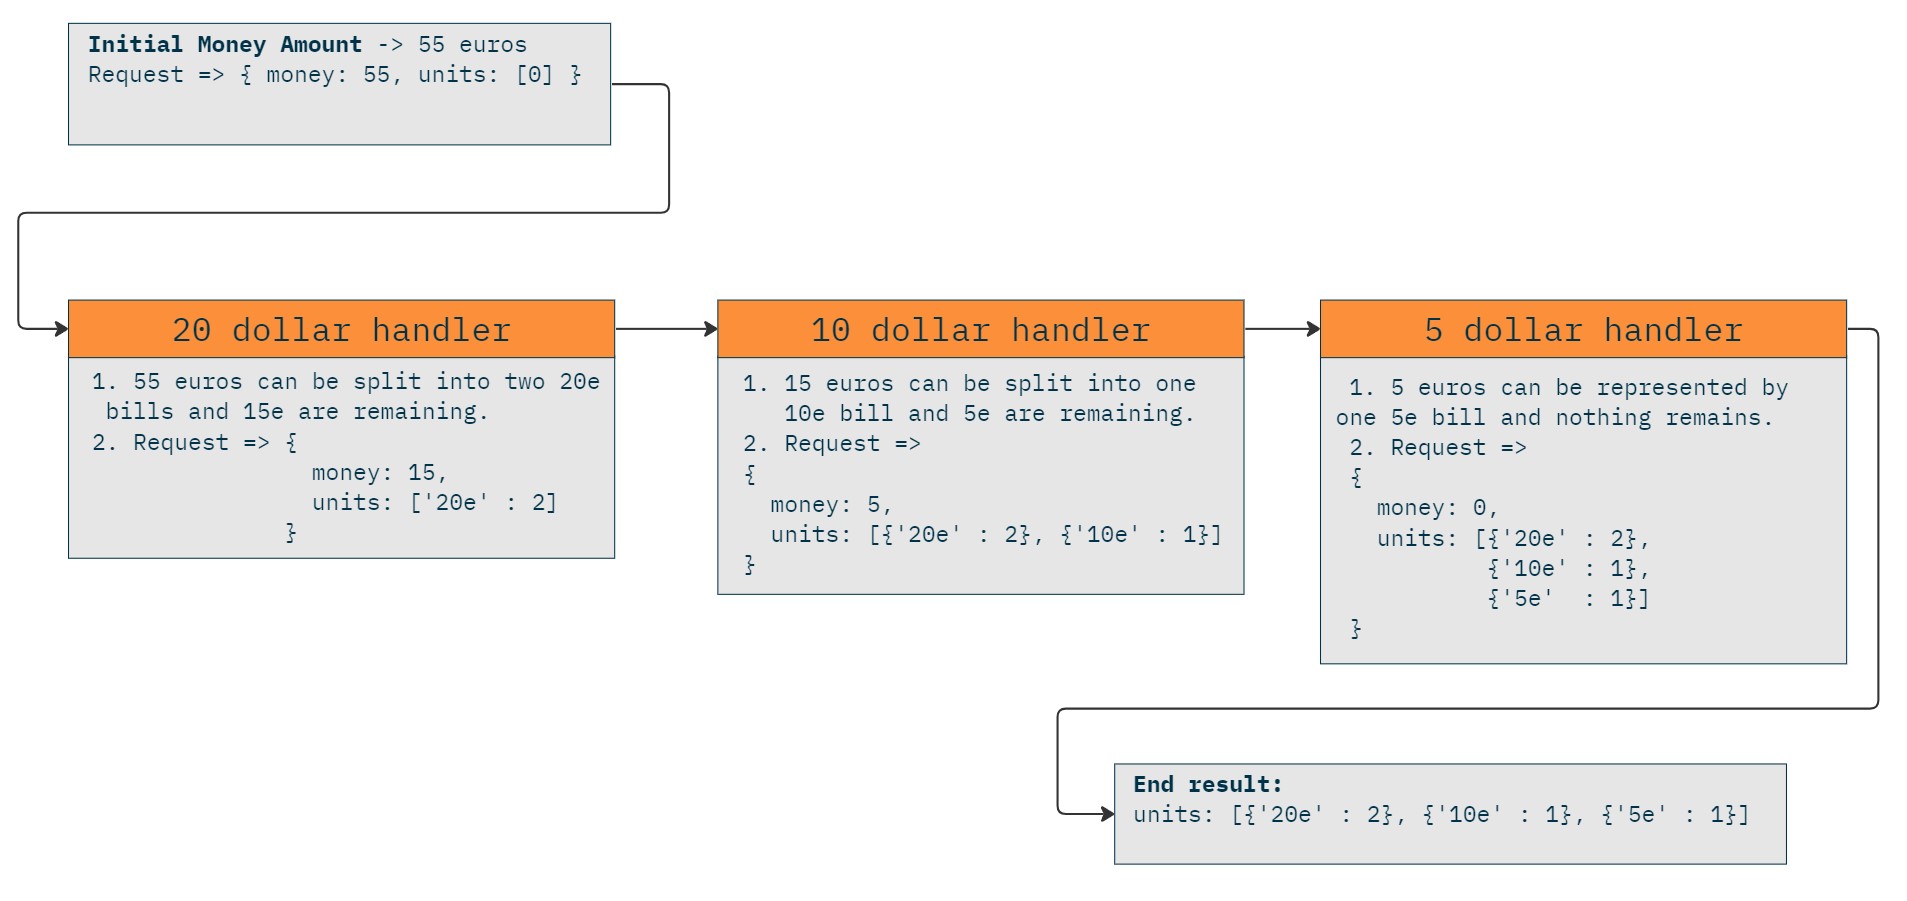
In a slight variation from previous definitions, this example also modifies the request itself. This is a variant of the Chain of Responsibility Pattern known as the Pipes and Filters pattern. Here, the request is the Money object, holding the divisions of its total amount in the CurrencyUnits property:
public class Money
{
   public Money(decimal amount)
   {
      this.CurrencyUnits = new Dictionary<decimal, int>();
      this.Amount = amount;
   }
   private Dictionary<decimal, int> CurrencyUnits { get; set; }
   public decimal Amount { get; private set; }

   public void AddUnit(decimal amount)
   {
      if (this.CurrencyUnits.ContainsKey(amount))
      {
         this.CurrencyUnits[amount]++;
      }else
      {
         this.CurrencyUnits.Add(amount, 1);
      }
      this.Amount -= amount;
   }
}
As units are added using the AddUnit method, we also subtract from the total amount the value that was added. This ensures that the next handler calculates divisions based on the updated amount.
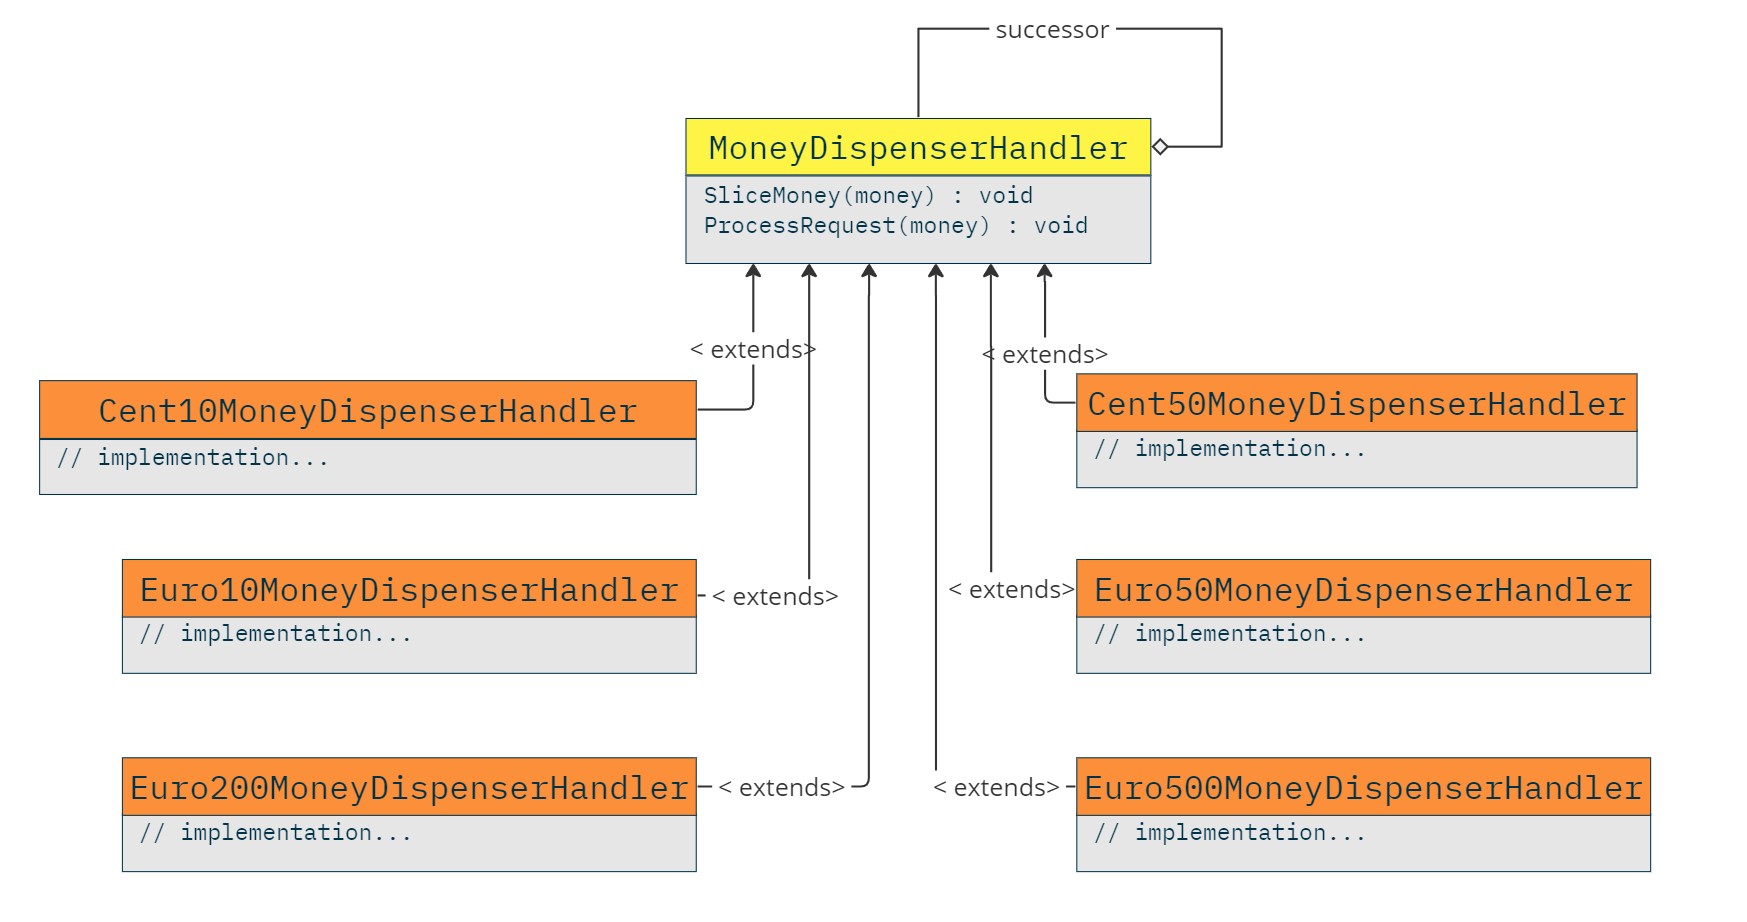
Next, we define the MoneyDispenserHandler base class for all handlers to extend. This class holds a reference to the next handler, which can be set by calling its SetSuccessor method. The SliceMoney method initiates the processing of the request and finds the dividers of the money amount.
public abstract class MoneyDispenserHandler
{
   protected MoneyDispenserHandler Successor;
   public void SetSuccessor(MoneyDispenserHandler successor)
   {
      this.Successor = successor;
   }

   public void SliceMoney(Money money)
   {
      if (money.Amount == 0)
         return;
      this.ProcessRequest(money);
   }

   protected abstract void ProcessRequest(Money money);
}
Next, we create the concrete handlers that implement the ProcessRequest method of the MoneyDispenserHandler. Each handler checks if it can divide the total amount inside the request and updates it by adding its unit.
public class Cent10MoneyMoneyDispenserHandler : MoneyDispenserHandler
{
   protected override void ProcessRequest(Money money)
   {
      while (money.Amount >= 0.1m)
      {
         money.AddUnit(0.1m);
      }
      Successor?.SliceMoney(money);
   }
}

public class Cent50MoneyDispenserHandler : MoneyDispenserHandler
{
   protected override void ProcessRequest(Money money)
   {
      while (money.Amount >= 0.5m)
      {
         money.AddUnit(0.5m);
      }
      Successor?.SliceMoney(money);
   }
}

public class Euro10MoneyDispenserHandler : MoneyDispenserHandler
{
   protected override void ProcessRequest(Money money)
   {
      while (money.Amount >= 10)
      {
         money.AddUnit(10);
      }
      Successor?.SliceMoney(money);
   }
}

public class Euro50MoneyDispenserHandler : MoneyDispenserHandler
{
   protected override void ProcessRequest(Money money)
   {
      while (money.Amount >= 50)
      {
         money.AddUnit(50);
      }
      Successor?.SliceMoney(money);
   }
}

public class Euro200MoneyDispenserHandler : MoneyDispenserHandler
{
   protected override void ProcessRequest(Money money)
   {
      while (money.Amount >= 200)
      {
         money.AddUnit(200);
      }

      Successor?.SliceMoney(money);
   }
}

public class Euro500MoneyDispenserHandler : MoneyDispenserHandler
{
   protected override void ProcessRequest(Money money)
   {
      while (money.Amount >= 500)
      {
         money.AddUnit(500);
      }
      Successor?.SliceMoney(money);
   }
}
All concrete handlers (Cent10MoneyMoneyDispenserHandler, Cent50MoneyDispenserHandler, Euro10MoneyDispenserHandler, Euro50MoneyDispenserHandler, Euro200MoneyDispenserHandler, Euro500MoneyDispenserHandler) have a similar responsibility of dividing the amount of money inside the Money request object and update it by adding their unit.
Finally, a Director object can help create a chain of handlers. For example, passing an array of handlers constructs a MoneyDispenserHandler chain, setting the appropriate successor for each:
public class Director
{
   public MoneyDispenserHandler ConstructChain(params MoneyDispenserHandler[] dispencers)
   {
      MoneyDispenserHandler pre = dispencers[0];
      MoneyDispenserHandler last = null;
      foreach(var changer in dispencers.Skip(1))
      {
         pre.SetSuccessor(changer);
         last = changer;
         pre = changer;
      }
      last.SetSuccessor(dispencers[0]);
      return dispencers[0];
   }
}
Class Diagram
The class diagram of the Money Dispenser example illustrates the MoneyDispenserHandler as the interface and several concrete handlers.
Usage Example
Now that all parts are in place, we can construct a chain capable of dispensing 500, 200, 50, 10 euro bills as long with 50 and 10 cent coins.
var director = new Director();
var handlers = director.ConstructChain(
	new Euro500MoneyDispenserHandler(),
	new Euro200MoneyDispenserHandler(),
	new Euro50MoneyDispenserHandler(),
	new Euro10MoneyDispenserHandler(),
	new Cent50MoneyDispenserHandler(),
	new Cent10MoneyMoneyDispenserHandler());

Money money = new Money(535.70m);

handlers.SliceMoney(money);

Console.WriteLine(money);

/* Output:
   1 of 500 euros, 3 of 10 euros, 11 of 0.5 euros, 2 of 0.1 euros
*/
The flexibility this pattern provides is significant. For example, if the machine runs out of 10 euro bills, we can create a chain without the Euro10MoneyDispenserHandler. Additionally, if we run out of certain amount during dispensing, then the handler can interrupt its job and call its successor to continue with smaller amounts. Lastly, if we want to give 10 euros more priority than 50 euros, we can construct a chain where the Euro10MoneyDispenserHandler is passed before the Euro50MoneyDispenserHandler.
Using Dependency Injection
Dependency injection is a powerful technique that enables flexible and loosely coupled code. In this section, we’ll explore how to use dependency injection to implement the Chain of Responsibility Pattern.
Autofac
The code with dependency injection is available on GitHub
C#
We can use Dependency Injection to register different chain instances with a discriminative key. This approach allows us to resolve the appropriate chain to handle requests based on the specific scenario. We will use the Money Dispenser example, where we have various handlers like Euro500MoneyDispenserHandler, Euro200MoneyDispenserHandler, Euro50MoneyDispenserHandler, Euro10MoneyDispenserHandler, Cent50MoneyDispenserHandler and Cent10MoneyDispenserHandler. These handlers divide a given money amount into the desired money parts.
Consider a scenario where we want to dispense only coins and another where we want to dispense both coins and bills. We can create two chain instances and register them in Autofac using different keys, as illustrated below:
var builder = new ContainerBuilder();

var director = new Director();

// Register multiple chain instances with a discriminator to use them
// depending on the scenario.
builder.RegisterInstance<MoneyDispenserHandler>(
   director.ConstructChain(
      new Euro500MoneyDispenserHandler(),
      new Euro200MoneyDispenserHandler(),
      new Euro50MoneyDispenserHandler(),
      new Euro10MoneyDispenserHandler(),
      new Cent50MoneyDispenserHandler(),
      new Cent10MoneyDispenserHandler()))
   .Keyed<MoneyDispenserHandler>("full");

builder.RegisterInstance<MoneyDispenserHandler>(
   director.ConstructChain(
      new Cent50MoneyDispenserHandler(),
      new Cent10MoneyDispenserHandler()))
   .Keyed<MoneyDispenserHandler>("only-coins");

IContainer container = builder.Build();
These instances can be used by resolving the respective chain instance using its key, as demonstrated below:
var fullDispenser = container.ResolveKeyed<MoneyDispenserHandler>("full");
var money = new Money(523);
fullDispenser.SliceMoney(money);
Console.WriteLine($"MoneyDispenserWithDIExample => With both coins and bills dispenser, the amount of 523 is divided:");
Console.WriteLine(money);

var onlyCoins = container.ResolveKeyed<MoneyDispenserHandler>("only-coins");
money = new Money(523);
onlyCoins.SliceMoney(money);
Console.WriteLine($"MoneyDispenserWithDIExample => With only coins dispenser, the amount of 523 is divided:");
Console.WriteLine(money);
Similar Patterns
Composite Design Pattern – A parent of a component can act as its successor.
Decorator Design Pattern – Decorator has a similar structure but with a different intent. It adds additional behavior to the object it decorates.
Mediator Design Pattern – Mediator also decouples requests and receivers but with a different intent.
Further Reading
Looking to dive deeper into design patterns and take your programming skills to the next level? Check out the following highly recommended books:


* This website includes affiliate product links. We may earn a commission if you make a purchase after clicking on one of these links. Your support is greatly appreciated!