

At some point, we’ve all encountered a payment system, either as a developer tasked with implementing it or simply as a user. Among the various payment gateways available, one of the most popular options is Stripe. While its documentation is comprehensive, it can sometimes overwhelm us, particularly if we’re new to payment systems. Having a clear starting point with the essential functionalities would make things easier, and that’s precisely the purpose of this article.
In this article, we’ll use the Stripe API to create customers, plans, payment methods, charge customers, and set up subscriptions.
The code is available on GitHub
What is Stripe?
Stripe is a popular payment gateway used by many developers. Additionally, it provides an API for payment integration, which we’ll explore and saw how it can be used.
Setting Up: Getting the API Key
To use Stripe, we first need to sign up and obtain a token (API Key). This API key enables secure communication with Stripe. Stripe offers separate tokens for Test and Live data, making it easier to develop using the Test API Token initially.
After registration, you can access the Stripe Dashboard, which includes sections like Payments, Customers and Products. Under the Developer section, you can generate and retrieve your Tokens.
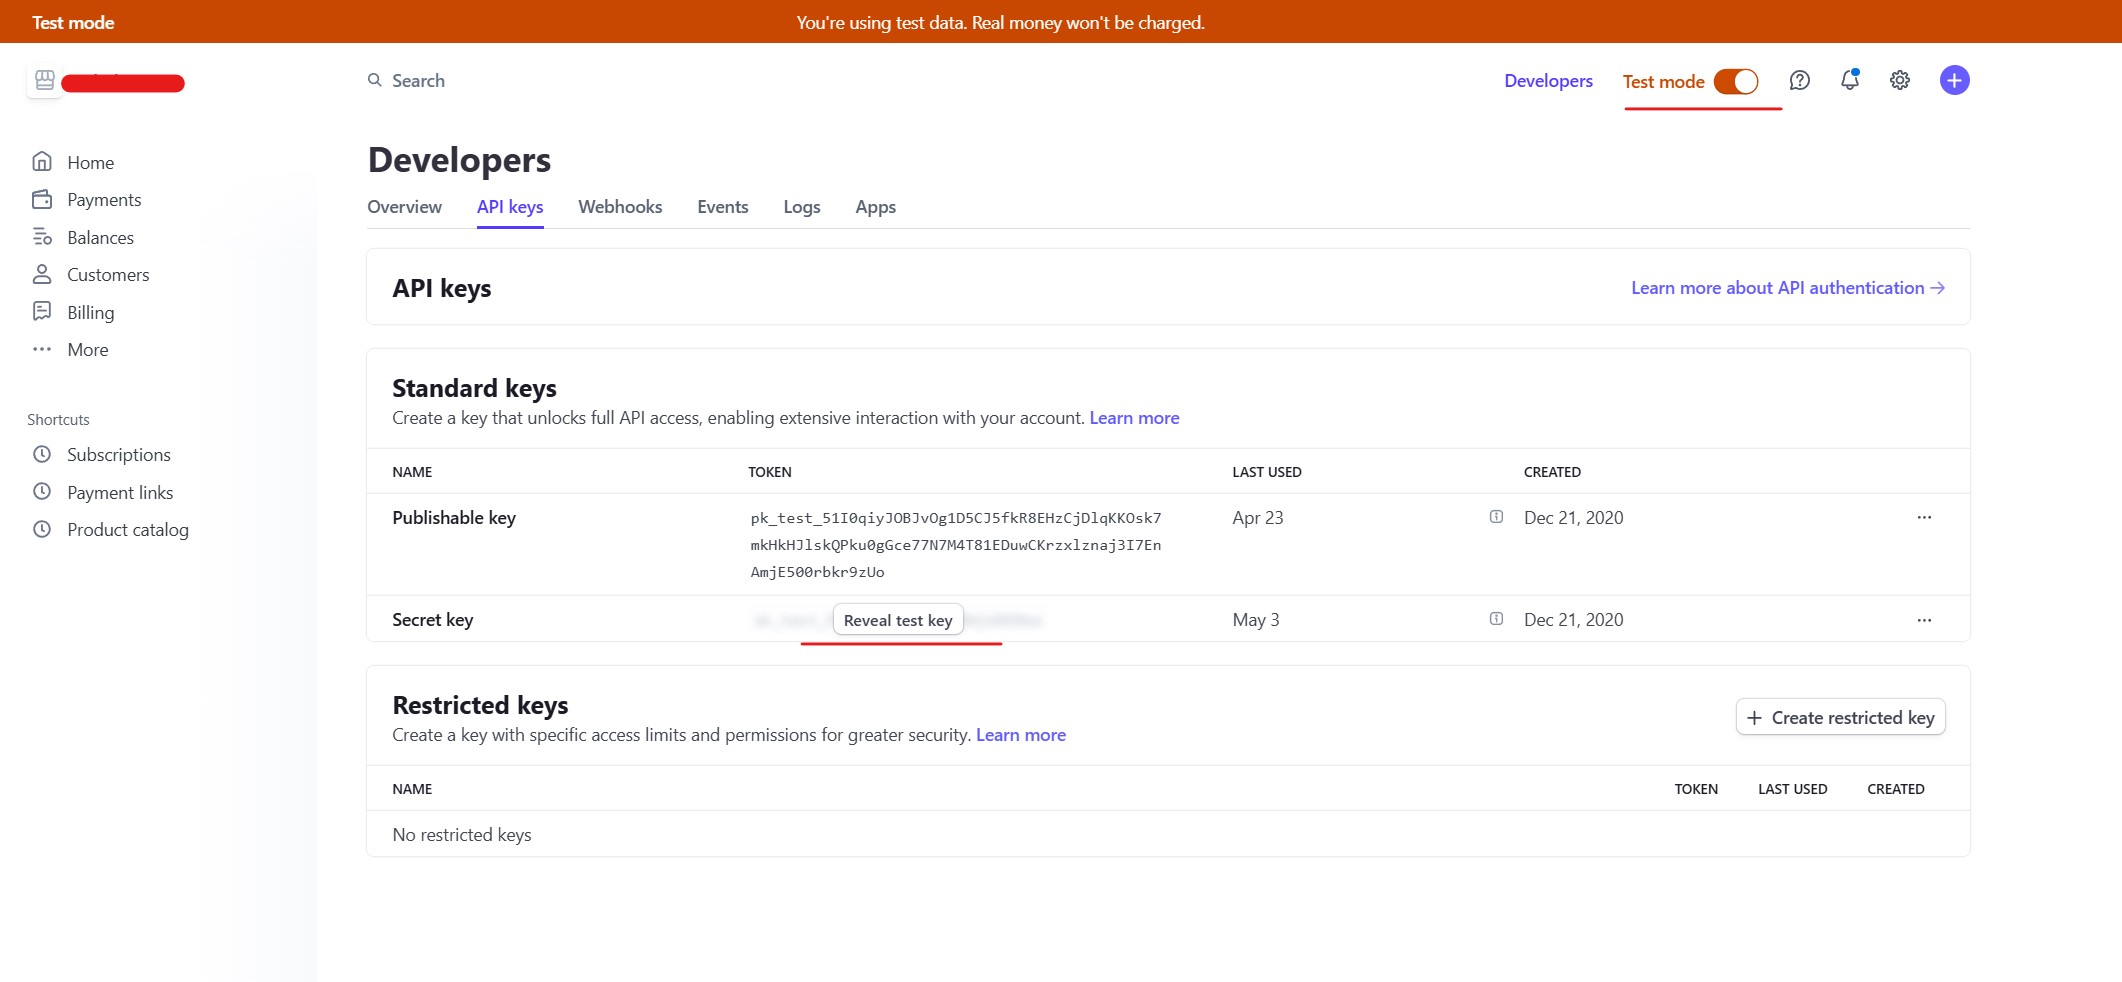
Click ‘Reveal test key’ to reveal your private Test API Key, which will be used internally in our application’s gateway. The public key will be used in JavaScript.
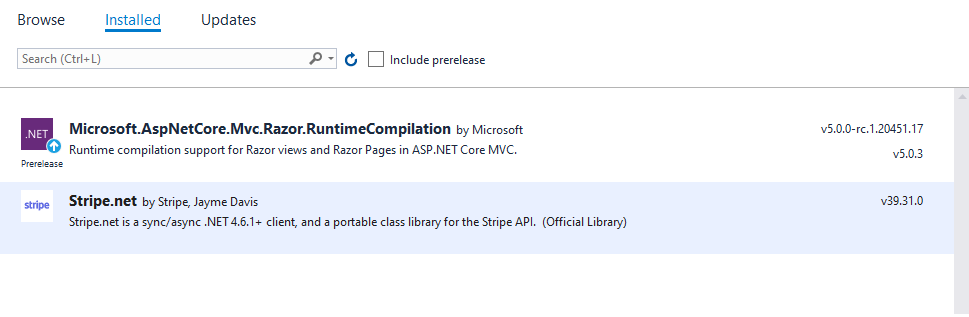
Next, we need to install Stripe’s library in order to be able to use their API. If you’re using Visual Studio, you can install Stripe.net NuGet package through the UI:
Alternatively, you can install it by running this command:
dotnet add package Stripe.netPayment Gateway Interface
In this section, we define the C# interface of our payment gateway. This interface will be used to handle various tasks such as creating plans, customers, and payment methods.
First, we create the IPaymentsGateway class that specifies all necessary actions:
public interface IPaymentsGateway
{
   #region Plans

   Task<List<PlanDto>> PopulatePlans(List<PlanDto> plans);
   Task<List<PlanDto>> GetPlans();

   #endregion Plans

   #region Customers

   Task<bool> CreateCustomer(string name, string email, string systemId);
   Task<List<CustomerDto>> GetCustomers(int take);
   Task<CustomerDto> GetCustomerByEmail(string email,
      params PaymentIncludeDto[] include);
   Task<CustomerDto> DeleteCustomerByEmail(string email);

   #endregion Customers

   #region Payment Methods

   /// <summary>
   /// When you want to add a payment method for future payments for a particular customer.
   /// </summary>
   /// <param name="customer">The customer that the payment method will be created.</param>
   /// <returns>An object that contains the IntentSecret key.</returns>
   Task<PaymentMethodIntentModel> PrepareForFuturePayment(string customerId);
   Task<PaymentMethodIntentModel> PrepareForFuturePaymentWithCustomerEmail(string customerEmail);

   Task<List<PaymentMethodModel>> GetPaymentMethods(string customerId,
      PaymentMethodType paymentMethodType);
   Task<List<PaymentMethodModel>> GetPaymentMethodsByCustomerEmail(string customerEmail,
      PaymentMethodType paymentMethodType);

   Task<PaymentMethodModel> AttachPaymentMethod(string paymentMethodId, string customerId,
      bool makeDefault);
   Task DeletePaymentMethod(string paymentMethodId);

   #endregion Payment Methods

   #region Subscriptions

   Task<bool> CreateSubscription(string customerEmail, string priceId);

   #endregion Subscriptions

   #region Charges

   Task Charge(string customerId, string paymentMethodId, Currency currency,
      long unitAmount,
      string customerEmail,
      bool sendEmailAfterSuccess = false,
      string emailDescription = "");

   Task ChargeWithCustomerEmail(string customerEmail, string paymentMethodId,
      Currency currency,
      long unitAmount,
      bool sendEmailAfterSuccess = false,
      string emailDescription = "");

   Task<IEnumerable<ChargeModel>> GetPaymentStatus(string paymentId);

   #endregion Charges
}
You can find the IPaymentsGateway interface on GitHub
In the next sections, we’ll implement each part of the interface using the Stripe API.
Customer Creation/Listing
First, we implement the CreateCustomer method. This method takes the customer’s name, email, and a system ID as parameters. The system ID could be an identifier from our application’s database. Stripe allows us to store metadata along with an entity, so we’ll use this feature to store the customer’s ID.
public async Task<bool> CreateCustomer(string name, string email, string systemId)
{
   this._logger.LogInformation("Creating Customer in Stripe");
   try
   {
      var options = new CustomerCreateOptions
      {
         Email = email,
         Name = name,
         Metadata = new Dictionary()
         {
            { "ID", systemId }
         }
      };
      var service = new CustomerService();
      Customer c = await service.CreateAsync(options);
      this._logger.LogInformation("Customer Created succesfully");
      return true;
   }
   catch (Exception ex)
   {
      this._logger.LogInformation($"An error occurred during customer creation,
         {ex}");
      return false;
   }
}
Next, we implement the GetCustomerByEmail method to retrieve a customer by email. We can also include their payment methods if needed.
public async Task<CustomerDto> GetCustomerByEmail(string email,
   params PaymentIncludeDto[] includes)
{
   var service = new CustomerService();
   var stripeCustomers = await service.ListAsync(new CustomerListOptions()
   {
      Email = email
   });

   if (!stripeCustomers.Any())
      return null;

   var stripeCustomer = stripeCustomers.Single();

   var customerModel = new CustomerDto(stripeCustomer.Id)
   {
      Email = email,
      Name = stripeCustomer.Name
   };

   if (includes.Any() && includes.Contains(PaymentIncludeDto.PaymentMethods))
   {
      var paymentMethods = await this.GetPaymentMethods(stripeCustomer.Id,
         PaymentMethodType.Card);
      customerModel.PaymentMethods = paymentMethods;
   }

   return customerModel;
}
The GetPaymentMethods method will be described in a next section.
To retrieve a list of customers (maximum 100), we implement the GetCustomers method:
public async Task<List<CustomerModel>> GetCustomers(int take)
{
   var service = new CustomerService();
   var stripeCustomers = await service.ListAsync(new CustomerListOptions()
   {
      Limit = take > 100 ? 100 : take,
   });

   return stripeCustomers.Select(x =>
      new CustomerModel(x.Id) {
         Email = x.Email,
         Name = x.Name,
         SystemId = x.Metadata["ID"]
      }).ToList();
}
You can modify the GetCustomers method to implement paging by using the CustomerListOptions, StartingAfter property.
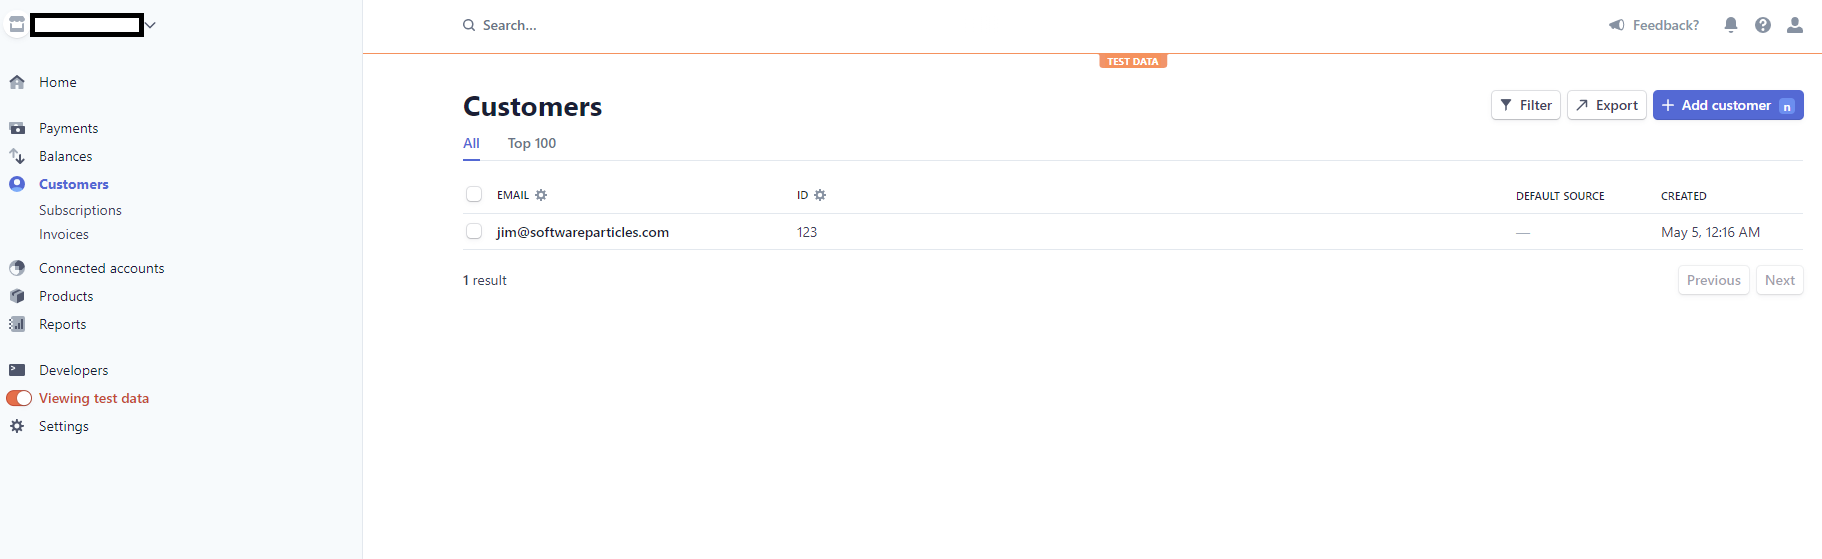
After using the CreateCustomer method for two customers, you can check the result in the Stripe Dashboard under Customers to see the created entities:
Plans (or Products, as Stripe calls them) Creation/Listing
In the case of subscriptions, customers typically choose a particular plan (for example Basic, Premium, Professional). Stripe refers to these as Products. Along with Products, we also create Prices. Prices determine how much and how often a charge occurs for a particular Product (for example, $15 every month). Therefore, a product can have multiple Prices.
To create plans along with their prices, we’ll use the PopulatePlans function of the IPaymentsGateway. Here’s the implementation:
public async Task<List<PlanModel>> PopulatePlans(List<PlanModel> plans)
{
   var productService = new ProductService();
   var existingProducts = await productService.ListAsync(new ProductListOptions()
   {
      Active = true
   });

   var priceService = new PriceService();
   var existingPrices = await priceService.ListAsync(new PriceListOptions()
   {
      Active = true
   });

   List<PlanModel> result = new List<PlanModel>();

   foreach (var plan in plans)
   {
      var existingProduct = existingProducts.FirstOrDefault(x => x.Name.Equals(plan.Name, StringComparison.OrdinalIgnoreCase));
      IEnumerable<Price> prices;
      if (existingProduct != null)
      {
         this._logger.LogInformation($"Product with NAME:{plan.Name} already exists.");
         var existingPricesForProduct = existingPrices.Where(x => x.ProductId == existingProduct.Id);
         prices = await CreatePrices(plan.Prices, existingProduct, existingPricesForProduct);
      }
      else
      {
         var options = new ProductCreateOptions
         {
            Name = plan.Name,
         };

         this._logger.LogInformation($"Creating Product with NAME:{plan.Name}");
         existingProduct = await productService.CreateAsync(options);
         this._logger.LogInformation("Product created succesfully");
         prices = await CreatePrices(plan.Prices, existingProduct);
      }

      result.Add(new PlanModel()
      {
         Id = existingProduct.Id,
         Name = existingProduct.Name,
         Prices = prices.Select(p => new PlanPriceModel()
         {
            Id = p.Id,
            Currency = p.Currency == "usd" ? Currency.USD : Currency.Eur,
            Interval = p.Recurring?.Interval == "month" ? PriceInterval.Monthly : PriceInterval.Yearly,
            UnitAmount = p.UnitAmount.GetValueOrDefault()
         }).ToList()
      });
   }
   return result;
}
The CreatePrices method is as follows:
private async Task<IEnumerable<Price>> CreatePrices(List<PlanPriceModel> prices, Product existingProduct,
   IEnumerable<Price> existingPricesForProduct = null)
{
   List<Price> stripePrices = new List<Price>();
   var priceService = new PriceService();
   foreach (var price in prices)
   {
      var existingPrice = existingPricesForProduct?.FirstOrDefault(x => x.UnitAmount == price.UnitAmount);
      if (existingPrice != null)
      {
         this._logger.LogInformation($"Price with AMOUNT:{existingPrice.UnitAmount} for Product with NAME:{existingProduct.Name} already exists.");
         continue;
      }

      var options = new PriceCreateOptions
      {
         Product = existingProduct.Id,
         UnitAmount = price.UnitAmount,
         Currency = price.Currency.ToString().ToLower(),
         Recurring = new PriceRecurringOptions
         {
            Interval = price.Interval == PriceInterval.Monthly ? "month" : "year"
         },
      };
      var createdPrice = await priceService.CreateAsync(options);
      stripePrices.Add(createdPrice);
   }
   return stripePrices;
}
Here’s an example with sample data:
await _paymentsGateway.PopulatePlans(new List() {
new PlanModel()
{
Name = "Basic",
Prices = new List()
{
new PlanPriceModel()
{
Interval = PriceInterval.Monthly,
Currency = Currency.USD,
UnitAmount = 10000
},
new PlanPriceModel()
{
Interval = PriceInterval.Yearly,
Currency = Currency.USD,
UnitAmount = 8000
}
}
}
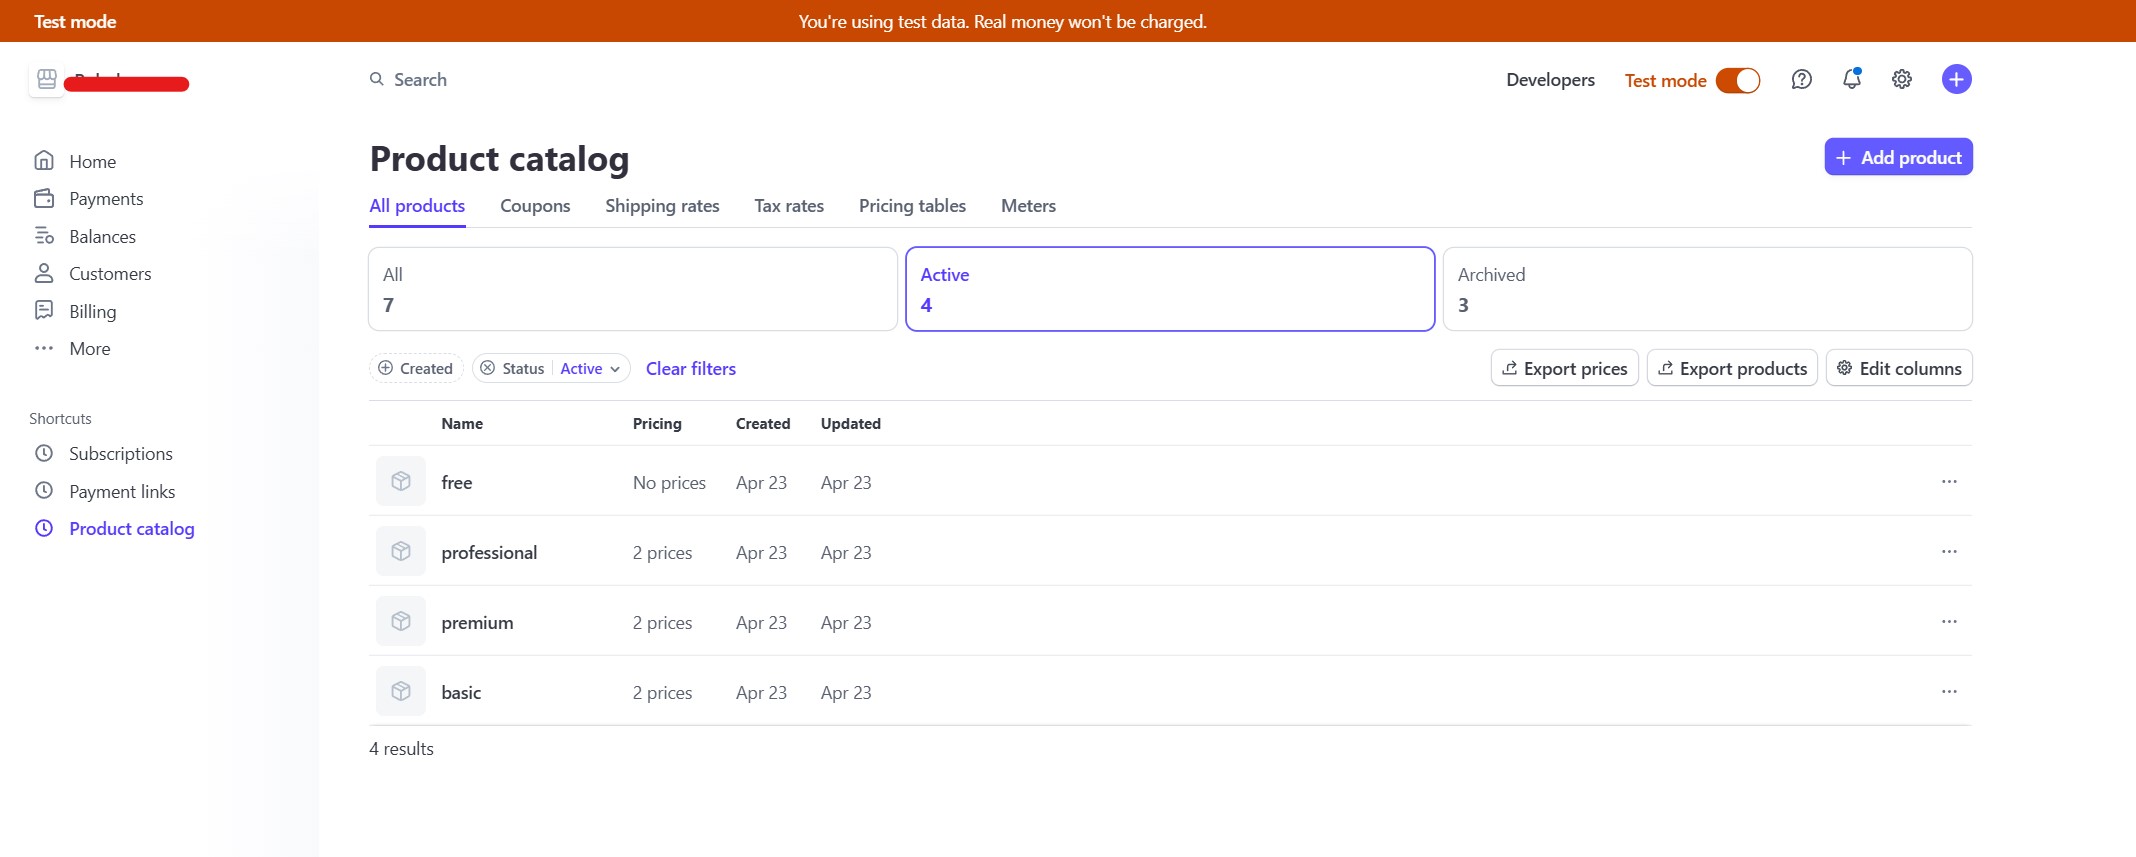
});You can verify the results by checking the Stripe Dashboard > Product catalog, as shown in the image below:
Payment Methods
Every customer can potentially have multiple payment methods. Stripe covers a wide variety of methods like cards, bank transfers, digital wallets, and others. In this article, we will cover the Card Payment method.
Create a Payment Method
Stripe provides the Setup Intent API for adding a payment method for future payments. This step doesn’t make a charge. After this step, the customer will have the newly created payment method in their profile.
The actual creation of the payment method will happen in JavaScript, but first, we have to create a SetupIntent (for a customer) using our IPaymentsGateway. This will provide us with a token that will be used by JavaScript to securely create the payment method for that particular customer.
On the JavaScript side, we will use the official JS library from Stripe (https://js.stripe.com/v3/). This library includes functionality for creating a payment method and provides all the HTML elements for collecting necessary data (like card number, expiration date, and more).
So, in the first step, we use the PrepareForFuturePaymentWithCustomerEmail() or PrepareForFuturePayment() method to create a SetupIntent object for Stripe and obtain a token that will be used in client side.
public async Task PrepareForFuturePaymentWithCustomerEmail(string customerEmail)
{
   var stripeCustomer = await this.GetCustomerByEmail(customerEmail);
   if (stripeCustomer == null)
      return null;
   FuturePaymentIntentModel intent = await PrepareForFuturePayment(stripeCustomer.Id);
   return intent;
}

public async Task PrepareForFuturePayment(string customerId)
{
   var options = new SetupIntentCreateOptions
   {
      Customer = customerId,
      Expand = new List()
      {
         "customer"
      }
   };

   var service = new SetupIntentService();
   var intent = await service.CreateAsync(options);

   return new FuturePaymentIntentModel()
   {
      Id = intent.Id,
      IntentSecret = intent.ClientSecret,
      Customer = new CustomerModel(intent.Customer.Id)
      {
         Email = intent.Customer.Email,
         Name = intent.Customer.Name,
         SystemId = intent.Customer.Metadata?.GetValueOrDefault("ID"),
      }
   };
}
An example usage could be in a Controller method like this:
public async Task<IActionResult> Index(string customerEmail)
{
   var customer = await _paymentsGateway.GetCustomerByEmail(customerEmail, PaymentModelInclude.PaymentMethods);
   ViewData["ClientSecret"] = (await _paymentsGateway.PrepareForFuturePayment(customer.Id)).IntentSecret;
   return View(customer);
}
On the client side, we first initialize the card element in HTML:
script
   var stripe = Stripe('your public API key here!!');
   var elements = stripe.elements();
   var cardElement = elements.create('card', {
      hidePostalCode: true,
      style: {
         base: {
            lineHeight: '38px',
            fontWeight: 300,
            fontSize: '15px',
         },
      }
   });
   cardElement.mount('#card-element');
/script
Finally, the confirmCardSetup JavaScript function will call Stripe to create the payment method.
script
var cardholderName = document.getElementById('cardholder-name');
var setupForm = document.getElementById('payment-setup-form');
var clientSecret = setupForm.dataset.secret;
setupForm.addEventListener('submit', function (ev) {
ev.preventDefault();
confirmCardSetup();
});
function confirmCardSetup() {
stripe.confirmCardSetup(
clientSecret,
{
payment_method: {
card: cardElement,
billing_details: {
name: cardholderName.value,
},
},
}
).then(function (result) {
if (result.error) {
// Display error.message in your UI.
} else {
// Payment method created.
location.reload();
}
});
}
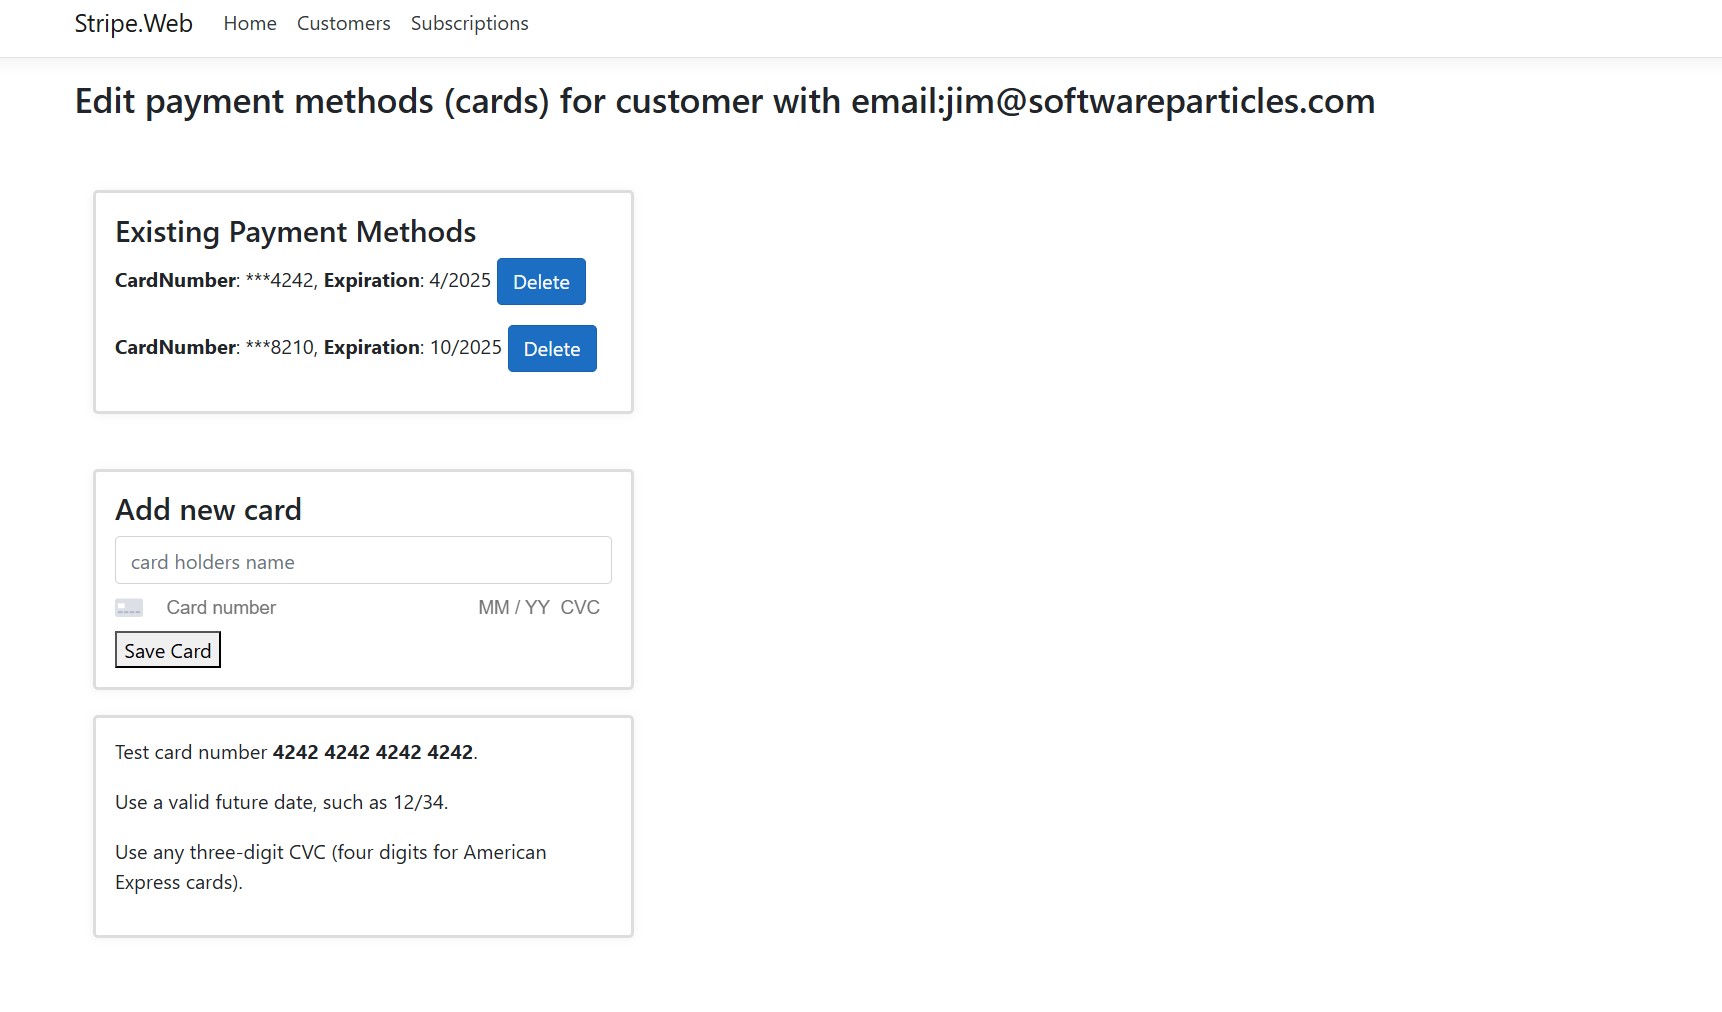
/scriptThe setupForm is a form in HTML that includes all the HTML elements related to card payment creation:
<h4>Add new card</h4>
<input id="cardholder-name" placeholder="card holders name" type="text">
<form id="payment-setup-form" data-secret='@ViewData["ClientSecret"]'>
   <div id="card-element"></div>
   <button id="card-button">
      Save Card
   </button>
</form>
As we can see above, we also use the ClientSecret token from backend. Now customers are ready to securely create and save card payment methods.
List Payment Methods
Similar to creating payment methods, we can also retrieve the payment methods of a customer. To do that, we can use the GetPaymentMethods or GetPaymentMethodsByCustomerEmail methods. Their implementation is shown below:
public async Task<List<PaymentMethodModel>> GetPaymentMethods(string customerId, PaymentMethodType paymentMethodType)
{
   var options = new PaymentMethodListOptions
   {
      Customer = customerId,
      Type = paymentMethodType.ToString().ToLower()
   };

   var service = new PaymentMethodService();
   var paymentMethods = await service.ListAsync(options);

   List<PaymentMethodModel> result = new List<PaymentMethodModel>();
   foreach (var stripePaymentMethod in paymentMethods)
   {
      if (!Enum.TryParse(stripePaymentMethod.Type, true, out PaymentMethodType currPaymentMethodType))
      {
         this._logger.LogError($"Cannot recognize PAYMENT_METHOD_TYPE:{stripePaymentMethod.Type}");
         continue;
      }

      PaymentMethodModel currentPaymentMethod = new PaymentMethodModel(stripePaymentMethod.Id)
      {
         Type = currPaymentMethodType
      };

      if (currPaymentMethodType == PaymentMethodType.Card)
      {
         currentPaymentMethod.Card = new PaymentMethodCardModel()
         {
            Brand = stripePaymentMethod.Card.Brand,
            Country = stripePaymentMethod.Card.Country,
            ExpMonth = stripePaymentMethod.Card.ExpMonth,
            ExpYear = stripePaymentMethod.Card.ExpYear,
            Issuer = stripePaymentMethod.Card.Issuer,
            Last4 = stripePaymentMethod.Card.Last4,
            Description = stripePaymentMethod.Card.Description,
            Fingerprint = stripePaymentMethod.Card.Fingerprint,
            Funding = stripePaymentMethod.Card.Funding,
            Iin = stripePaymentMethod.Card.Iin
         };
      }

      result.Add(currentPaymentMethod);
   }
   return result;
}

public async Task<List<PaymentMethodModel>> GetPaymentMethodsByCustomerEmail(string customerEmail, PaymentMethodType paymentMethodType)
{
   CustomerDto customer = await this.GetCustomerByEmail(customerEmail);

   return await this.GetPaymentMethods(customer.Id, paymentMethodType);
}
You can also view the payment methods of a customer from the Stripe Dashboard, as shown below:
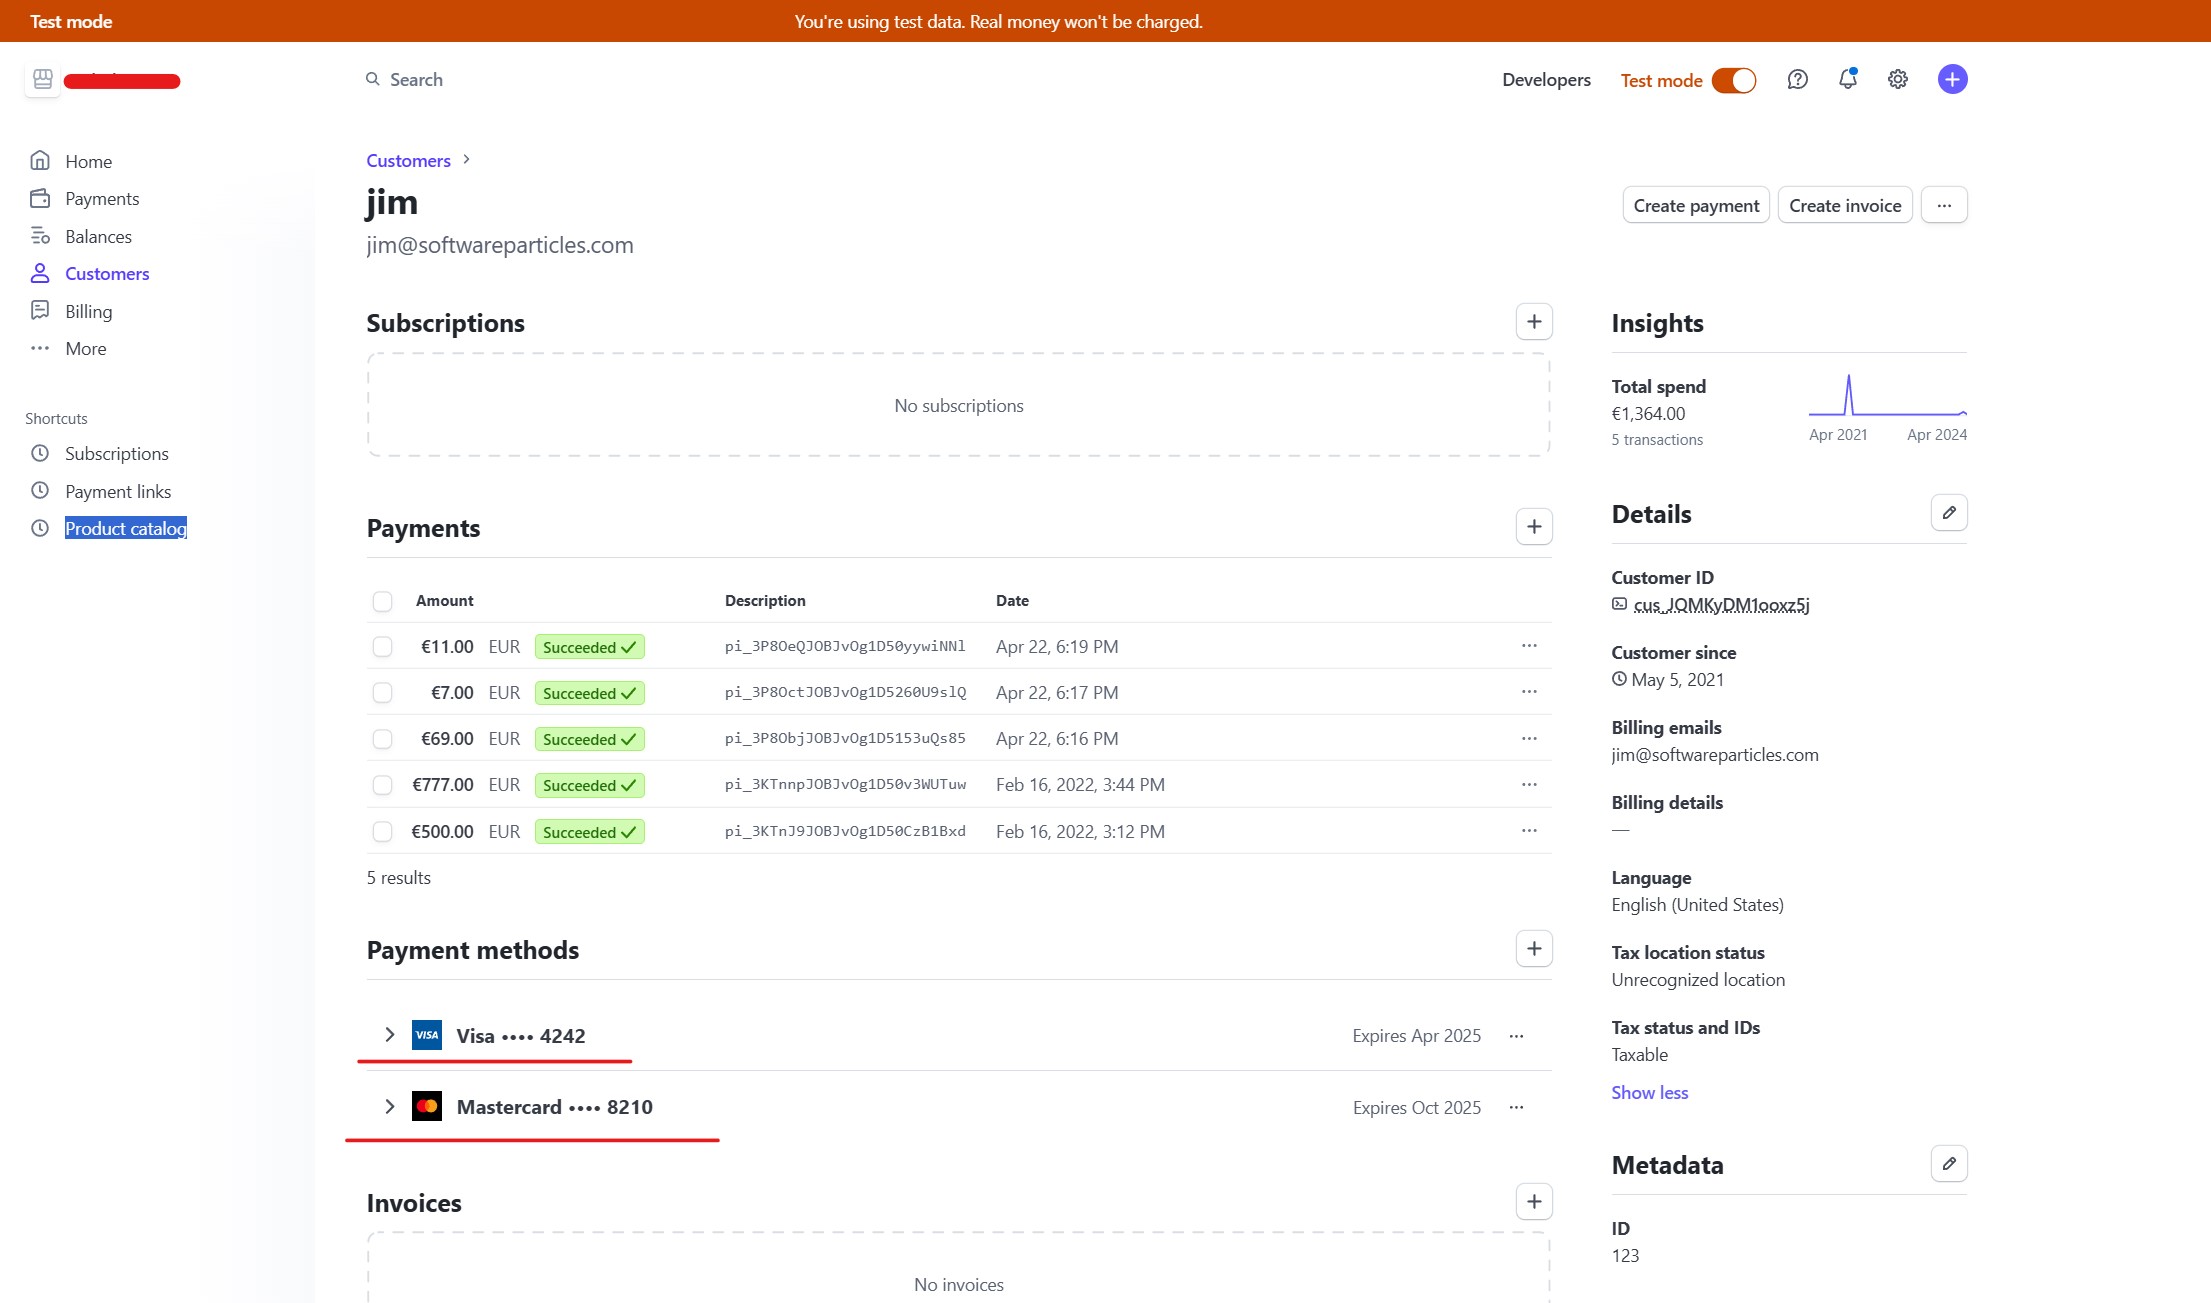
In the demo Web Application for this article in the /PaymentMethods page we can list and create payment methods for a particular customer as shown below:
Delete a Payment Method
The last functionality that we will implement for a Payment Method is to delete one. We can use the DeletePaymentMethod of the IPaymentsGateway interface to achieve that. Here’s the method’s implementation:
public async Task DeletePaymentMethod(string paymentMethodId)
{
   var service = new PaymentMethodService();
   var paymentMethod = await service.DetachAsync(paymentMethodId);
}
Subscription Creation
We can set up a subscription for a customer to enable them to use our products. Subscriptions come in different types. For example, we can have fixed price subscriptions, metered subscriptions which charge the customer based on usage, or Per-Seat subscriptions which charge the customer based on how many units of your product or service they purchased. In this article, we focus on fixed-price subscriptions as they are the most common.
To create a fixed-price subscription, we’ll use the CreateSubscription method from the IPaymentsGateway interface. The PriceId refers to the Plan’s pricing strategy.
public async Task<bool> CreateSubscription(string customerEmail, string priceId)
{
   var stripeCustomer = await this.GetCustomerByEmail(customerEmail);
   if (stripeCustomer == null)
      return false;
   var subscriptionOptions = new SubscriptionCreateOptions
   {
      Customer = stripeCustomer.Id,
      Items = new List
      {
         new SubscriptionItemOptions
         {
            Price = priceId,
         },
      },
   };
   subscriptionOptions.AddExpand("latest_invoice.payment_intent");
   var subscriptionService = new SubscriptionService();
   try
   {
      Subscription subscription = await subscriptionService.CreateAsync(subscriptionOptions);
      return true;
   }
   catch (StripeException e)
   {
      this._logger.LogError($"An error occured during creation of subscription for CUSTOMER:{stripeCustomer.Id} and PRICE:{priceId}, {e}");
      return false;
   }
}
Charge a Customer
To charge a customer, we need the email, currency, and amount. We can achieve this using the ChargeWithCustomerEmail() method.
public async Task ChargeWithCustomerEmail(string customerEmail, string paymentMethodId,
   Currency currency, long unitAmount,
   bool sendEmailAfterSuccess = false, string emailDescription = "")
{
   var customer = await GetCustomerByEmail(customerEmail);
   await Charge(customer.Id, paymentMethodId, currency,
      unitAmount, customerEmail, sendEmailAfterSuccess, emailDescription);
}

public async Task Charge(string customerId, string paymentMethodId,
    Currency currency, long unitAmount, string customerEmail,
    bool sendEmailAfterSuccess = false, string emailDescription = "")
{
   try
   {
      var service = new PaymentIntentService();

      var options = new PaymentIntentCreateOptions
      {
         Amount = unitAmount,
         Currency = currency.ToString().ToLower(),
         Customer = customerId,
         PaymentMethod = paymentMethodId,
         Confirm = true,
         OffSession = true,
         ReceiptEmail = sendEmailAfterSuccess ? customerEmail : null,
         Description = emailDescription,
      };

      await service.CreateAsync(options);
   }
   catch (StripeException e)
   {
      switch (e.StripeError.Type)
      {
         case "card_error":
            // Error code will be authentication_required if authentication is needed
            Console.WriteLine("Error code: " + e.StripeError.Code);
            var paymentIntentId = e.StripeError.PaymentIntent.Id;
            var service = new PaymentIntentService();
            var paymentIntent = service.Get(paymentIntentId);
            Console.WriteLine(paymentIntent.Id);
            break;
         default:
            break;
      }
   }
}
Stripe can automatically send a receipt to the customer after successfully completing the payment. You can customize this through Stripe dashboard, the receipt and invoice. Also, the email that is send upon failure can be configured here.
Webhooks
As seen in this article, we can make requests to Stripe, but Stripe can also call our application with various information such as when a customer is created or when a charge was successful. This is where Webhooks come into play.
We can configure the endpoints we want Stripe to call our application via Stripe Dashboard / Webhooks. Here we also configure which endpoints to call depending the event occurred. For example we might want all events related to a customer (customer.created, customer.deleted) to have a different endpoint than the charge events.


14 Comments
can i get the source code please
Hi Michael, I will upload it on github and I will let you know
Hi, Thanks . May I have the update notice for github ?
The source is on GitHub now.
https://github.com/dkokkinos/stripe-sample/blob/main/Stripe.Web/Services/IPaymentsGateway.cs
https://github.com/dkokkinos/stripe-sample/blob/main/Stripe.Web/Services/StripePaymentsGateway.cs
Please send github link.
Thank you for commenting! Yes I will
The source is on GitHub now.
https://github.com/dkokkinos/stripe-sample/blob/main/Stripe.Web/Services/IPaymentsGateway.cs
https://github.com/dkokkinos/stripe-sample/blob/main/Stripe.Web/Services/StripePaymentsGateway.cs
Hi Wally,
Thank you for your comment! Much appreciated, it gives me motivation to write more!
Hi brother,
The article was awesome. It helped me to understand and integrate Stripe for my University Project. Cleaner and more understandable code. Thank you so much!
Love from Srilanka.
Hi Akshayan, Glad to be of help!
Hi Dimitris
My customers live in different countries, so would like to charge them based on their currency, and also make it a recurring payment. So I’m struggling to integrate all stripe components like add price, plan, customer, subscription dynamically.
E.g customer 1 pay $3 every month, customer 2 pays £5 every second month..etc.
How can I achieve this goal?
I added the reference to Stripe.net, but my project doesn’t recognize the types used in the IPaymentGateway interface. Where are they defined?
For the Charge method of the interface, I don’t find any definition for it in the Stripe API documentation. The only currency I find in the documentation is an enum.
Sorry for all of these posts, but how on earth can I implement the Charge object when it has a property with the name “object”. Impossible in C#