In every application that allow users to supply input data, it is crucial to ensure that these data are submitted in the correct format, within the expected ranges, and aligned with any other rules we might apply. This process is known as input validation and in this article, we will explore how to implement input validation in ASP.NET Core MVC and Razor Pages. We will cover step-by-step how to implement both server-side and client-side validation, as well as custom validation and localization of error messages.
The code is available on GitHub
What you will learn
- What you will learn
- Introduction
- How ASP.NET Validation Works
- Applying Validation to a Class
- Defining Our Class Model and Creating the HTML Form In MVC
- Defining Our Model and Creating HTML Form In Razor Page
- Making a Property Required
- Define a Certain Length for a String Property
- Validate an Email Field
- Comparing two Fields
- Regex Validation
- Set a Minimum or Maximum Length for an Array
- Validate a Property Before Submitting the HTML Form – The Remote Attribute
- Method Parameter Validation
- Custom Validations
- Client side validation
- Custom Error messages
- Using Resource Files for Error Messages
- Localization
Introduction
Input validation is mandatory in every application that accepts user data. These data usually come from HTML forms in POST requests, URL parameters, cookie values, and more. Input values should always be considered untrusted, and proper validation should be applied before reaching critical business logic and the database. This enforces smooth operation of the application and reduces security risks such as SQL injection, cross-site scripting (XSS) and more.
In ASP.NET MVC, the build-in validation mechanism helps us validate user input both in server-side and client-side. While client-side validation is useful, server-side validation is essential because client-side validation can be bypassed as we will see later in the article. Users can create and send requests directly using various tools, such as Postman.
Creating the Project
To demonstrate the various forms of validations in MVC and Razor Pages, we will use a sample project developed explicitly for this purpose. We will develop the project incrementally, adding new validations along the way to cover all aspects and kinds of validation.
The project will be a web application that allow us to store and retrieve books. Each time we create a new book through a web form, various validations will take place on the book properties such as its name, ISBN, Author’s name and URL.
The final form of the project includes two pages to add new books: one using an MVC view and the other using a Razor Page. The final result will also include client-side validation and localized error messages.
First, create an ASP.NET Web Application using Visual Studio.
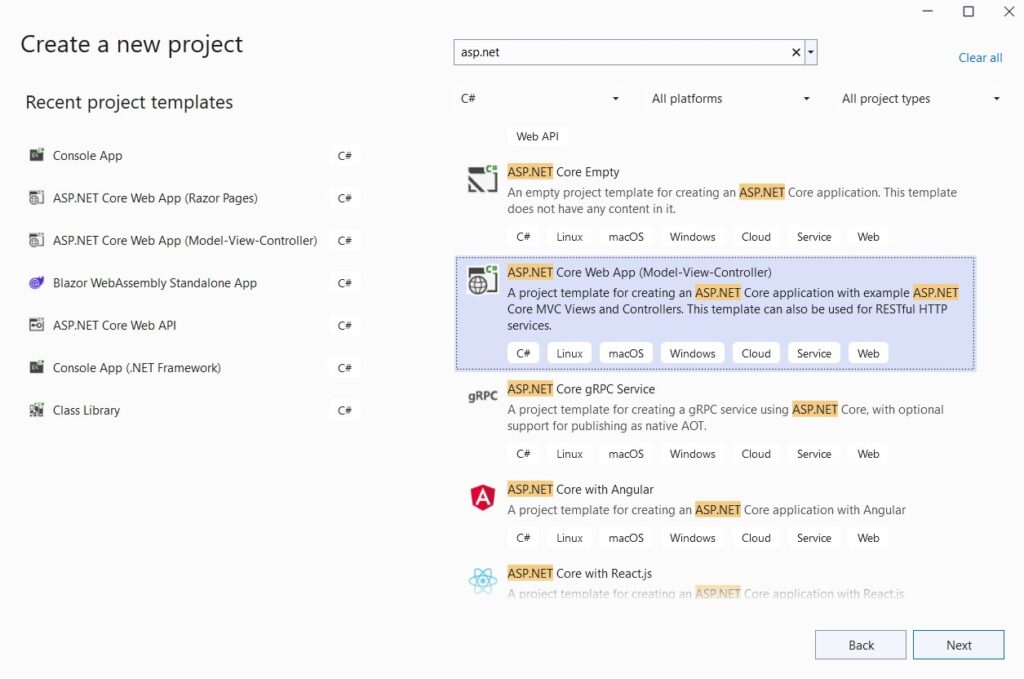
After setting a Project Name and other settings click ‘Next’ to create the project. The solution initially will look like below:

Using Razor Pages
To use Razor Pages in your project, follow these steps:
Create a Pages Folder
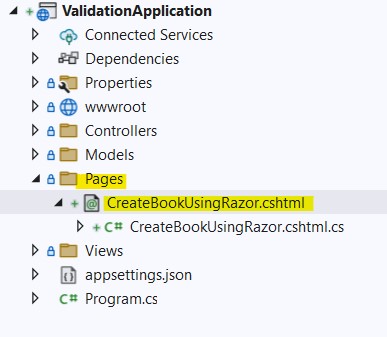
Create a folder named Pagesin the root of your project. Inside this folder, create a new Razor Page (Empty) named CreateBookUsingRazor.cshtml.
Unlike MVC Views, Razor Pages do not have a controller. Instead, requests are handled using actions defined in the code-behind file of the Razor Page.
Update Startup.cs
Finally, we need to update the Startup.cs file to configure the application to use Razor Pages.
public void ConfigureServices(IServiceCollection services)
{
    services.AddControllersWithViews();
    services.AddRazorPages(); // Makes the Razor Pages available.
}

public void Configure(IApplicationBuilder app, IWebHostEnvironment env)
{
   ...

   app.UseEndpoints(endpoints =>
   {
      endpoints.MapControllerRoute(
         name: "default",
         pattern: "{controller=Home}/{action=Index}/{id?}");

         // Adds endpoints for Razor Pages.
         endpoints.MapRazorPages();
     });
}
Add Razor Tag Helpers
Razor Tag Helpers makes it easier to create and render HTML elements from the server in Razor files.
Enable Tag Helpers
To enable Tag Helpers in all Razor Pages, create a _ViewImports.cshtml file inside the Pages folder. Add the following code to this file:
@addTagHelper *, Microsoft.AspNetCore.Mvc.TagHelpersSpecify Layout for Razor Pages
If you want to specify a layout for all Razor Pages, create a _ViewStart.cshtml file in the Pages folder and add the following code:
@{
   Layout = "_Layout";
}
How ASP.NET Validation Works
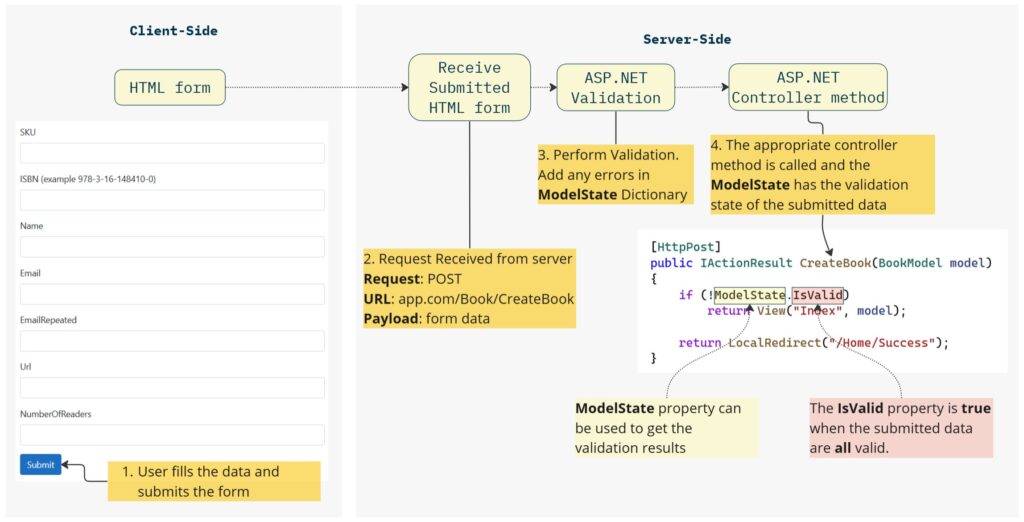
Each time a request is made from the client, such as through an HTML form, a controller method in MVC or a Page Handler method in Razor is called. At that point, we can use the ModelState property to check for any validation errors.
ASP.NET has a pipeline through which each request passes, with validation being one of the key steps. Before the request reaches the controller method or Razor Page handler, the input data is already validated automatically by ASP.NET.
Below, we illustrate the ASP.NET pipeline steps, the filters that are applied when a request is arrived in server. One of those steps, highlighted is when the model validation is take place. This is the server-side validation, as the client-side is done separately in client. In that step is where the ModelState dictionary is filled with all validation errors might occur.
ModelState
ModelState is a dictionary that contains all validation errors gathered automatically by the ASP.NET framework. Before the request reaches the controller method (or Razor Page handler), ASP.NET has already validated the input data and added any errors found into the ModelState dictionary. These errors can be localized and used for further processing within the controller method.
Below is an overview of how validation is performed by ASP.NET:
Specify Validation Rules Using Validation Attributes
The core mechanism of ASP.NET validation revolves around Validation Attributes. These are Data Annotations that inherit from the abstract ValidationAttribute class and can be applied to various properties of a class that we want to validate.
There are many build-in validation attributes available, and we can also create our own or extend existing ones to enhance their functionality. The table below shows the build-in validation attributes, which will be explored in detail in later sections:
| Validation Attribute | Description |
|---|---|
| Required | Ensures the property always has a value. This attribute is optional in non-nullable properties such as DateTime because a null value is not allowed. |
| StringLength | Specifies the minimum and maximum number of characters a string property can have. The minimum argument is optional. |
| Remote, PageRemote | These attributes are used to validate a single property in server-side every time a new value is supplied on the client-side. A POST request is done asynchronously (using AJAX), providing the supplied value to the server for further validation. Remote is used in MVC, and PageRemote is used in Razor Page Models. |
| EmailAddress | Ensures the string property contains a valid email format. |
| Url | Ensures the property has a valid URL format. |
| Range | Ensures that numeric properties (such as int and decimal) fall within a specified minimum and maximum range. |
| RegularExpression | Validates that the property value matches a specified regular expression. |
| MinLength, MaxLength | Validates the provided property has a minimum length ( or is less than a maximum length). Works for arrays and strings. |
| Compare | Compares the value of the property to another property’s value, useful for confirming inputs like email addresses. |
These built-in Validation Attributes provided by ASP.NET cover a wide range of validation needs. For additional requirements, you can extend existing ValidationAttributes or create custom ones by inheriting from ValidationAttribute. These attributes also support custom error messages and localization, which will be discussed in the next sections.
Applying Validation to a Class
To apply validation attributes and specify validation rules for properties, we first need to define our model. The model can be a class with properties, similar to a DTO (Data Transfer Object). In this article, we’ll build an application that can create and store books, so first we’ll create the appropriate Book class.
Our model will be mapped to an HTML form with the help of ASP.NET tags, as we will see later, First, let’s define the Book class with its properties listed below:
| Property Name | Description |
|---|---|
| ISBN | A unique identifier for the Book. |
| Name | The name of the Book (e.g. It). |
| AuthorName | The name of the author. |
| An email associated with the book, for sending questions or suggestions. | |
| EmailRepeated | A duplicate of the email to ensure the user has provided it correctly. |
| Description | A description of the book. |
| Url | The URL of the book, where more information or updates can be found. |
| Genres | List of strings, representing the genres the book belongs to. |
| NumberOfPages | The number of pages in the book. |
For each property, we will apply one or more validations using build-in validation attributes and custom validations where necessary.
Defining Our Class Model and Creating the HTML Form In MVC
In MVC we can have the model in a separate C# class located in the Models folder of our project. The BookModel.cs class is show below:
public class BookModel
{
   public string ISBN { get; set; }

   public string Name { get; set; }

   public string AuthorName { get; set; }

   public string Email { get; set; }

   public string EmailRepeated { get; set; }

   public string Description { get; set; }

   public List<string> Genres { get; set; } = new List<string>();

   public string Url { get; set; }

   public int NumberOfPages { get; set; }
}
Next, inside the Views folder, we create a Book subfolder and an Index.cshtml View inside it. This View will map our model to an HTML form, automatically collect user data, and submit them to the server. Below is the HTML of the form with input fields for each model property:
<form asp-action="CreateBook" method="post">
    <div asp-validation-summary="All"></div>
    <div class="mb-3">
        <label for="book_isbn" class="form-label">ISBN (example 978-3-16-148410-0)</label>
        <input id="book_isbn" asp-for="ISBN" class="form-control">
        <span asp-validation-for="ISBN"></span>
    </div>
    <div class="mb-3">
        <label for="book_name" class="form-label">Name</label>
        <input id="book_name" asp-for="Name" class="form-control">
        <span asp-validation-for="Name"></span>
    </div>
    <div class="mb-3">
        <label for="book_authorname" class="form-label">Author's Name</label>
        <input id="book_authorname" asp-for="AuthorName" class="form-control">
        <span asp-validation-for="AuthorName"></span>
    </div>
    <div class="mb-3">
        <label for="book_email" class="form-label">Email</label>
        <input id="book_email" asp-for="Email" class="form-control">
        <span asp-validation-for="Email"></span>
    </div>
    <div class="mb-3">
        <label for="book_email" class="form-label">EmailRepeated</label>
        <input id="book_email" asp-for="EmailRepeated" class="form-control">
        <span asp-validation-for="EmailRepeated"></span>
    </div>
    <div class="mb-3">
        <label for="book_description" class="form-label">Description</label>
        <input id="book_description" asp-for="Description" class="form-control">
        <span asp-validation-for="Description"></span>
    </div>
    <div class="mb-3">
   <label class="form-label">Genres</label>
       <select asp-for="Genres" asp-items="Model.GenreCollection" class="form-control"></select>
       <span asp-validation-for="Genres"></span>
    </div>
    <div class="mb-3">
        <label for="book_url" class="form-label">Url</label>
        <input id="book_url" asp-for="Url" class="form-control">
        <span asp-validation-for="Url"></span>
    </div>
    <div class="mb-3">
        <label for="book_numberofpages" class="form-label">NumberOfPages</label>
        <input id="book_numberofpages" asp-for="NumberOfPages" class="form-control">
        <span asp-validation-for="NumberOfPages"></span>
    </div>
    <button type="submit" class="btn btn-primary" asp-action="CreateBook">Submit</button>
</form>
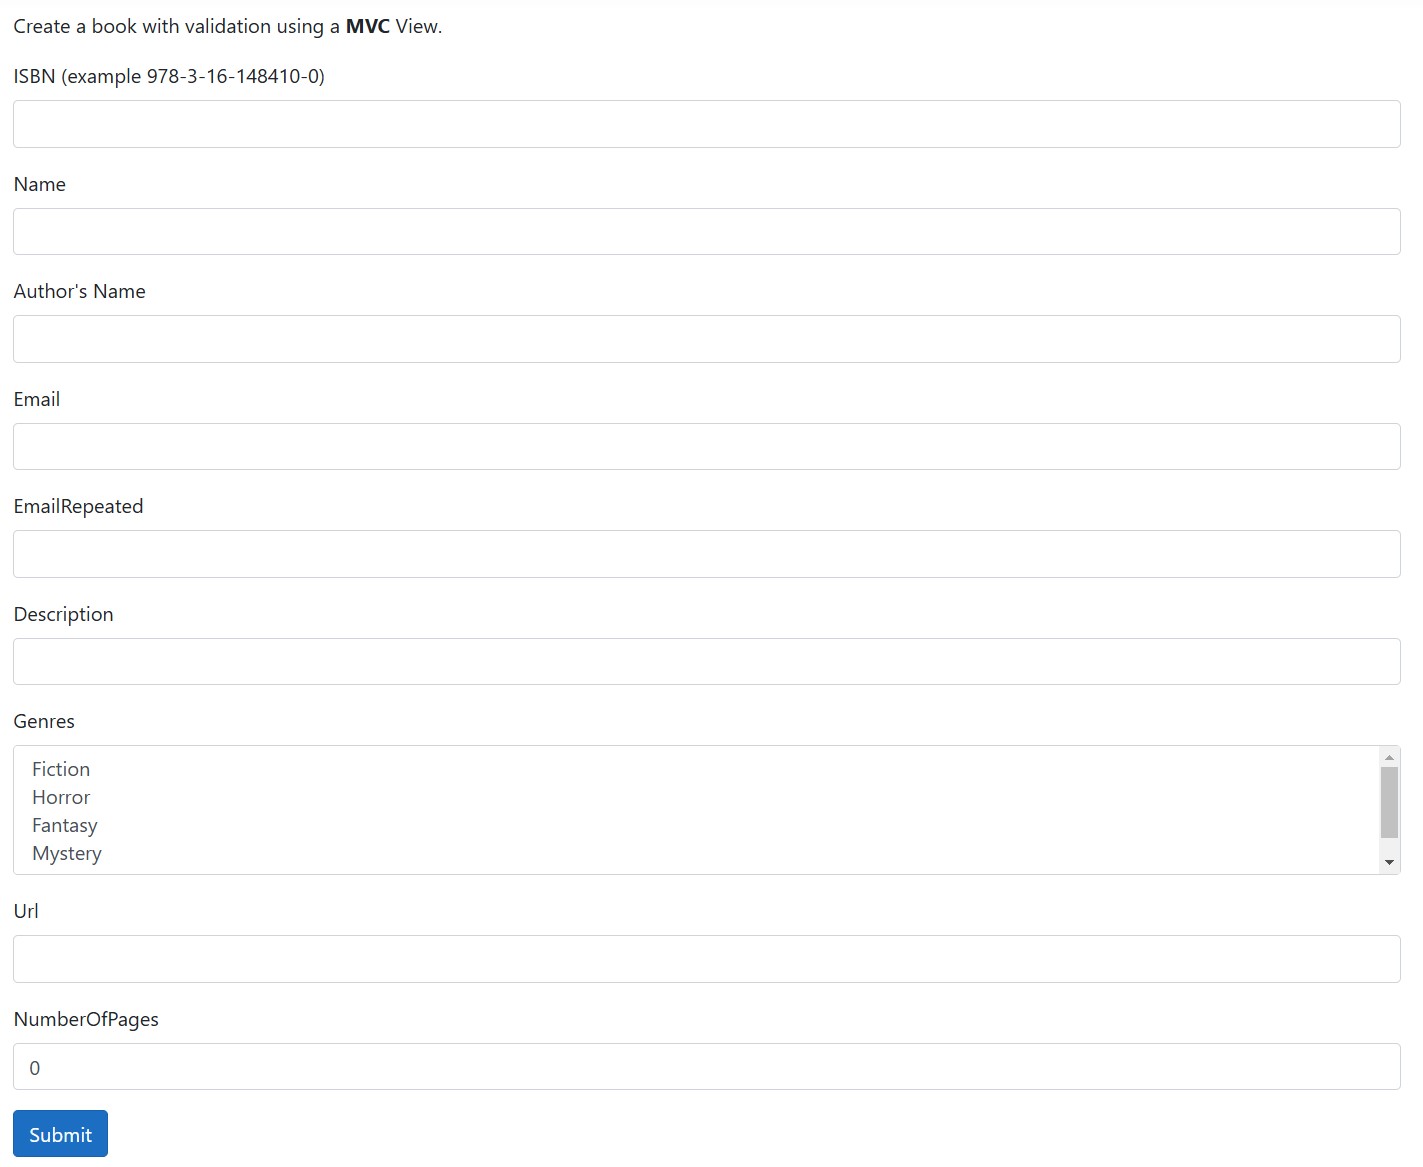
The rendered HTML form will look like this:
The <form> tag contains the asp-action tag, which specifies the action that will be triggered when the form is submitted. In this case, the CreateBook action of the BookController on server-side will be triggered.
For each HTML input, we use the asp-for tag and provide a property of the BookModel. This way, ASP.NET can understand which property the input is associated with, enabling data binding when the user submits the form.
Finally, notice the use of the asp-validation-for Razor tag helper. This is responsible for displaying validation errors for the corresponding field. Additionally, the asp-validation-summary=”All” will render all validation errors inside the div.
Defining Our Model and Creating HTML Form In Razor Page
In Razor Pages, we create a CreateBookUsingRazor.cshtml file in the Pages folder (if you don’t have already).
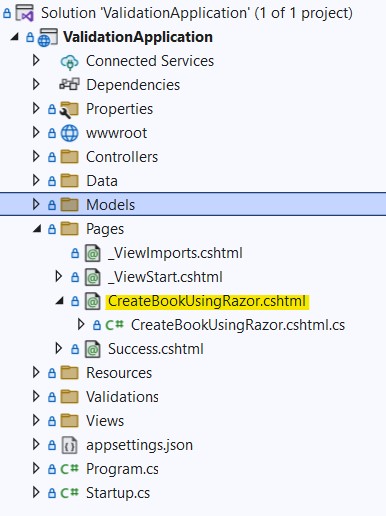
Each Razor Page has its code in a corresponding .cshtml.cs file. In the code behind file (cshtml.cs), we can set the properties of our model or reference one or multiple classes that contain the appropriate properties. To keep things separated from the MVC part, we’ll use a separate class for our Razor Page. We’ll create a RazorBookModel.cs class that has the same properties as the BookModel class used in MVC.
Next, we define a RazorBookModel property in the CreateBookUsingRazorModel.cshtml.cs as shown below:
public class CreateBookUsingRazorModel : PageModel
{
   // The model used in the HTML form.
   public RazorBookModel Book { get; set; }

   public void OnGet() { }

   // This method will be called when the user submits the form.
   public async Task<IActionResult> OnPostBook(RazorBookModel bookModel)
   {
      if (ModelState.IsValid)
      {
         return RedirectToPage("Success");
      }
      return Page();
   }
}
Finally, in CreateBookUsingRazorModel.cshtml, we use the asp-for tag to bind the properties of the model to the HTML. Unlike in MVC views, the HTML form tag in Razor Pages uses the asp-page and asp-page-handler attributes. The asp-page attribute specifies the page the submit request will reach, and the asp-page-handler attribute specifies the method of that page to be triggered. In our case, the page is CreateBookUsingRazor, and the asp-page-handler is Book. The OnPost, OnGet etc., prefixes in the methods are used by convention to define the verb of the request (GET, POST etc.).
<form asp-page="/CreateBookUsingRazor" asp-page-handler="Book" method="post">
    <div asp-validation-summary="All"></div>
    <div class="mb-3">
        <label class="form-label">ISBN (example 978-3-16-148410-0)</label>
        <input asp-for="Book.ISBN" class="form-control">
        <span asp-validation-for="Book.ISBN"></span>
    </div>
    <div class="mb-3">
        <label class="form-label">Name</label>
        <input asp-for="Book.Name" class="form-control">
        <span asp-validation-for="Book.Name"></span>
    </div>
    @*the rest of the properties. Similar with MVC View*@
    <button type="submit" class="btn btn-primary">Submit</button>
</form>
The asp-validation-for tag is used the same way as in MVC to display validation errors for each field. The asp-validation-summary=”All” attribute renders all validation errors inside the div.
BindProperty
In Razor Pages, we can use the BindProperty attribute to map properties in the PageModel to data from the HTML form automatically. This eliminates the need for method parameters to handle form data. For example, we can remove the RazorBookModel parameter in the OnPostBook method and use the BindProperty attribute on the Book property instead.
public class CreateBookModel : PageModel
{
   // The model used in the HTML form.
   [BindProperty] // This attribute maps properties of the Book model with the HTML form data.
   public RazorBookModel Book { get; set; }

   public void OnGet() { }

   // This method is called when the user submits the form.
   public async Task<IActionResult> OnPostBook()
   {
      // All properties of the Book model are filled.
      if (ModelState.IsValid)
      {
         return RedirectToPage("Success");
      }
      return Page();
   }
}
Making a Property Required
A common requirement is to make certain properties mandatory. In our model, properties like Name and AuthorName must be required. We achieve this by using the Required attribute, as shown below:
public class BookModel
{
   [Required]
   public string ISBN { get; set; }

   [Required]
   public string Name { get; set; }

   [Required]
   public string AuthorName { get; set; }

   [Required]
   public string Email { get; set; }

   [Required]
   public string EmailRepeated { get; set; }

   public string Description { get; set; }

   public string Url { get; set; }

   public int NumberOfPages { get; set; }
}
Result
When a required field is not provided, the Required attribute generates an automatic error message like ‘The Name field is required.’
The text ‘The Name field is required’ is automatically generated by ASP.NET and can be customized, which will be explained in later sections.
The Required attribute works the same way in MVC and Razor Pages.
Define a Certain Length for a String Property
To specify a range for the number of characters a string can have, we use the StringLength validation attribute. This attribute has two properties, minimumLength and maximumLength. For example, we want the Name of a Book to be between 2 and 30 characters long:
public class BookModel
{
   [Required]
   public string ISBN { get; set; }

   [Required]
   [StringLength(maximumLength: 30, MinimumLength = 2)]
   public string Name { get; set; }

   // Other properties...
}
Result
If the form is submitted with the Name field containing a string outside the specified length range, an error message will be displayed.
The StringLength attribute works the same way in MVC and Razor Pages.
Validate an Email Field
To validate an email field, we can use the built-in EmailAddress validation attribute in ASP.NET. This attribute checks whether a property contains a valid email format.
public class BookModel
{
   [Required]
   public string ISBN { get; set; }

   // Other properties...

   [Required]
   [EmailAddress]
   public string Email { get; set; }

   // Other properties...
}
Result
If an invalid email address is provided, an error message will be displayed.

The EmailAddress attribute works the same way in MVC and Razor Pages.
Comparing two Fields
To ensure the user types the same email in both the Email and EmailRepeated fields, we can use the Compare attribute. This attribute compares two fields to check if they are equal. We place the attribute on the EmailRepeated property and specify the name of the property we want to compare it with:
[Required]
[EmailAddress]
[Compare("Email")]
public string EmailRepeated { get; set; }
Result
If the emails are in the correct format but do not match, an error message will be displayed.

The Compare attribute works the same way in both MVC and Razor Pages.
Regex Validation
Currently, we only check if the user has provided a value for the ISBN field. To also validate the format of the supplied ISBN, we can use the RegularExpression attribute and specify a regex pattern. The following regex pattern validates an ISBN code. We can add this attribute to the ISBN property in the BookModel:
[Required]
[RegularExpression("^(?:ISBN(?:-13)?:?\\ )?(?=[0-9]{13}$|(?=(?:[0-9]+[-\\ ]){4})[-\\ 0-9]{17}$)97[89][-\\ ]?[0-9]{1,5}[-\\ ]?[0-9]+[-\\ ]?[0-9]+[-\\ ]?[0-9]$")]
public string ISBN { get; set; }
Result
Running the application and providing an invalid ISBN code will display an error message.
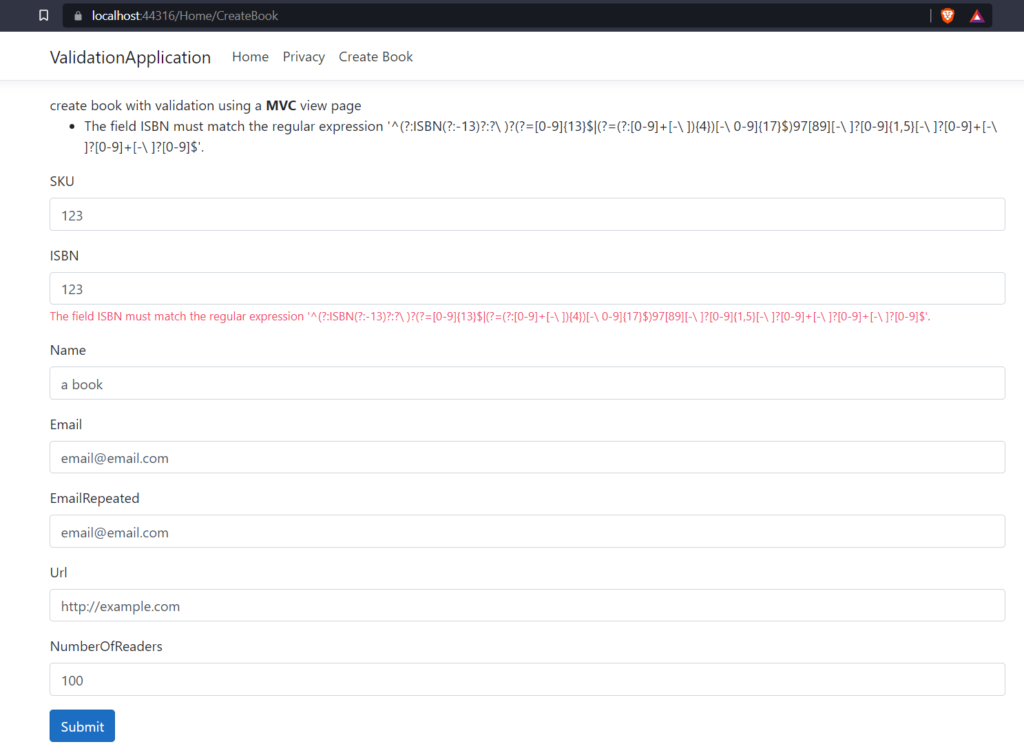
The RegularExpression attribute works the same way in both MVC and Razor Pages.
The default error message generated by ASP.NET for the Regex attribute may not be user-friendly, but we can customize validation messages, which we will explore in later sections.
Set a Minimum or Maximum Length for an Array
Similar to the StringLength validation attribute for strings, the MinLength and MaxLength attributes can be used to define a minimum and maximum number of items in an array. For example, the Genres property of the BookModel can be validated to ensure it has between 1 and 10 items:
[MinLength(1)]
[MaxLength(10)]
public List<string> Genres { get; set; }
Result
If no genres are selected or if the number of selected genres exceeds 10, an error message will be displayed.

The MinLength and MaxLength work the same way in both MVC and Razor Pages.
Validate a Property Before Submitting the HTML Form – The Remote Attribute
In some cases, client-side validation isn’t possible because we lack the necessary information, which is only available on the server. However, we still want to provide users with quick feedback about specific field values without requiring them to fill out the entire form and submit it. The Remote and PageRemote attributes in MVC and Razor Pages enable us to make server-side validation requests through AJAX for specific properties.
Below, we illustrate how ASP.NET handles these requests when a field is filled and validated via the appropriate controller method.

For example, on the client side, we might not know if the ISBN we are typing already exists, but the server does. We want to provide this information before the user submits the form providing a better user experience.
Implementation in MVC
In MVC, the Remote validation attribute is used for this purpose, as shown below:
[Required]
[Remote(action:"BookExists", controller:"Book")]
public string ISBN { get; set; }
In the attribute, we specify which controller and which action to use for the AJAX call. The actions exists in the controller:
public class BookController : Controller
{
   private readonly BookDbContext _dbContext;

   public BookController(BookDbContext dbContext)
   {
      _dbContext = dbContext;
   }

   public async Task<IActionResult> BookExists(string isbn)
   {
      if (ModelState.IsValid)
      {
         var isbnAlreadyExists = _dbContext.Books.Any(x=>x.ISBN == isbn);
         if (isbnAlreadyExists)
            return Json("The ISBN already exists");
         else
            return Json(true);
      }
      return Json("invalid ISBN");
   }

}
The Json(true) result indicates success, while any other message will cause the UI to display the provided error.
Implementation in Razor
In Razor Pages, we use the PageRemote attribute, similar to the Remote attribute in MVC. In the PageRemote attribute, we specify the PageHandler for the AJAX request, along with the HTTP method (POST, GET etc.) and some additional fields. In our example, we define a method called OnPostCheckISBN that receives the ISBN as a string parameter to check if a book with same ISBN already exists in the database.
public class CreateBookUsingRazorModel : PageModel
{
   private readonly BookDbContext _dbContext;

   public CreateBookUsingRazorModel(BookDbContext dbContext)
   {
      _dbContext = dbContext;
   }

   [BindProperty]
   public RazorBookModel Book { get; set; }

   [BindProperty]
   [Required]
   [PageRemote(HttpMethod = "post",
      AdditionalFields = "__RequestVerificationToken",
      PageHandler = "CheckISBN")]
   public string ISBN { get; set; }

   public JsonResult OnPostCheckISBN(string isbn)
   {
      var isbnAlreadyExists = _dbContext.Books.Any(x => x.ISBN == isbn);
      if (isbnAlreadyExists)
         return new JsonResult("The ISBN already exists");
      else
         return new JsonResult(true);
   }
}
We cannot have a nested property with a Remote attribute in Razor Page. Here’s why:
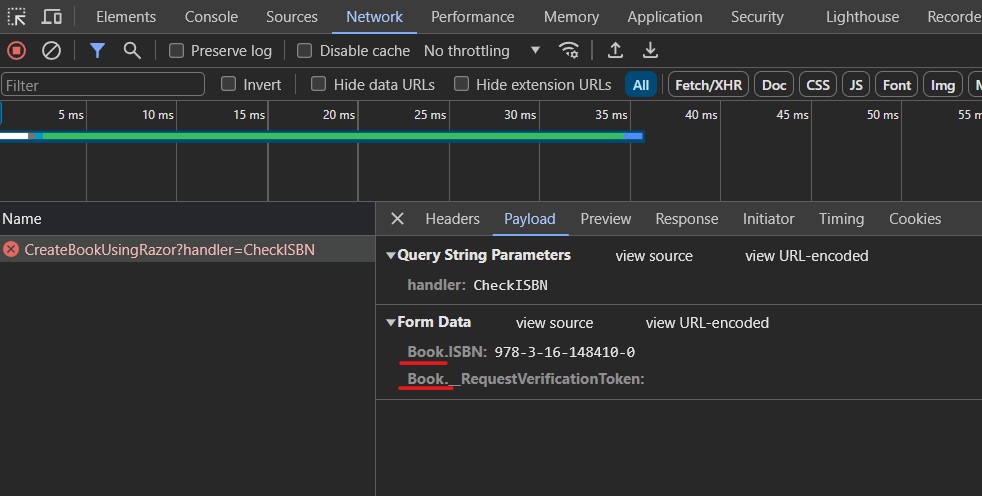
The ISBN property is placed at the root of the CreateBookUsingRazorModel to ensure that properties and the __RequestVerificationToken are mapped correctly without the ‘Book’ prefix that would be present if the ISBN were inside the RazorBookModel.
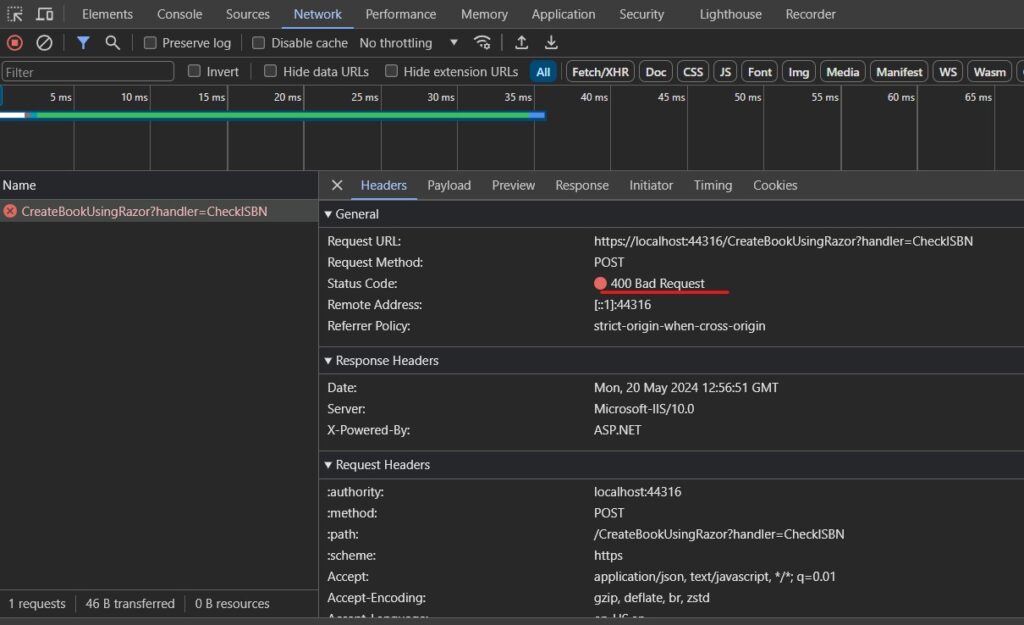
If the ISBN were a nested property (inside the RazorBookModel), the asp-for tag helper would generate a form field with a ‘Book’ prefix. The prefix would also apply to all fields listed in the AdditionalFields, including the __RequestVerificationToken. As a result, the request verification token would not be found, resulting to a 400 error and a failed request.
You can observe this behavior using developer tools in Chrome or any other browser:
When the ISBN property is nested within RazorBookModel, every request parameter in the payload gets the ‘Book’ prefix, causing issues with the request verification token and resulting in a 400 Bad Request error:
Method Parameter Validation
In addition to applying validation attributes to properties of a class, we can also apply these attributes to method parameters. For example, we can enhance the validation of the method that checks if a book already exists by its ISBN. In the BookExists method of the BookController, we can validate the isbn parameter by adding the RegularExpression validation attribute:
public async Task<IActionResult> BookExists(
   [RegularExpression("^(?:ISBN(?:-13)?:?\\ )?(?=[0-9]{13}$|(?=(?:[0-9]+[-\\ ]){4})[-\\ 0-9]{17}$)97[89][-\\ ]?[0-9]{1,5}[-\\ ]?[0-9]+[-\\ ]?[0-9]+[-\\ ]?[0-9]$"),
   BindRequired,
   FromQuery] string isbn)
{
   if (ModelState.IsValid)
   {
      // check if book exists
      return Ok();
   }
   throw new ArgumentException("Invalid ISBN number");
}
In this example, BindRequired indicates that the parameter is required, and FromQuery specifies that the parameter will be in the URL query string. The RegularExpression attribute ensures that the isbn parameter conforms to the same pattern used in the BookModel ISBN property.This approach allows us to apply the same validation rules to both a model property and a controller method’s parameter easily.
Custom Validations
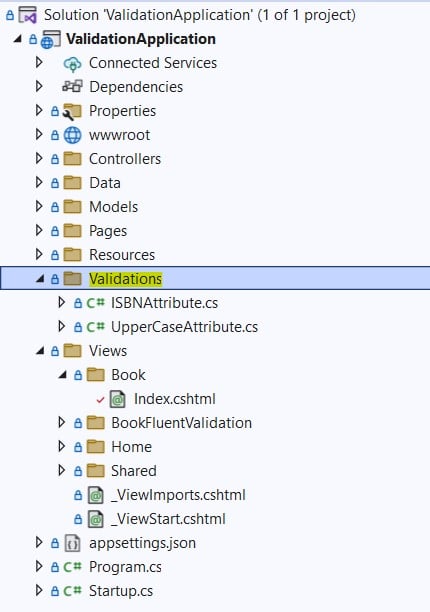
Creating custom validation attributes allows us to implement validations that are not achievable with built-in attributes. By defining our own custom validation attributes, we can apply them across various properties in our models. We will place all custom validation attributes inside a folder named Validations in the root of the project.
ISBN Attribute
First, let’s create a validation attribute for validating the ISBN of a book. We encapsulate the ISBN validation logic within a class named ISBNAttribute:
public class ISBNAttribute : RegularExpressionAttribute
{
   public ISBNAttribute() : base("^(?:ISBN(?:-13)?:?\\ )?(?=[0-9]{13}$|(?=(?:[0-9]+[-\\ ]){4})[-\\ 0-9]{17}$)97[89][-\\ ]?[0-9]{1,5}[-\\ ]?[0-9]+[-\\ ]?[0-9]+[-\\ ]?[0-9]$")
   {
      ErrorMessageResourceType = typeof(ValidationMessages);
      ErrorMessageResourceName = "ISBN";
   }
}
We inherit from RegularExpressionAttribute because ISBNAttribute is essentially a specialized regular expression attribute for ISBNs. The regex pattern ensures the input conforms to ISBN standards.
We can now replace the RegularExpression attribute on the ISBN property with our custom ISBNAttribute:
[Required]
[ISBN]
public string ISBN { get; set; }
This makes the model clearer and allows the ISBN attribute to be reused in other models as well. No other changes are necessary because the ISBNAttribute does not have custom validation logic.
Uppercase Attribute
Next, we need an attribute to ensure that the name of the book starts with an uppercase letter. For this, we create a new UpperCaseAttribute class in the Validations folder:
public class UpperCaseAttribute : ValidationAttribute
{
   public UpperCaseAttribute()
      : base("Must start with upper case.") { }

   public override bool IsValid(object value)
   {
      if(value is string str)
      {
         return str.Substring(0, 1) == str.Substring(0, 1).ToUpper();
      }
      throw new ArgumentException("The value is not a string.");
   }
}
We inherit from ValidationAttribute and override the IsValid method to implement our custom validation logic.
Each ValidationAttribute takes in its constructor the custom error message it should display in case of a validation error. For the UpperCaseAttribute, the “Must start with upper case.” string is provided for this purpose.
Now, we can apply this attribute to the Name property of the BookModel like this:
[Required]
[StringLength(maximumLength: 30, MinimumLength = 2)]
[UpperCase]
public string Name { get; set; }
Client side validation
ASP.NET provides JavaScript files for client-side validation. To use them, simply import these files in the Layout page (or another appropriate location based on your needs):
<scrip src="~/lib/jquery-validation/dist/jquery.validate.min.js">
<scrip src="~/lib/jquery-validation-unobtrusive/jquery.validate.unobtrusive.min.js">
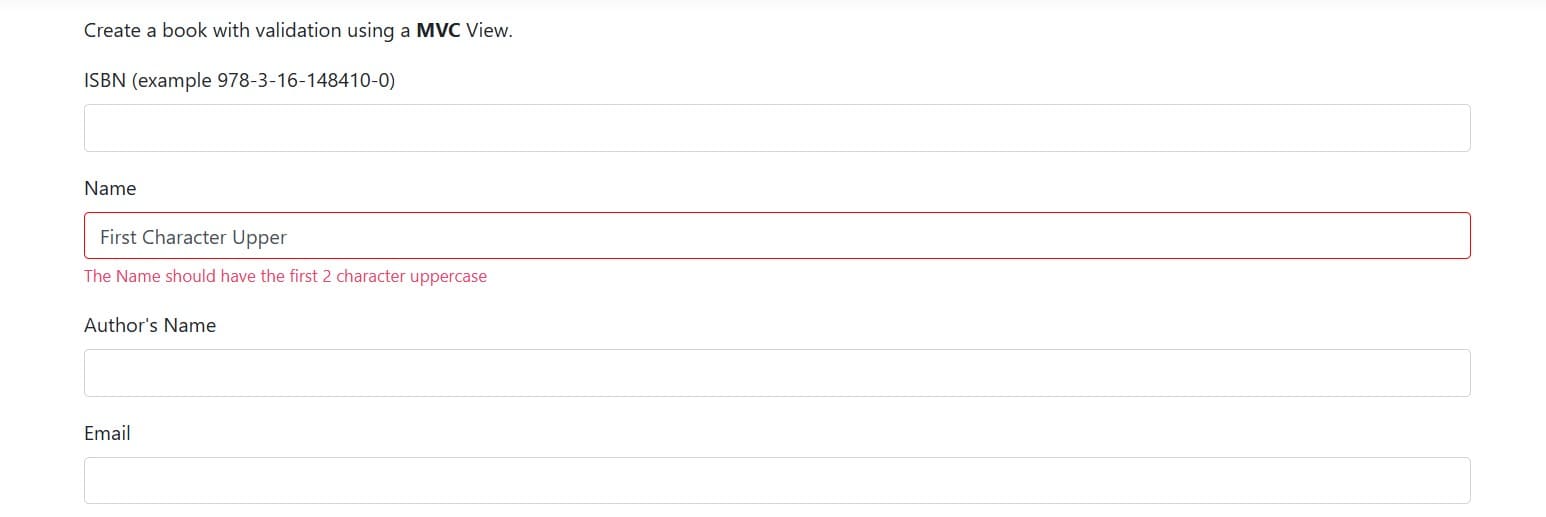
Once imported, running the application will enable validations to execute and display error messages without submitting the form.
All build-in validation attributes and custom attributes that extend from them will work on the client side without additional configuration. However, custom validations with their own logic, like UpperCaseAttribute, require further changes to function on the client-side.
To make UpperCaseAttribute work on client-side, we need to implement the IClientModelValidator interface and provide the ClientModelValidationContext with attributes that will be rendered in HTML and used by JavaScript.
public class UpperCaseAttribute : ValidationAttribute, IClientModelValidator
{
   public UpperCaseAttribute()
   {
      ErrorMessage = "Must start with upper case.";
   }

   public void AddValidation(ClientModelValidationContext context)
   {
      context.Attributes.Add("data-val", "true");
      context.Attributes.Add("data-val-uppercase", ErrorMessage);
   }

   public override bool IsValid(object value)
   {
      if(value is string str)
      {
         return str.Substring(0, 1) == str.Substring(0, 1).ToUpper();
      }
      throw new ArgumentException("value is not a string.");
   }
}
The data-val attribute must be true to enable client-side validation for this validation attribute. The ErrorMessage is assigned to data-val-uppercase for use by JavaScript.
Next, we need the validation logic in JavaScript. For this purpose, we create a new JavaScript file named site.js, import it in the _Layout.cshtml, and add the validation logic for the UpperCaseAttribute:
$.validator.addMethod('uppercase', function (value, element, params) {
    return value[0] === value[0].toUpperCase();
});

$.validator.unobtrusive.adapters.addBool("uppercase");
Adding Parameters to Attributes
To modify the UpperCaseAttribute to validate that the first N letters are uppercase, not just the first, we will introduce a new parameter for the attribute. This requires changes both in the attribute class and in the client-side validation logic.
First, update the UpperCaseAttribute class:
public class UpperCaseAttribute : ValidationAttribute, IClientModelValidator
{
   private readonly int _startingUpperCaseCharacters;

   public UpperCaseAttribute(int startingUpperCaseCharacters)
   {
      ErrorMessage = $"The {startingUpperCaseCharacters} first characters must be upper case.";
      _startingUpperCaseCharacters = startingUpperCaseCharacters;
   }

   public void AddValidation(ClientModelValidationContext context)
   {
      context.Attributes.Add("data-val", "true");
      context.Attributes.Add("data-val-uppercase", ErrorMessage);
      context.Attributes.Add("data-val-uppercase-startingUpperCaseCharacters", $"{_startingUpperCaseCharacters}");
   }

   public override bool IsValid(object value)
   {
      if(value is string str)
      {
         if (str.Length < _startingUpperCaseCharacters)
            return false;
         return str.Substring(0, _startingUpperCaseCharacters) == str.Substring(0, _startingUpperCaseCharacters).ToUpper();
      }
      throw new ArgumentException("value is not a string.");
   }
}
In the AddValidation method, the new parameter is passed to JavaScript via the data-val-uppercase-startingUpperCaseCharacters attribute.
Next, update site.js to handle the new parameter:
$.validator.addMethod('uppercase', function (value, element, params) {
    let startingUpperCaseCharacters = parseInt(params);
    if (value.length < startingUpperCaseCharacters)
        return false;

    return value.substring(0, startingUpperCaseCharacters) ===
       value.substring(0, startingUpperCaseCharacters).toUpperCase();
});

$.validator.unobtrusive.adapters.addSingleVal("uppercase",
   "startingUpperCaseCharacters");
Using addSingleVal, we instruct the framework to parse the startingUpperCaseCharacters parameter for the uppercase validation attribute. This parameter is accessible through the params parameter.
Finally, use this attribute in the BookModel like this:
[Required]
[StringLength(maximumLength: 10, MinimumLength = 4)]
[UpperCase(2)]
public string Name { get; set; }
Custom Error messages
In this section, we will explore how to customize the default error messages provided by ASP.NET for validation attributes. Every validation attribute has an ErrorMessage property that allows us to define custom error messages. For example, we can customize the RegularExpression error message to avoid displaying the regex pattern, which can pose a security risk by exposing the pattern to potential attackers.
To use custom error messages, set the ErrorMessage property of each validation attribute. Here’s how you can customize the error message for a RegularExpression attribute:
[Required]
[RegularExpression("^(?:ISBN(?:-13)?:?\\ )?(?=[0-9]{13}$|(?=(?:[0-9]+[-\\ ]){4})[-\\ 0-9]{17}$)97[89][-\\ ]?[0-9]{1,5}[-\\ ]?[0-9]+[-\\ ]?[0-9]+[-\\ ]?[0-9]$",
   ErrorMessage = "{0} must be a valid ISBN code")]
public string ISBN { get; set; }
The result would be like this:

The {0} placeholder will be replaced with the property name.
This method is suitable if you don’t need message localization, which will be explored in the next section.
Using Resource Files for Error Messages
A more flexible approach is to use resource files to store custom error messages. This keeps the code clean and centralizes the management of resource strings.
In order to use resources, create a folder named Resources in the root of the project.
Inside this folder, create a new Resource file item named ValidationMessages.resx. We can edit this file from Visual Studio and add a new key-value pair for the ISBN Validation Attribute:

Ensure the access modifier of this resource is set to internal or public, as shown in the previous image. This allows it to be accessed in the validation attribute.
Next, specify the resource key and type in the validation attribute:
[Required]
[RegularExpression("^(?:ISBN(?:-13)?:?\\ )?(?=[0-9]{13}$|(?=(?:[0-9]+[-\\ ]){4})[-\\ 0-9]{17}$)97[89][-\\ ]?[0-9]{1,5}[-\\ ]?[0-9]+[-\\ ]?[0-9]+[-\\ ]?[0-9]$",
   ErrorMessageResourceType = typeof(ValidationMessages),
   ErrorMessageResourceName = "ISBN")]
public string ISBN { get; set; }
Now, the error message is controlled through the resource file.
Localization
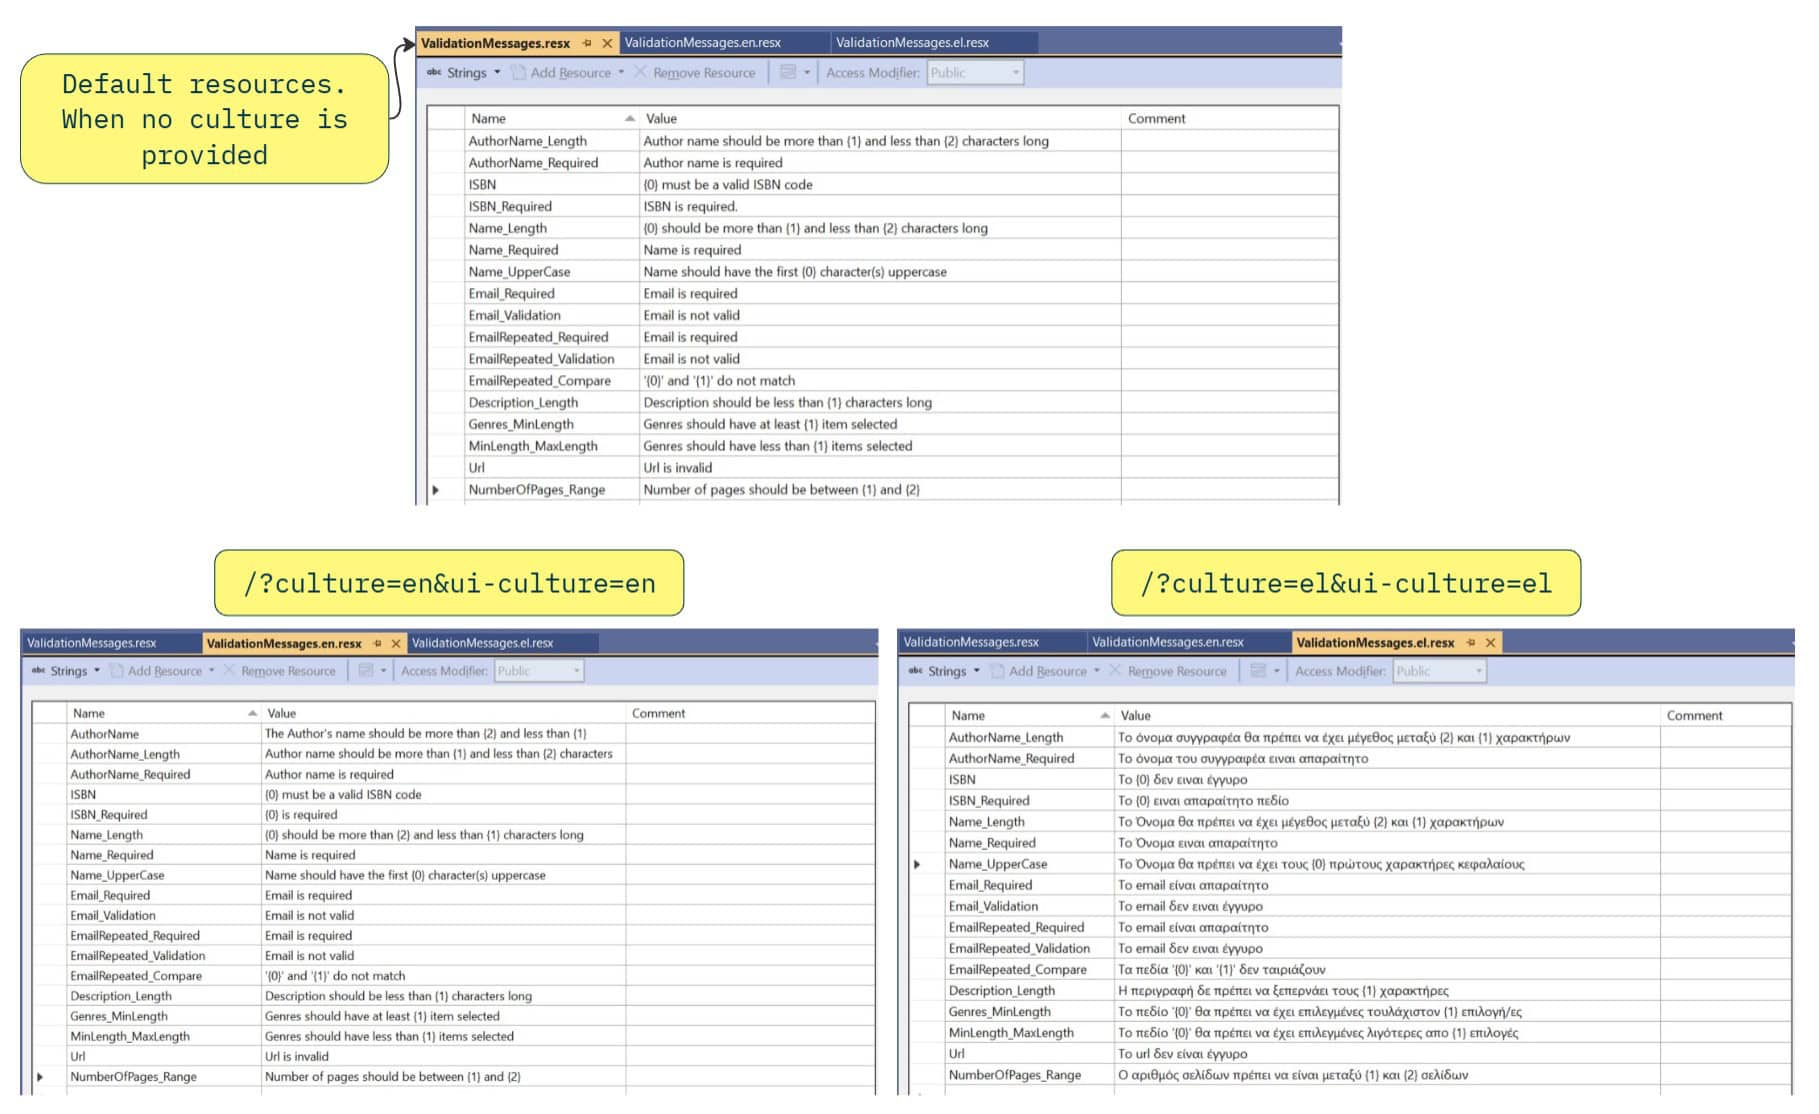
To localize error messages, use multiple resource files, one for each locale. For example, we will use two locales: en (English) and el (Greek). Inside the Resources folder, we create two Resource files: ValidationMessages.el.resx for Greek and ValidationMessages.en.resx for English.
Below, we illustrate the resource files after the necessary key-value pairs were added:
Next, specify these locales in the startup file and enable the localization for the ValidationAttrbutes. This will allow the framework to automatically search for the appropriate resource value for the ValidationAttribute.
public void ConfigureServices(IServiceCollection services)
{
   // uncomment if you want to change the default Resources directory
   //services.AddLocalization(options => options.ResourcesPath = "Resources");

   services.AddMvc()
      .AddDataAnnotationsLocalization(options =>
      {
         // uncomment if you use one resource for multiple C# classes
         //options.DataAnnotationLocalizerProvider = (type, factory) =>
         //    factory.Create(typeof(ValidationMessages));
      });

   services.AddControllersWithViews();
   services.AddRazorPages();
}

public void Configure(IApplicationBuilder app, IWebHostEnvironment env)
{
   if (env.IsDevelopment())
   {
      app.UseDeveloperExceptionPage();
   }
   else
   {
      app.UseExceptionHandler("/Home/Error");
      app.UseHsts();
   }

   // Add locales in the framework
   var supportedCultures = new[] { "en", "el" };
   var localizationOptions = new RequestLocalizationOptions().SetDefaultCulture(supportedCultures[0])
      .AddSupportedCultures(supportedCultures)
      .AddSupportedUICultures(supportedCultures);

   // Localization middleware
   app.UseRequestLocalization(localizationOptions);

   // .. rest of the code
}
For built-in attributes like ISBNAttribute, simply set the following configuration for each attribute:
public class ISBNAttribute : RegularExpressionAttribute
{
   public ISBNAttribute()
      : base("^(?:ISBN(?:-13)?:?\\ )?(?=[0-9]{13}$|(?=(?:[0-9]+[-\\ ]){4})[-\\ 0-9]{17}$)97[89][-\\ ]?[0-9]{1,5}[-\\ ]?[0-9]+[-\\ ]?[0-9]+[-\\ ]?[0-9]$")
   {
      // Localization settings.
      ErrorMessageResourceType = typeof(ValidationMessages);
      ErrorMessageResourceName = "ISBN";
   }
}
For custom attributes like UpperCaseAttribute , use the IStringLocalizer to localize the error message provided to JavaScript. Modify the AddValidation method inside the UpperCaseAttribute class as follows:
public void AddValidation(ClientModelValidationContext context)
{
   var localizer = context.ActionContext.HttpContext.RequestServices.GetService(typeof(IStringLocalizer<ValidationMessages>)) as IStringLocalizer<ValidationMessages>;

   context.Attributes.Add("data-val", "true");
   context.Attributes.Add("data-val-uppercase",
      string.Format( localizer.GetString("Name"), _startingUpperCaseCharacters ));
   context.Attributes.Add("data-val-uppercase-startingUpperCaseCharacters",
      $"{_startingUpperCaseCharacters}");
}
We can change the locale in different ways, but here we will change it via URL query string:
/?culture=el&ui-culture=elThe result localized in Greek (for the attributes that have entries in the Resource files) will be displayed correctly.
To localize all error messages, ensure all key-value pairs are added to the Resource files.








4 Comments
Nice tutorial but the adding the client side validation for custom validation is confusing. I only done this around 2 times so maybe that is why. One what happened to the rest of it IsValid(object value, ValidationContext validationContext) like the validation context? Two, what if I am not trying to make my stuff to uppercase, but I am trying to make it check if a date is in the past. So how would I write that in the javascript section. Lastly, does this work with .net6 for I see balzor is on the tags but .net 6. Like I said I am new so I was just wondering how that would work and why it was confusing
I am not sure I understand your first question, about your second question instead of integer startingUpperCaseCharacters you will have a DateTime argument, and then you will have a check like: dateTimeArg < DateTime.Now, both in server-side an client-side the check is similar. About you last question, recently I updated the post and code for .NET7.
Awesome information. Found this blog post when I was looking for unobtrusive, bootstrap 5, .NET core. I needed information regarding how to change the unobtrusive CSS classes to match those of BS5 and make it work. I will keep looking but keep up the great work. I have saved your blog post for future reference.
I appreciate it!