

The code is available on GitHub here
The State Design Pattern is a behavioral pattern that makes a class behave differently depending on its current state. The number of states the class can have is arbitrary, making the State Pattern a useful tool in cases where the behavior of an object needs to be changed during runtime.
When to use
Use the State Pattern if you have a component that needs to have different behaviors depending on which state it is.
You can localize different behaviors of a component to different state objects and give them a common State interface. Each State class is responsible for implementing the appropriate behavior of the component.
Use the State Pattern in case there are multiple if else statements inside a class that set a variable which is used to alter the behavior of the class’s methods depending on its value.
By modeling each possible value of the variable into a separate State class, an extra dimension and capability of separating the different behaviors into separate classes can be brought to the design, keeping the main class clean and maintainable. This way, the behavior of our main component can be localized into separate state classes.
An example of using a variable and differentiating the behavior of our component depending on the current value of that variable is shown below:
public void DoAction()
{
   if(state == USER_LOGED_IN)
   {
      // exhibit the appropriate behavior
      // state = NEW_STATE; // can transition to a new state
   }else if(state == USER_LOGED_IN_WITHOUT_QUOTA)
   {
      // do something else
   }
   // the else if can continue on..
}
The previous example violates the Single Responsibility Principle by having one method do different things depending on the instance variable state. This code is a case that can be refactored to State Pattern.
Use the State Pattern in case you have to implement a state machine.
A State machine is a mechanism that describes the various states a system can have and also how to transition from one state to another. Below we present a state machine example:
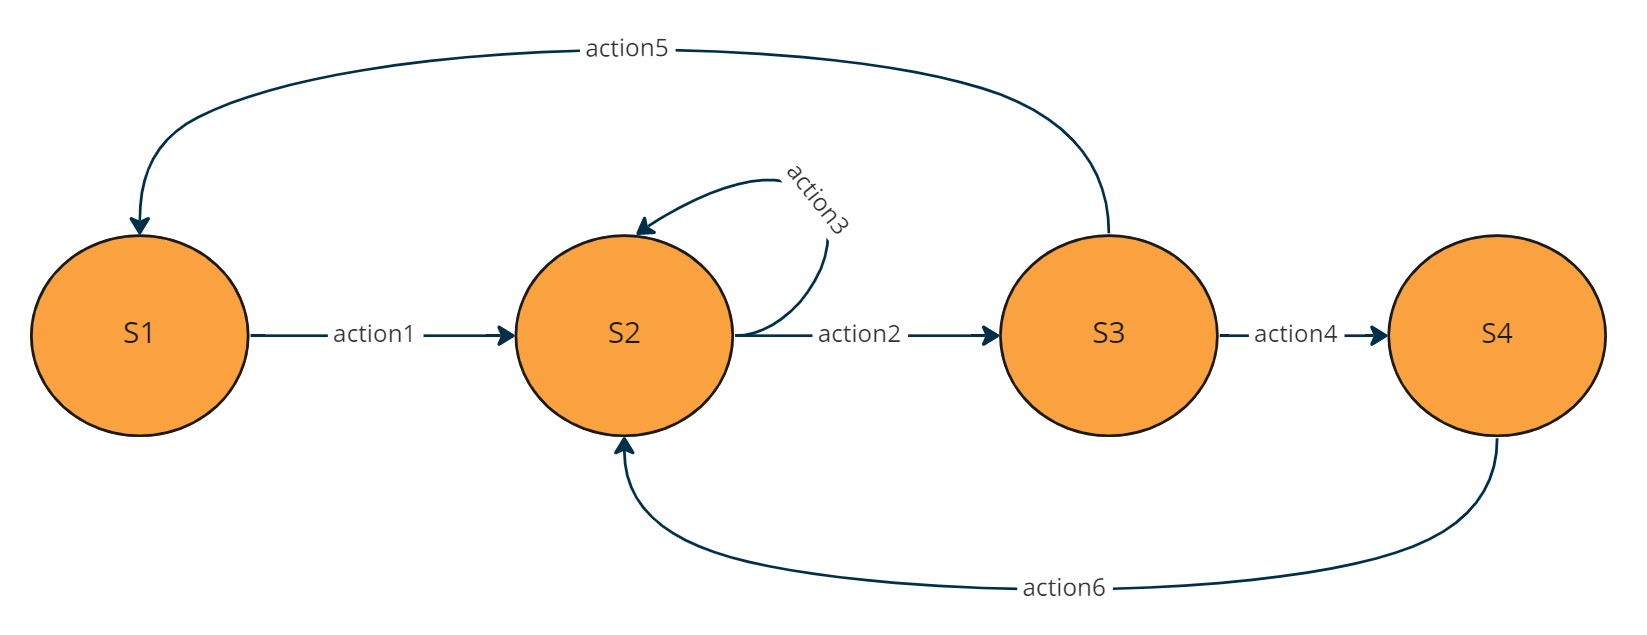
The State Pattern is the object oriented way of modeling a state machine with software. Each state has a valid number of transitions to another state or to itself. In order to make a transition from a state to another one, an action has to be made. Depending on the action and the state the machine is currently in, we can determine the next state.
Use the State Pattern as a flexible alternative to subclassing.
If you don’t want to get stuck with a certain behavior using inheritance, consider implementing the State Pattern in order to change behavior at runtime dynamically.
How to implement
First, we define the main class that needs to have multiple behaviors depending on its internal state. That class is also called context.
One of the core component of the State Pattern is the context class. That class holds a reference to an abstract State class and forwards the calls from its methods to that State class. It may also has the following attributes:
- A public method that takes a State object as parameter in order to change its current state to the new state.
- Pass itself to each State constructor. Each State can call methods from the Context if needed.
- The context gets its behavior by delegating to the current State object.
The second step is to define our State interface or abstract class.
Another core component of the State Pattern is the State class that represents all possible discrete states the context could have. The important aspect of this step is to define the proper methods to the State class/interface from the context class that are state dependent. Usually the State interface contains methods for every action of the context class. By encapsulating each state into a class, we localize any changes that will need to be made.
Finally we implement as many states as we need.
The final step is to implement the different State classes. Each implementation is responsible for giving the Context class a different behavior related to that state. The transition from a state to another can happen inside a concrete state or in the context class.
Design the states in such a way that can have visibility and access to the context’s methods and also sometimes to other states.
Each State might need to call a method of the context class. It might also need to change the Context’s state. This requires the current state to know how it can handle this functionality.
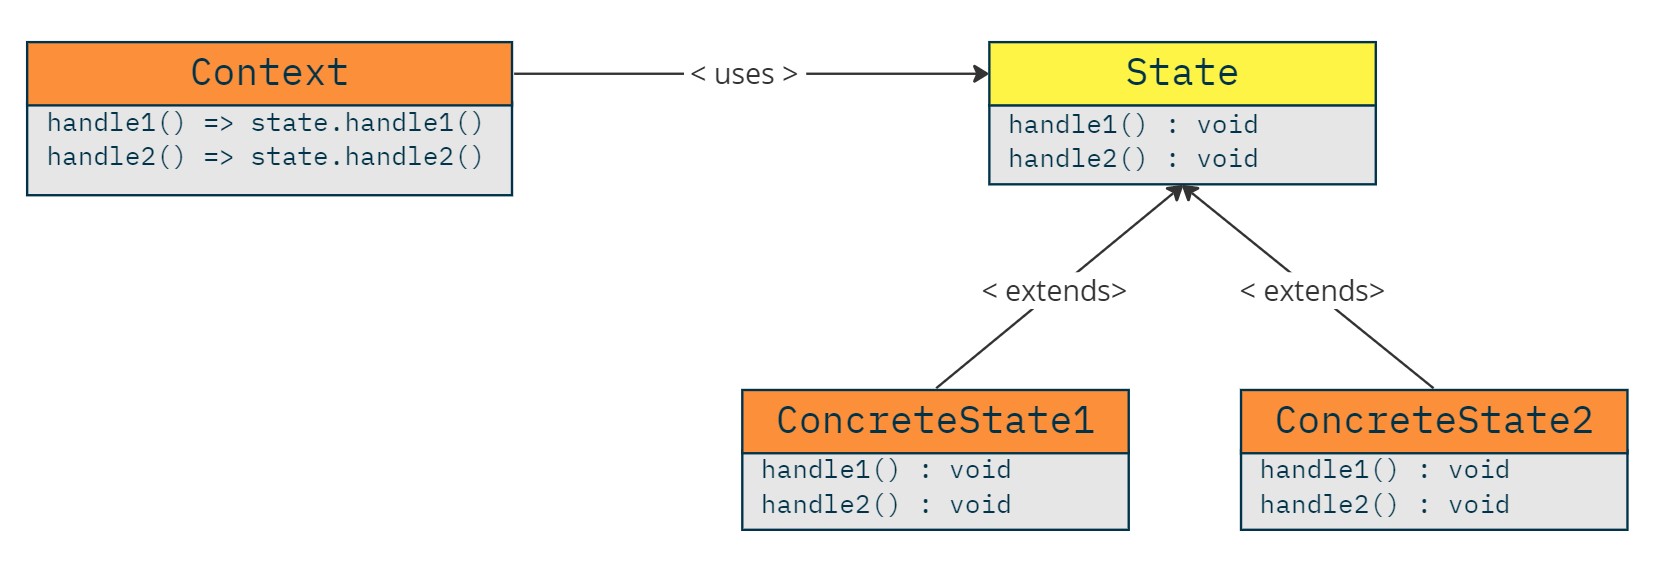
State Pattern – Class diagram
The class diagram of the State Pattern consists of the context class, which has a reference to a State interface (or abstract class). Each one of the concrete states extend the State interface and implement the specific behavior the context class should have during that state. Also, all state-dependent methods of the context delegate to the appropriate method of the State instance.
Real World Example
The State Pattern is widely used in programming languages and frameworks that we use on a daily basis. For example, in user interfaces, controls such as buttons and textboxes can take on different states depending on user actions. Also an interpreter, which can be implemented as a state machine, can have a State that gives it a different behavior depending on its state. The Task class in .NET’s System.Threading.Tasks is another example that uses the State Pattern. A Task can have several states as shown below:
| State | Description |
|---|---|
| Created | The task has been initialized but has not yet been scheduled. |
| WaitingForActivation | The task is waiting to be activated and scheduled internally by the .NET infrastructure. |
| WaitingToRun | The task has been scheduled for execution but has not yet begun executing. |
| Running | The task is running but has not yet completed. |
| WaitingForChildrenToComplete | The task has finished executing and is implicitly waiting for attached child tasks to complete. |
| RanToCompletion | The task completed execution successfully. |
| Canceled | The task acknowledged cancellation by throwing an OperationCanceledException with its own CancellationToken while the token was in signaled state, or the task’s CancellationToken was already signaled before the task started executing |
| Faulted | The task completed due to an unhandled exception. |
A Task’s state can be accessed through its TaskStatus property that has the values shown above. In the example below we show a case where a task transitions through various states.
// We create a new task that executes the delegate function.
var task = new Task(() => {
   Console.WriteLine("Thread is running");
   Thread.Sleep(50);
});

Console.WriteLine($"Task state: {task.Status}"); // Task state: Created

task.Start(); // we start the task.
Console.WriteLine($"Task state: {task.Status}"); // Task state: WaitingToRun

Thread.Sleep(10); // some delay to ensure the task has already started.
Console.WriteLine($"Task state: {task.Status}"); // Task state: Running

task.Wait(100); // we wait the maximum amount of milliseconds for the task to finish.
Console.WriteLine($"Task state: {task.Status}"); // Task state: RanToCompletion
Another example is to cancel a task and not allow it to finish. The task will have a Cancelled state as shown in the example below:
var tokenSource = new CancellationTokenSource();
CancellationToken token = tokenSource.Token;

task = new Task(() => {
   Console.WriteLine("Thread is running");
   while (true)
   {
      Thread.Sleep(50);
      // we check if there is cancellation requested.
      if (token.IsCancellationRequested)
      {
         // this will throw an OperationCanceledException which transitions
         // the task to the Canceled state.
         token.ThrowIfCancellationRequested();
      }
   }
}, tokenSource.Token);
Console.WriteLine($"Task state: {task.Status}"); // Task state: Created

task.Start();
Console.WriteLine($"Task state: {task.Status}"); // Task state: WaitingToRun

Thread.Sleep(10);
Console.WriteLine($"Task state: {task.Status}"); // Task state: Running

try
{
   tokenSource.Cancel();
   await task;
}
catch (OperationCanceledException e)
{
   Console.WriteLine($"{nameof(OperationCanceledException)} thrown with message: {e.Message}");
}
Console.WriteLine($"Task state: {task.Status}"); // Task state: Canceled
In this example, the .NET framework uses the State Pattern to give different behaviors to a Task depending on its current state.
Example – Vending Machine
This section presents the implementation of a Vending Machine using the State Pattern. The Vending Machine will have multiple internal states, each with different behaviors.
The vending machine maintains a list of products with a code, price, and stock, and the user selects a product by code and then inserts coins to match the price. The vending machine gives change if required and dispenses the product. If the machine runs out of a product, it enters the SoldOutState and cannot accept new selections or payments. To reset it, it must be refilled. Below we present the state machine of the VendingMachine showing the different states it can have and how it can transition from one to another.

The Context class – VendingMachine
The VendingMachine class is designed as the context class, with methods like InsertCoin, SelectProduct, and Refill. The VendingMachine instance variable holds the current state. Also, the list of products will be stored in that class.
public class VendingMachine
{
   public List<Product> Products;
   public State CurrentState { get; private set; }

   public VendingMachine(List<Product> products)
   {
      Products = products;
      CurrentState = new IdleState(this);
   }

   public string SelectedProductCode { get; set; }

   public void SelectProduct(string productCode)
      => CurrentState.SelectProduct(productCode);

   public void InsertMoney(decimal amount)
      => CurrentState.InsertMoney(amount);

   public void DispenseProduct()
      => CurrentState.DispenseProduct();

   public void Refill(List<Product> products)
      => CurrentState.Refill(products);

   public void SetState(State state)
      => CurrentState = state;
}
The State interface
The State class can be an interface or an abstract class. In case of an abstract class, it can also contain default implementations of the methods as most of the states will override only a few of them. In this example, it is an abstract class to enforce the VendingMachine instance as a constructor parameter.
public abstract class State
{
   // The VendingMachine instance that all states can use in order to control the vending machine.
   protected readonly VendingMachine VendingMachine;

   protected State(VendingMachine vendingMachine)
   {
      VendingMachine = vendingMachine;
   }

   // All state dependent methods
   public abstract void InsertMoney(decimal amount);
   public abstract void SelectProduct(string productCode);
   public abstract void DispenseProduct();
   public abstract void Refill(List<Product> products);
   public abstract void Cancel();
}
The State class also defines all state-dependent methods called from the VendingMachine or other states. Next, we continue by implementing the various concrete state classes.
IdleState
When the VendingMachine is started, the first state it has is the IdleState. This is the state in which the user can select a product. When the user selects a product, the IdleState assigns that product’s code to the SelectedProductCode instance variable of the VendingMachine. Any other state can access that variable. Lastly, the IdleState is responsible for transitioning the VendingMachine to the PaymentState, which we will see in the next section.
Another action the user can take during the IdleState is to refill the VendingMachine. The new list of products is assigned to the Products variable of the VendingMachine class, and no other transition occurs. Below, we present the implementation of the IdleState:
public class IdleState : State
{
   public IdleState(VendingMachine vendingMachine)
      : base(vendingMachine)
   {
      Console.WriteLine("IDLE - Wait for product selection");
   }

   public override void InsertMoney(decimal money)
   {
      Console.WriteLine("Please select a product before inserting any money.");
   }

   public override void SelectProduct(string productCode)
   {
      var selectedProduct = VendingMachine.Products.FirstOrDefault(x => x.Code == productCode);
      if(selectedProduct.Stock == 0 )
      {
         Console.WriteLine($"The product code:{selectedProduct.Code} is out of stock.");
         return;
      }
      VendingMachine.SelectedProductCode = selectedProduct.Code;
      Console.WriteLine($"Product:{selectedProduct.Code} with price:{selectedProduct.Price} selected.");
      VendingMachine.SetState(new PaymentState(VendingMachine));
   }

   public override void DispenseProduct()
      => Console.WriteLine("Select a product first.");

   public override void Cancel()
      => Console.WriteLine("There is no selected product or payment in progress to cancel.");

   public override void Refill(List<Product> products)
   {
      VendingMachine.Products = products;
      Console.WriteLine($"Total amount of products:{VendingMachine.Products.Sum(x=>x.Stock)}");
   }
}
PaymentState
The PaymentState is responsible for accepting coins from the user until the amount reaches the price of the selected product. We transition to the PaymentState from the IdleState when the user selects a product. As a result, in PaymentState we can access the SelectedProductCode variable from the VendingMachine instance and get its price.
Every time the user inserts a coin, the InsertMoney() method is called. Inside that method we add the inserted amount to the total amount the user has inserted and check if we have enough funds for the selected product. If we don’t, we stay in that state and wait for the user to insert more coins or cancel the operation. Otherwise, we compute the change and transition to the DispenseProductState which is responsible for dispensing the product.
The user also can cancel the operation during the PaymentState, resulting in a refund of the amount the user has inserted so far. Afterward, the PaymentState transitions back to the IdleState. We cannot refill or select another product during that state.
public class PaymentState : State
{
   private decimal _funds = 0;

   public PaymentState(VendingMachine vendingMachine) : base(vendingMachine)
   {
      Console.WriteLine($"PAYMENT - You can insert coins.");
   }

   public override void Cancel()
   {
      Console.WriteLine("Cancelling order.");

      if (_funds > 0)
         Console.WriteLine($"Returning the amount of {_funds}");

      VendingMachine.SelectedProductCode = null;
      VendingMachine.SetState(new IdleState(VendingMachine));
   }

   public override void DispenseProduct()
      => Console.WriteLine("Cannot dispense product yet. Insuffiecient funds.");

   public override void InsertMoney(decimal money)
   {
      _funds += money;
      var selectedProduct = VendingMachine.Products.FirstOrDefault(x => x.Code == VendingMachine.SelectedProductCode);
      if (_funds < selectedProduct.Price)
         Console.WriteLine($"Remaining:{selectedProduct.Price - _funds}");
      else
      {
         Console.WriteLine($"Proper amount received.");
         var change = _funds - selectedProduct.Price;
         if (change > 0)
            Console.WriteLine($"Dispensing {change} amount.");

         VendingMachine.SetState(new DispenseProductState(VendingMachine));
         VendingMachine.DispenseProduct();
      }
   }

   public override void Refill(List<Product> products)
      => Console.WriteLine("Cannot refill during payment operation. Please cancel or complete payment before refill.");

   public override void SelectProduct(string productCode)
      => Console.WriteLine("Product is already selected. Please complete or cancel the current payment.");
}
DispenseProductState
The DispenseProductState is responsible not only for dispensing the product but also for updating the stock of that product. After calculating the new product availability, we check if is there are any other products left for selling. If there are, we transition to the IdleState, otherwise we transition to the SoldOutState. We cannot insert coins, select a product, refill, or even cancel the operation during the DispenseProductState.
public class DispenseProductState : State
{
   public DispenseProductState(VendingMachine vendingMachine) : base(vendingMachine)
   {
      Console.WriteLine("DISPENSE");
   }

   public override void Cancel()
      => Console.WriteLine("Cannot cancel dispensing operation.");

   public override void DispenseProduct()
   {
      if(VendingMachine.SelectedProductCode == null)
      {
         Console.WriteLine("There is no selected product to dispense.");
         VendingMachine.SetState(new IdleState(VendingMachine));
         return;
      }

      Console.WriteLine("Dispensing product.");
      System.Threading.Thread.Sleep(2000); // dispensing the product..
      var product = VendingMachine.Products.FirstOrDefault(x=>x.Code == VendingMachine.SelectedProductCode);
      product.Stock--; // update the new stock of the product.
      VendingMachine.SelectedProductCode = null; // the selected product is sold.
      Console.WriteLine("Product dispensed.");

      // we check if there are other products left for selling.
      if (VendingMachine.Products.All(x=>x.Stock == 0))
         VendingMachine.SetState(new SoldOutState(VendingMachine));
      else
         VendingMachine.SetState(new IdleState(VendingMachine));
   }

   public override void InsertMoney(decimal money)
      => Console.WriteLine("Cannot insert money during product dispensing.");

   public override void Refill(List<Product> products)
      => Console.WriteLine("Cannot refill during dispensing product.");

   public override void SelectProduct(string productCode)
      => Console.WriteLine("Product already selected.");
}
SoldOutState
The VendingMachine transitions to this state when there are no other products to sell. The actual check happens when the DispenseProduct action of the DispenseProductState is called. During the SoldOutState, the VendingMachine cannot perform any operation except for the refill. All the other operations return the appropriate message to the user.
public class SoldOutState : State
{
   public SoldOutState(VendingMachine vendingMachine) : base(vendingMachine)
   {
      Console.WriteLine("SOLDOUT");
   }

   public override void InsertMoney(decimal money)
      => Console.WriteLine($"There are no products in the vending machine");

   public override void SelectProduct(string productCode)
      => Console.WriteLine($"There are no products in the vending machine");

   public override void Cancel()
      => Console.WriteLine($"There is no operation to cancel.");

   public override void DispenseProduct()
      => Console.WriteLine($"There is no selected product.");

   public override void Refill(List<Product> products)
   {
      VendingMachine.Products = products;
      Console.WriteLine($"Total amount of products:{VendingMachine.Products.Sum(x => x.Stock)}");
      VendingMachine.SetState(new IdleState(VendingMachine));
   }
}
VendingMachine – class diagram
The final class diagram of our VendingMachine implemented with the State Pattern is shown below:
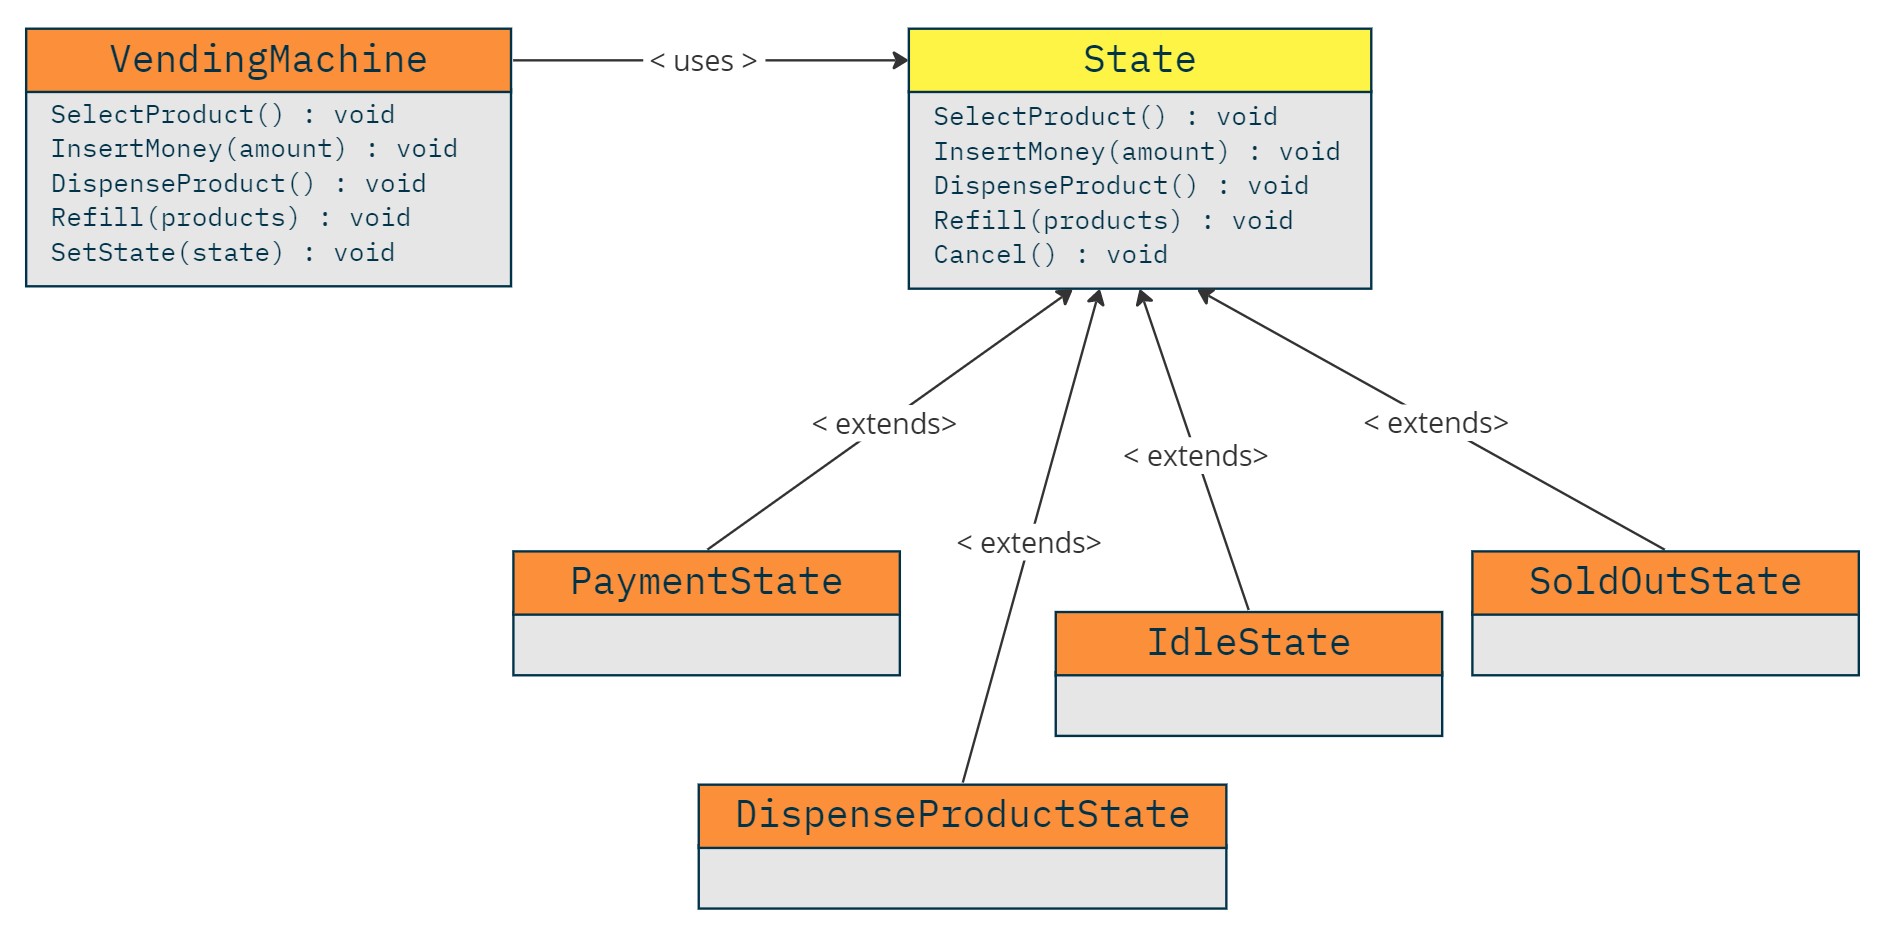
We can see that the context in this case is the VendingMachine, and the State interface contains the same methods as the context. All concrete states extend from the State abstract class.
Usage Example
Now, let’s demonstrate how we can operate the VendingMachine by combining the context, the State interface, and the various concrete states.
First, we create an instance of the VendingMachine and pass two types of products, along with their prices and stock, as parameters. While the VendingMachine is in the IdleState, we select a product by its code, which transitions the VendingMachine to the PaymentState. Afterward, we insert an amount of money equals to the price of the selected product.
VendingMachine vendingMachine = new(new List<Product>(){
   new Product("SPCOM1", 1, 3),
   new Product("SPCOM2", 3, 1)
});
vendingMachine.SelectProduct("SPCOM1"); // IdleState => PaymentState
vendingMachine.InsertMoney(1); // PaymentState => DispenseProductState => IdleState
The output of the previous code is:
IDLE - Wait for product selection
Product:SPCOM1 with price:1 selected.
PAYMENT - You can insert coins.
Proper amount received.
DISPENSE
Dispensing product.
Product dispensed.
IDLE - Wait for product selection
Another more complex example is shown below:
VendingMachine vendingMachine = new(new List<Product>(){
   new Product("SPCOM1", 1, 1),
   new Product("SPCOM2", 3, 1)
});
vendingMachine.InsertMoney(1); // Cannot accept coins while in IdleState
vendingMachine.SelectProduct("SPCOM1"); // IdleState => PaymentState
vendingMachine.InsertMoney(0.4m); // Stays in PaymentState because the amount is not sufficient yet.
vendingMachine.InsertMoney(1.2m); // PaymentState => DispenseProductState => IdleState
vendingMachine.SelectProduct("SPCOM2"); // IdleState => PaymentState
vendingMachine.InsertMoney(3.2m); // PaymentState => DispenseProductState => SoldOutState
// Vending Machine is now sold out.
vendingMachine.Refill(new List<Product>()
{
   new Product("SPCOM1", 1, 3),
   new Product("SPCOM2", 3, 4)
}); // SoldOutState => IdleState
vendingMachine.SelectProduct("SPCOM2"); // IdleState => PaymentState
vendingMachine.InsertMoney(5.2m); // PaymentState => DispenseProductState => IdleState
In the previous example, we attempt to execute actions that are not supported during the current internal state of the VendingMachine, and also we purchase all remaining products, so the VendingMachine transitions to the SoldOutState. We then refill the VedningMachine, which transitions again to the IdleState, ready to accept new orders.
The output of the previous code is:
IDLE - Wait for product selection
Please select a product before inserting any money.
Product:SPCOM1 with price:1 selected.
PAYMENT - You can insert coins.
Remaining:0.6
Proper amount received.
Dispensing 0.6 amount.
DISPENSE
Dispensing product.
Product dispensed.
IDLE - Wait for product selection
Product:SPCOM2 with price:3 selected.
PAYMENT - You can insert coins.
Proper amount received.
Dispensing 0.2 amount.
DISPENSE
Dispensing product.
Product dispensed.
SOLDOUT
Total amount of products:7
IDLE - Wait for product selection
Product:SPCOM2 with price:3 selected.
PAYMENT - You can insert coins.
Proper amount received.
Dispensing 2.2 amount.
DISPENSE
Dispensing product.
Product dispensed.
IDLE - Wait for product selection
Using Dependency Injection
Using Dependency Injection, the various states can be registered in a dependency injection container like any other service.
Autofac
C#
The code with the dependency injection is available on GitHub here
First, all services, including states, the vending machine, and a new service that creates new states called the StateFactory, are registered. To learn more about the Factory Pattern you can check the following articles: Design Patterns – Simple/Static Factory, Design Patterns – Factory Method and Design Patterns – Abstract Factory
// First configure the Autofac service
var builder = new ContainerBuilder();

builder.RegisterType<VendingMachine>().AsSelf();

builder.RegisterType<IdleState>().Keyed<State>("idle");
builder.RegisterType<PaymentState>().Keyed<State>("payment");
builder.RegisterType<DispenseProductState>().Keyed<State>("dispense");
builder.RegisterType<SoldOutState>().Keyed<State>("soldout");

builder.RegisterType<StateFactory>().AsSelf();

container = builder.Build();
To create a new VendingMachine instance, the IContainer instance of Autofac is used as follows:
VendingMachine vendingMachine = container.Resolve<VendingMachine>(new NamedParameter("products", new List<Product>(){
   new Product("SPCOM1", 1, 1),
   new Product("SPCOM2", 3, 1)
}));

vendingMachine.DispenseProduct();
vendingMachine.InsertMoney(2);
Next, the StateFactory service is implemented. This service creates a new state depending on the key provided, using the ILifeTimeScope of Autofac.
public class StateFactory
{
   private readonly ILifetimeScope _lifeTimeScope;

   public StateFactory(ILifetimeScope lifeTimeScope)
   {
      _lifeTimeScope = lifeTimeScope;
   }

   public State Create(string key, VendingMachine context)
   {
      return _lifeTimeScope.ResolveKeyed<State>(key, new NamedParameter("vendingMachine", context));
   }
}
Finally, the code previously used to create new state instances using the new keyword is refactored with a new method of the VendingMachine that accepts a state key and returns a new state. This way, the states are decoupled from each other, making the design more maintainable.
As an example, the DispenseProductState is shown below. Similarly the same changes will be applied in the rest state objects.
public class DispenseProductState : State
{
   // code omitted

   public override void DispenseProduct()
   {
      // code omitted

      if (VendingMachine.Products.All(x=>x.Stock == 0))
         VendingMachine.SetState(VendingMachine.GetState("soldout"));
// Instead of using the new keyword we call the GetState method of the context to give us a new state.
      else
         VendingMachine.SetState(VendingMachine.GetState("idle"));
   }

   public override void InsertMoney(decimal money)
      => Console.WriteLine("Cannot insert money during product dispensing.");

   public override void Refill(List<Product> products)
      => Console.WriteLine("Cannot refill during dispensing product.");

   public override void SelectProduct(string productCode)
      => Console.WriteLine("Product already selected.");
}
Also, the new method in the VendingMachine is shown below:
public class VendingMachine
{
   public List<Product> Products;
   public State CurrentState { get; private set; }

   // The state factory instance used to create new state objects.
   private readonly StateFactory _stateFactory;

   public VendingMachine(List<Product> products, StateFactory stateFactory)
   {
      Products = products;
      _stateFactory = stateFactory;
      CurrentState = _stateFactory.Create("idle", this);
   }

   // code omitted

   public State GetState(string key)
      => _stateFactory.Create(key, this);

   public void SetState(State state)
      => CurrentState = state;
}
Recommendations
Looking to dive deeper into design patterns and take your programming skills to the next level? Check out the highly recommended books Head First Design Patterns and Design Patterns: Elements of Reusable Object-Oriented Software and start mastering the Iterator pattern today! Grab your copy and level up your coding game.
* This site contains product affiliate links. We may receive a commission if you make a purchase after clicking on one of these links.