

The code is available on GitHub
WordPress plugins are an integral part of the WordPress ecosystem, offering users extended functionality without requiring an in-depth knowledge of the core platform. In this article, we’ll delve into the basics of creating a WordPress plugin and explore how to install and access them.
WordPress Plugin Location
All WordPress plugins are located in their own directory with a unique name. Typically, there are two ways to access a plugin, either through the WordPress Admin panel or the WordPress file directory.
Access Plugins in WordPress Admin Panel
To access plugins via the WordPress Admin Panel, simply navigate to your-site/wp-admin and click on Plugins in the sidebar. There, you can see a list of installed plugins. You can activate or deactivate a plugin, with deactivating causing it to lose its effect while still remaining present in the WordPress directory.
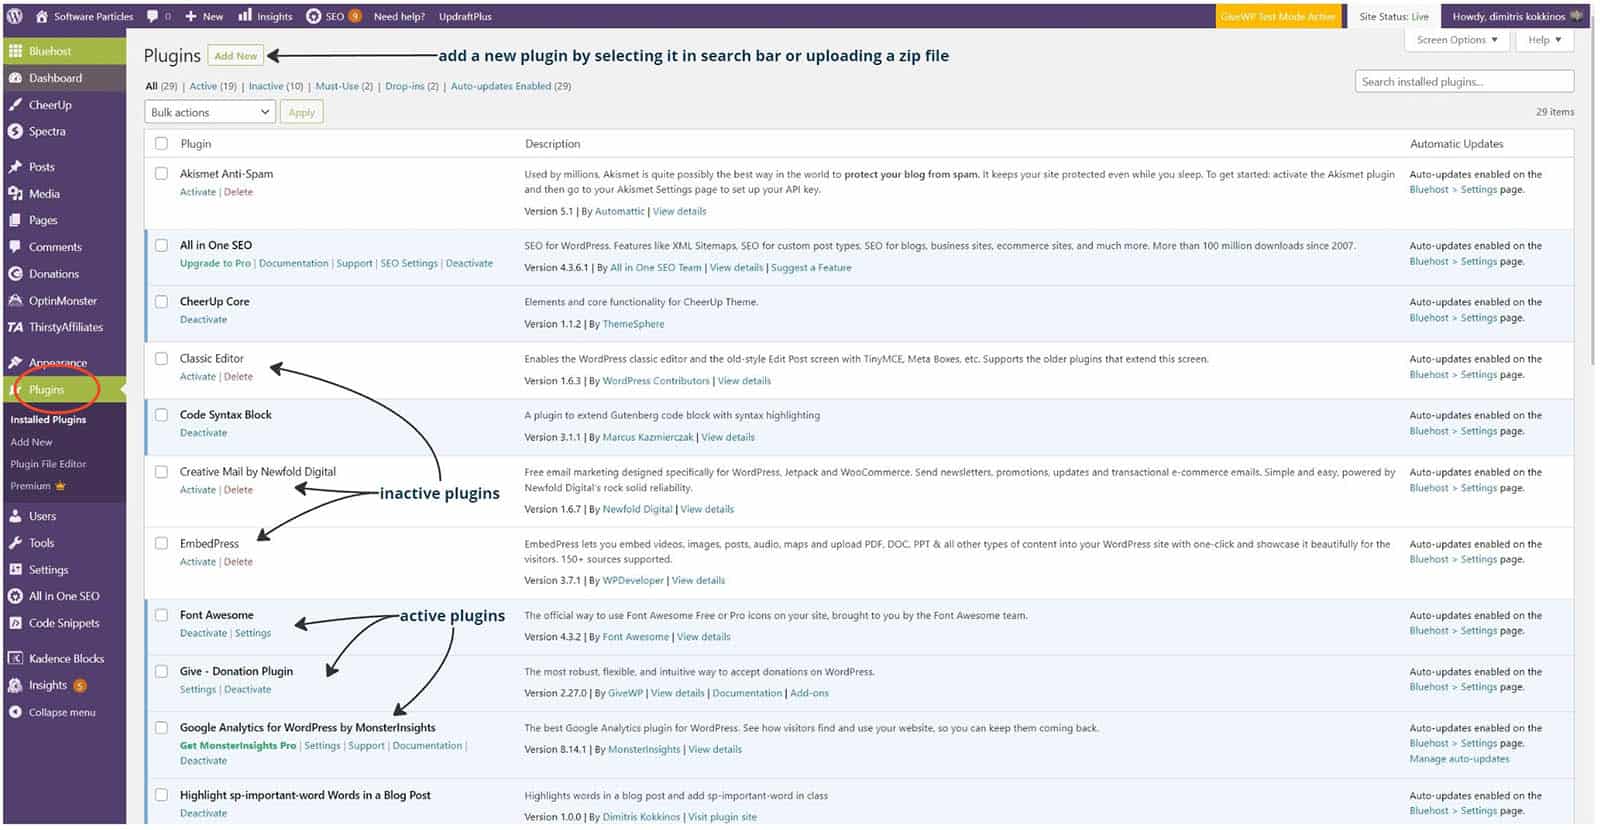
Additionally, you can add new plugins by clicking on Add New and search for a plugin in the text field or by uploading a zip file containing all the necessary plugin files.
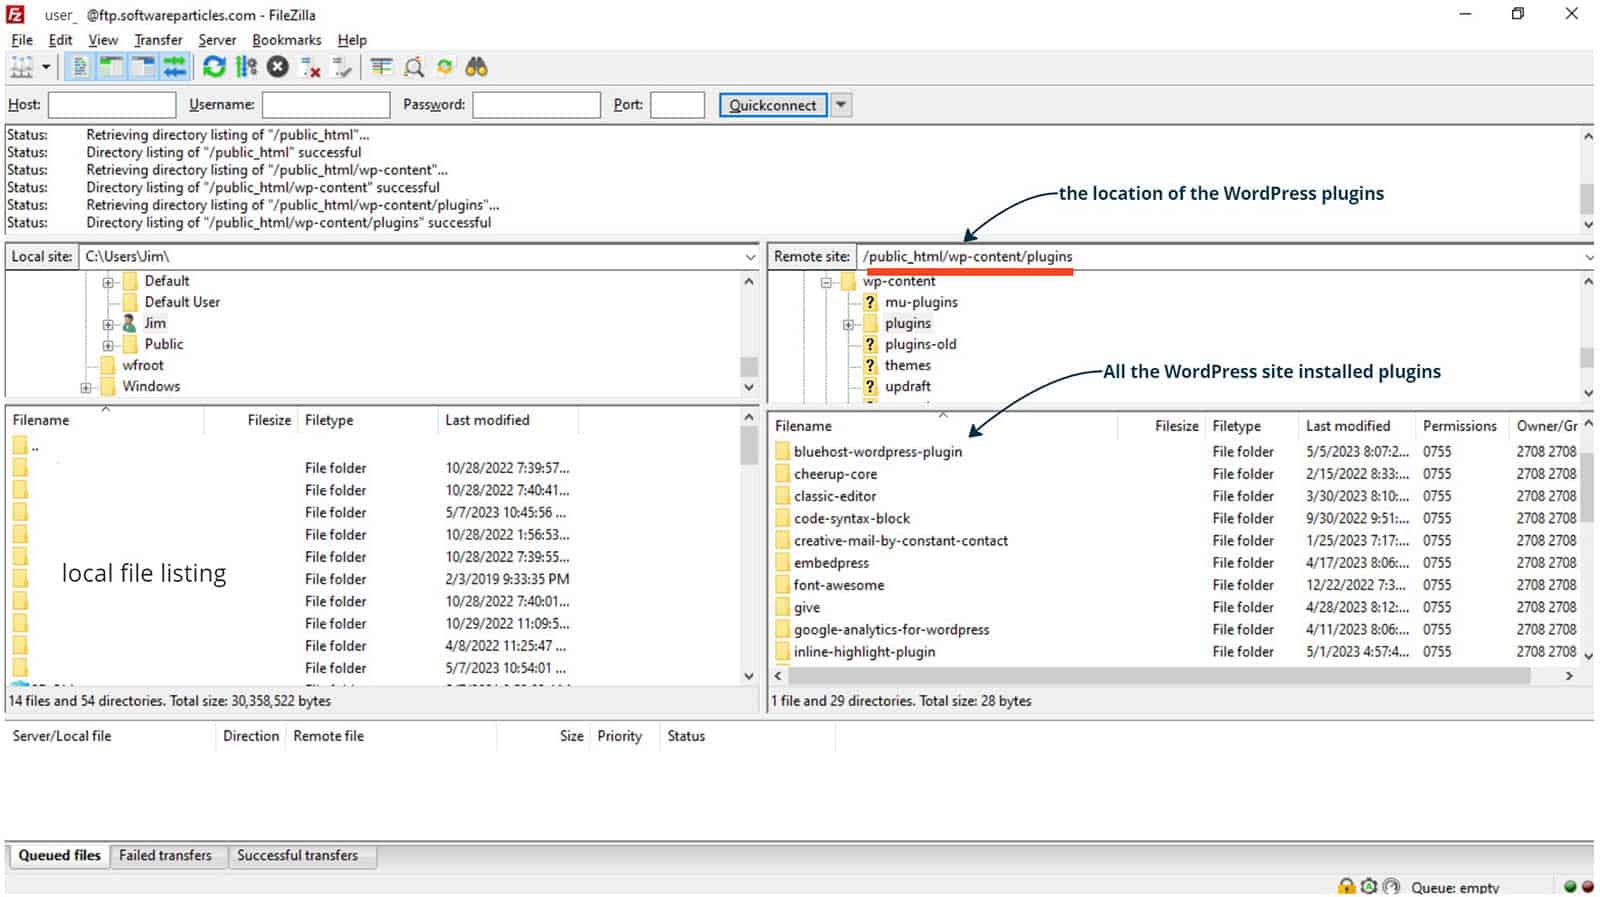
Access WordPress Plugins using FTP
Alternatively, you can access installed plugins using an FTP client such as FileZilla. With the correct username, password, host, and port details – which can be obtained from your web host – you can see a list of all files on your WordPress site. The plugins directory is located in public_html > wp_content > plugins. Each plugin has a separate folder with its name serving as the directory name.
Now that you understand how to access and install WordPress plugins, let’s explore the basics of creating a plugin.
How a WordPress Plugin is structured
At its core, a WordPress plugin is a PHP file that contains a WordPress plugin comment header. The header provides essential information about the plugin, including its name, description, author, version, and license information.
Below is an example header with all the available fields:
/*
 * Plugin Name:       Plugin's name
 * Plugin URI:        https://softwareparticles/plugin
 * Description:       What the plugin does.
 * Version:           1.1.3
 * Requires at least: 5.2
 * Requires PHP:      7.2
 * Author:            Dimitris Kokkinos
 * Author URI:        https://softwareparticles.com/
 * License:           GPL v2 or later
 * License URI:       https://www.gnu.org/licenses/gpl-2.0.html
 * Update URI:        https://example.com/my-plugin/
 */
The remainder of the file contains the PHP code that powers the plugin. Here’s an example:
<?php

/*
Plugin Name: Inline highlight Words in a Blog Post
Plugin URI: https://softwareparticles.com
Description: Highlights words in a blog post.
Version: 1.0.0
Author: Dimitris Kokkinos
Author URI: https://softwareparticles.com
License: GPL-2.0+
License URI: https://www.gnu.org/licenses/gpl-2.0.html
*/

// PHP code for the plugin.
Hooks – How and When a Plugin is called
Hooks provide the necessary mechanism to enable the execution of a Plugin. In simple terms, hooks are functions that take a custom callback function, which contains the code of the plugin.
There are two types of Hooks, Actions and Filters.
Actions
Actions are called at a specific point in the execution of the WordPress pipeline and are used to add data or change how WordPress operates.
While Actions do not return anything to the caller, you can use them to add a JavaScript file or update the database. You cannot for example directly update the content of a post using Actions.
To hook a plugin as an Action, you can use the add_action function:
function my_plugin_action() {
    // do something
}

// or as action
add_action('hook_name', 'my_plugin_action', queue_priority);
The hook_name declares the type of hook that controls when the Plugin/Action will be called during the WordPress lifecycle and for which purpose. The most common Action Hook types are listed below:
| Hook name | Description |
|---|---|
| wp_enqueue_scripts | Add scripts and styles to your WordPress site. |
| wp_head | Add custom content to the head section of a WordPress site. |
| admin_menu | Add menu items to the WordPress admin menu. |
| wp_login | Trigger an action when a user logs in to WordPress. |
| wp_logout | Trigger an action when a user logs out of WordPress. |
| save_post | Trigger an action when a post is saved or updated. |
You can view the full list of all available Action Hooks on the WordPress ActionReference
Filters
Filters, take an argument (for example the content of a post) modify it, and return it.
This way, you can change the data contained by your WordPress site. The logic behind filters is that data are passed through various filters (like a chain of responsibility), and each filter can alter them.
To hook a plugin as a Filter, you can use the add_filterfunction shown below:
function my_plugin_filter($data)
{
   // do something
   return $data; // in filters you must return the data provided.
}
add_filter('hook name', 'my_plugin_filter');
Similar with the Actions, the hook_name controls when the Plugin/Action will be called during the WordPress lifecycle and for which purpose. For filters the most frequently used Hook types are listed below:
| Hook name | Description |
|---|---|
| the_content | Modify the content of a post or page. |
| the_title | Modify the title of a post or page. |
| wp_nav_menu_items | Modify the items in a WordPress navigation menu. |
| get_the_excerpt | Modify the excerpt of a post. |
| wp_list_categories | Modify the categories list. |
You can view the full list of all available Action Hooks on the WordPress FilterReference.
Create a plugin that modifies the content of a Blog post
In this example we create a plugin that modifies the content of a blog post by highlighting specific words. This can be achieved by registering the plugin as a filter and using the the_content hook to modify the content.
To create such a plugin, we start by designing the outline as a single PHP file and defining the necessary details in the plugin header, such as the name, description, version, author, and license. Afterward, we create the main plugin function to update the content and register it as a Filter using the add_filter() function.
<?php

/*
Plugin Name: Highlight Words in a Blog Post
Plugin URI: https://softwareparticles.com
Description: Highlights words in a blog post by adding them in a span with a class.
Version: 1.0.0
Author: author's name
Author URI: https://softwareparticles.com
License: GPL-2.0+
License URI: https://www.gnu.org/licenses/gpl-2.0.html
*/

function sp_highlight_words($content)
{
   // ensure that we are in a single blog post or page.
   if (!is_single())
        return $content;

   // our plugin's code

   return $content;
}

add_filter('the_content', 'sp_highlight_words'); // We register our Plugin's main function as a Filter.
The function sp_highlight_words() will be called every time a post or page is rendered and will receive the post content as an argument. Inside the function, we ensure that the logic will only be executed for a single post or page by calling the is_single() function of WordPress.
We continue by adding the logic of highlighting words inside a post by replacing those words with a span with a specific CSS class. The CSS class is added separately as additional style. The main algorithm of the plugin is as follows:
We create an array (words_to_replace) to store the words that need to be replaced.
$words_to_replace = array(
   'WordPress',
   'capability',
);
We use the DOMDocument object to parse the post content easily.
// Use DOMDocument to parse the post content.
$dom = new DOMDocument();
$dom->loadHTML($content);
For each entry in the words_to_replace array we build an XPath query that searches that word inside the post paragraphs and returns the nodes found.
The XPath query should select from p HTML elements but will not replace words that are already contained inside a span with the desired class.
foreach ($words_to_replace as $word) {
   // Use XPath to find all text nodes containing the word inside p elements, excluding those that are already contained in a span with class the-new-class
   $xpath = new DOMXPath($dom);
   $nodes = $xpath->query("//p//text()[contains(., '$word') and not(ancestor::span[contains(@class,'the-new-class')])]");
   // further logic...
}
For each of the nodes found, we split the node content by the current word into three parts, and construct a new span element with the desired class. Then, we reassemble the new node that contains the newly created span.
This will replace the word with a span containing the desired class.
foreach ($nodes as $node) {
  $split = explode($word, $node->nodeValue);
  $new_node = $dom->createDocumentFragment();
  $new_node->appendChild($dom->createTextNode($split[0]));
  for ($i = 1; $i < count($split); $i++) {
	 // we create the span element with the correct attributes.
	 $span = $dom->createElement('span');
	 $span->setAttribute('class', 'the-new-class');
	 $span->nodeValue = $word;
	 $new_node->appendChild($span);
	 $new_node->appendChild($dom->createTextNode($split[$i]));
  }
  $node->parentNode->replaceChild($new_node, $node);
}
The full code of the plugin is as follows:
<?php

/*
Plugin Name: Highlight Words in a Blog Post
Plugin URI: https://softwareparticles.com
Description: Highlights words in a blog post by adding them in a span with a class.
Version: 1.0.0
Author: author's name
Author URI: https://softwareparticles.com
License: GPL-2.0+
License URI: https://www.gnu.org/licenses/gpl-2.0.html
*/

function sp_highlight_words($content)
{
   if (!is_single())
      return $content;

   $words_to_replace = array(
      'WordPress',
      'capability',
   );

   // Use DOMDocument to parse the post content
   $dom = new DOMDocument();
   $dom->loadHTML($content);

   // Loop through each word in the array
   foreach ($words_to_replace as $word) {
      // Use XPath to find all text nodes containing the word inside p elements, excluding those that are already contained in a span with class the-new-class
      $xpath = new DOMXPath($dom);
      $nodes = $xpath->query("//p//text()[contains(., '$word') and not(ancestor::span[contains(@class,'the-new-class')])]");

      // Loop through each text node and replace all occurrences of the word with a span element containing a link to the URL
      foreach ($nodes as $node) {
         $split = explode($word, $node->nodeValue);
         $new_node = $dom->createDocumentFragment();
         $new_node->appendChild($dom->createTextNode($split[0]));
         for ($i = 1; $i < count($split); $i++) {
            // we create the span element with the correct attributes.
            $span = $dom->createElement('span');
            $span->setAttribute('class', 'the-new-class');
            $span->nodeValue = $word;
            $new_node->appendChild($span);
            $new_node->appendChild($dom->createTextNode($split[$i]));
         }
         $node->parentNode->replaceChild($new_node, $node);
      }
   }

   // Get the updated post content
   $updated_content = $dom->saveHTML();
   return $updated_content; // as a filter we must return the updated value.
}

add_filter('the_content', 'sp_highlight_words');
In the end we must return the updated content to the WordPress pipeline.
Usage Example
Given the content that is provided in the plugin is the following:
<p>WordPress has the capability to create and install software that does something more or different than already does.
This makes it easy to extend the capabilities of WordPress because otherwise we would need to know how WordPress works and how to modify it without breaking something.
 In this article we will learn the basic concepts needed in order to create a WordPress plugin and install it in our blog or site.</p>
The plugin will change the content and the final result will be following:
<p><span class="the-new-class">WordPress</span> has the <span class="the-new-class">capability</span> to create and install
 software that does something more or different than already does. This makes it easy to extend the capabilities of
<span class="the-new-class">WordPress</span> because otherwise we would need to know how <span class="the-new-class">WordPress</span> works
and how to modify it without breaking something. In this article we will learn the basic concepts needed in order to
create a <span class="the-new-class">WordPress</span> plugin and install it in our blog or site.</p>
The visual effect the Plugin will have in a post is shown below:
Install the plugin
In order to install the plugin we zip the PHP file, and then go to WordPress Plugins > Add New > Upload New Plugin and select the zip file. Then it will be visible in the Plugins page of the WordPress Admin panel.
Create a WordPress Plugin that modifies the post content in client side
In this example, we will show how to create a WordPress plugin that modifies a post content on client-side. We will show you how to register the plugin as an Action to enqueue a JavaScript file that highlights specific words in the post.
The logic is similar with the previous one. However, in this case, the words that we want to highlight are contained within code tags in the blog post and have also a certain class. The challenge here is that those classes are generated by another plugin on client-side, so the JavaScript our Plugin will inject will have to run after the rendering of the other plugin is finished.
This plugin will highlight words in posts or pages that are found in other parts of the post or page, such as in code sections. In order to identify the words to highlight, they need to have a certain HTML attribute, such as a specific class.
Below we show an example of the result the plugin will have:
To start, the plugin will consist of two files, one PHP and one JavaScript file. The PHP file will contain the action and will add the JavaScript file in the WordPress. Here is an example of the PHP code:
<?php

/*
Plugin Name: Inline highlight Words in a Blog Post
Plugin URI: https://softwareparticles.com
Description: Highlights words in a blog post.
Version: 1.0.0
Author: Dimitris Kokkinos
Author URI: https://softwareparticles.com
License: GPL-2.0+
License URI: https://www.gnu.org/licenses/gpl-2.0.html
*/

function word_highlighter() {
   wp_enqueue_script( 'inline-code-plugin', plugin_dir_url( __FILE__ ) . 'inline-code-plugin.js', array(), '1.0', true );
}

add_action( 'wp_enqueue_scripts', 'word_highlighter', 9999 );
In the code above, the word_highlighter function is registered as an action for the wp_enqueue_scripts hook with a priority of 9999. This means that it will be executed after any other function that are registered with a lower priority. The wp_enqueue_script function is used to enqueue the inline-code-plugin.js file, which is located in the directory of the plugin. The array() argument contains the dependencies for the script. Finally, the true argument specifies that the script should be added to the footer of the page.
The JavaScript highlight Algorithm
The main algorithm of the JavaScript that highlights words inside the content of the post consist of the following steps:
First, we get all elements that have the desired class.
Our first step is to find which words to highlight. Those words are located inside code sections of the blog, and they have the class-name as their class.
let codeSections = document.querySelectorAll('code .class-name');We extract their inner text, getting that way the words that need to be highlighted in the rest of the post.
We have selected the elements/nodes in the previous step, now we have to get the actual words (their text) by filtering those elements and extracting their innerText property.
let elements = Array.from(codeSections).map(function (code) {
   return code.innerText;
});
We filter those words to exclude duplicates and invalid words.
There is a high chance that a word will be found in multiple places. We should exclude the duplicates as soon as possible.
elements = elements.filter(onlyUnique);

function onlyUnique(value, index, array) {
   return !value.includes('[') && !value.includes('<') && array.indexOf(value) === index;
  }
For each of the paragraphs of the blog post, we call a function that replaces the words with a new span.
Here, we select the different paragraphs a post or page has, and for each of them, we call a function that scans the paragraph content and searches for any word that needs to be highlighted.
let sections = document.querySelectorAll('.post-content p');
sections.forEach(function (section, index) {
   addInline(section);
});

function addInline(element, index) {
  element.childNodes.forEach(function (element, index) {
    if (element.nodeType === 3) // if its a text node
      addInlineToTextNode(element);
    else {
      if (element.classList.contains('sp-important-word') || element.classList.contains('sp-inline-code'))
        return;
      addInline(element);
    }
  });
}
Also notice that in case the node is not a text node, we recursively call again the addInline function to check also its children. The addInlineToTextNode does the actual replacement of the word with a new span having the sp-inline-code as a class, highlighting that way the word.
In order to make the actual replacement of the word with a span the following steps are followed:
Use a regex that finds the first occurrence for any word we want to replace in the node.
We search inside the node if there are any of the words that need to be highlighted.
var regex = new RegExp("\\b(" + elements.join('|') + ")\\b", "g");

var s = node.nodeValue;
let match = regex.exec(s); // returns only the first occurrence
We split the found match into three parts: the part before the word, the part that contains the word, and the rest of the text.
let startIndex = match.index; // get the starting index of the match
let endIndex = startIndex + match[0].length; // get the ending index of the match

// get the text before the highlight
let part1 = s.substring(0, startIndex);

// get the text that will be highlighted
let part2 = s.substring(startIndex, endIndex);

// get the part after the highlight
let part3 = s.substring(endIndex);
From part2 text, we create a new element that contains the span with the desired class. We then reassemble all distinct part/nodes to the parentNode.
let parentNode = node.parentNode;

let textNode = document.createTextNode(part1);
parentNode.replaceChild(textNode, node);

// create a span node and add it to the parent immediately after the first text node
let spanNode = document.createElement("span");
spanNode.className = "sp-inline-code";
parentNode.insertBefore(spanNode, textNode.nextSibling);

// create a text node for the highlighted text and add it to the span node
textNode = document.createTextNode(part2);
spanNode.appendChild(textNode);

// create a text node for the text after the highlight and add it after the span node
textNode = document.createTextNode(part3);
parentNode.insertBefore(textNode, spanNode.nextSibling);
We recursively call again the addInlineToTextNode function in order to process further occurrences of any word.
The full code of the JavaScript file is shown below:
(function () {
  function onlyUnique(value, index, array) {
    return !value.includes('[') && !value.includes('<') && array.indexOf(value) === index;
  }

  var regex;
  setTimeout(function () {
    // Get the code sections and extract their contents to a new array
    let codeSections = document.querySelectorAll('code .class-name');
    let elements = Array.from(codeSections).map(function (code) {
      return code.innerText;
    });
    if (elements.length == 0) return;
    elements = elements.filter(onlyUnique);

    regex = new RegExp("\\b(" + elements.join('|') + ")\\b", "g");
    let sections = document.querySelectorAll('.post-content p');

    sections.forEach(function (section, index) {
      addInline(section);
    });
  }, 2000);

  function addInline(element, index) {

    element.childNodes.forEach(function (element, index) {
      if (element.nodeType === 3)
        addInlineToTextNode(element);
      else {
        if (element.classList.contains('sp-important-word') || element.classList.contains('sp-inline-code'))
          return;
        addInline(element);
      }
    });

  }

  function addInlineToTextNode(node) {
    var parentNode = node.parentNode;

    // break the node text into 3 parts: part1 - before the selected text, part2- the text to highlight, and part3 - the text after the highlight
    var s = node.nodeValue;

    let match = regex.exec(s);
    regex.lastIndex = 0;  // Reset
    if (match === null) return;
    let startIndex = match.index; // get the starting index of the match
    let endIndex = startIndex + match[0].length; // get the ending index of the match

    // get the text before the highlight
    let part1 = s.substring(0, startIndex);

    // get the text that will be highlighted
    let part2 = s.substring(startIndex, endIndex);

    // get the part after the highlight
    let part3 = s.substring(endIndex);

    // replace the text node with the new nodes
    let textNode = document.createTextNode(part1);
    parentNode.replaceChild(textNode, node);

    // create a span node and add it to the parent immediately after the first text node
    let spanNode = document.createElement("span");
    spanNode.className = "sp-inline-code";
    parentNode.insertBefore(spanNode, textNode.nextSibling);

    // create a text node for the highlighted text and add it to the span node
    textNode = document.createTextNode(part2);
    spanNode.appendChild(textNode);

    // create a text node for the text after the highlight and add it after the span node
    textNode = document.createTextNode(part3);
    parentNode.insertBefore(textNode, spanNode.nextSibling);

    addInlineToTextNode(textNode);
  }
})();
Install the plugin
In order to install the plugin we zip the PHP file of the plugin along with the JavaScript file, and then we go to WordPress Plugins > Add New > Upload New Plugin and select the zip file. Then it will be visible in the Plugins page of the WordPress Admin panel.