

Productivity is something that we all strive for, but it can be challenging to achieve, especially with so many distractions around us. If you are searching for a way to boost your productivity by building a timer using Arduino, the Pomodoro technique might be the answer you need.
Parts Used
- Arduino Duemilanove or UNO
- 4-Digit 7-Segment LED display – common cathode
- Mini Breadboard
- Jumper wires
- USB 2.0 Cable Type A/B
* This site contains product affiliate links. We may receive a commission if you make a purchase after clicking on one of these links.
What is the Pomodoro technique
The Pomodoro technique is a time management method that breaks down your work into 25-minute intervals, separated by short breaks (usually 5 minutes each). Breaking down your work into manageable chunks makes it easier to manage your workload, stay focused, and avoid burnout. You can also measure your daily productivity in Pomodoro time chunks, with a typical day containing about 12 Pomodoro and a highly productive day consisting of 14-16 Pomodoro.
Writing the software
To display the remaining time for each Pomodoro interval, we will use a 4-Digit 7-Segment LED display, which is easy to control using Arduino libraries.
In case you want to learn more about how a 4-Digit 7-Segment LED display works you can visit the Learn How a 4-Digit 7-Segment LED Display Works and how to control it using an Arduino article.
Using the SevSeg Library
The SevSeg.h library is a powerful C++ library that we can utilize in order to display numbers and characters in our LED display. First, we build the wiring and initialize the library accordingly in the setup function.
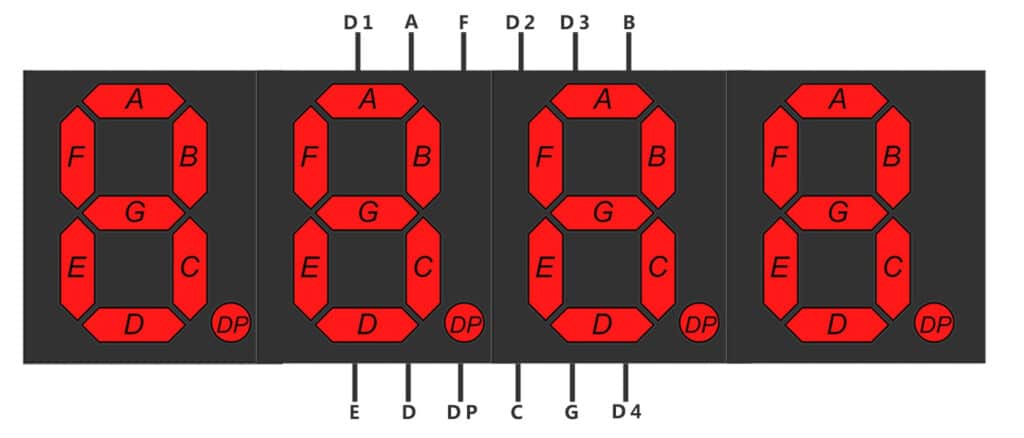
The configuration consists of connecting the digit pins of the LED display to the Arduino pins (in this case the digit pins of the display D1 through D4 are connected to the 2, 3, 4 and 5 digital pins of the Arduino) and the segment pins, which control which segment of the LED display are ON, to Arduino pins (in this case we connect the segment pins A through DP of the led display, to the 6, 7, 8, 9, 10, 11, 12 and 13 digital pins of the Arduino).
A typical 4-Digit 7-Segment LED display pinout is shown below:
And our wiring of the display with the Arduino is shown below:

Inside the loop function of the Arduino, we calculate the remaining time using the millis() function, which tells us how many milliseconds have passed after the Arduino has started. By subtracting the startTime from it (which is when the Arduino has started), we can extract the elapsed time. Dividing the elapsed time by 1000 gives us the elapsed time in seconds, which we can then convert to minutes and pass the variable to the setNumber() function of the SevSeg object.
#include "SevSeg.h"
SevSeg sevseg;

unsigned long startTime;

void setup() {
    byte numDigits = 4;
    byte digitPins[] = {2, 3, 4, 5};
    byte segmentPins[] = {6, 7, 8, 9, 10, 11, 12, 13};
    bool resistorsOnSegments = 0;
    // Variable above indicates that 4 resistors were placed on the digit pins.
    // Set variable to 1 if you want to use 8 resistors on the segment pins.
    sevseg.begin(COMMON_CATHODE, numDigits, digitPins, segmentPins, resistorsOnSegments);
    sevseg.setBrightness(60);

    startTime = millis(); // we store when the Arduino started.
}

int minutes = 25; // Set 25 minutes for each Pomodoro chunk.
long seconds = 1 * minutes * 60;

void loop() {
   long elapsed = elapsedSec();
   long remainingSec = seconds - elapsed;
   int remainingMins = remainingSec / 60;

   sevseg.setNumber(remainingMins);
   sevseg.refreshDisplay();
}

unsigned long elapsedSec(){
  return (millis() - startTime) / 1000;
}
The final result is shown below:

After the 25 minutes have passed, you can take a break and then restart the Arduino using its reset button to begin another Pomodoro. With this Pomodoro technique and Arduino timer, you can boost your productivity and focus on your work efficiently.