

The code is available on GitHub here
The Singleton Pattern ensures a class has only one instance, providing a global point of access to that instance. With this mechanism we can store and share the same unique instance with the rest of the application.
When to use
The simplicity of the pattern makes it very easy for implementation but there are many cases where this pattern is overused. You should implement the Singleton Pattern if the needs are one of the following:
Use the Singleton Pattern if you want to ensure an object will have only one instance and also prevent any other class from creating an instance of that object.
The Singleton Pattern usually is only referred as the way of accessing the same instance from a global access point. However, this is not its only purpose, another important responsibility is to prevent any other part of the software from making a new instance of that object.
Use the Singleton Pattern if you want a global access point to a single instance of an object.
All the components of the application can access that instance.
How to implement
Implementing the Singleton Pattern involves only one class. This class provides the global access point for the single instance. Usually, that instance has the same type as the Singleton class.
Below is the class diagram of the Singleton Pattern which has only one class:
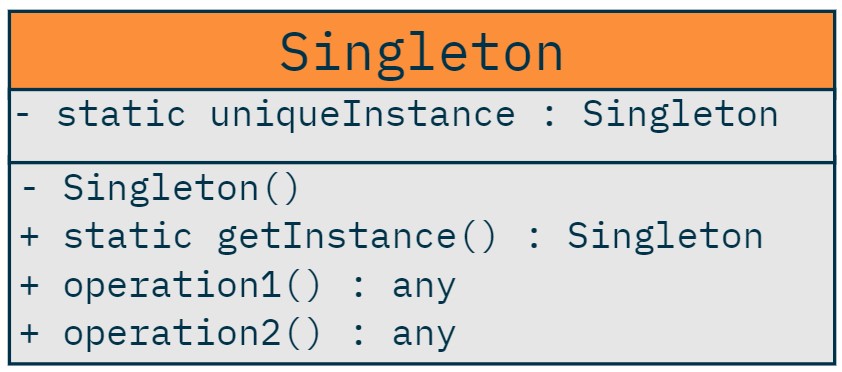
The class diagram indicates that we must have a private constructor for preventing other components instantiating a new instance and a public static method getInstance() that is used for retrieving that instance. All other methods ( operation1(), operation2() ) are various instance level methods of the component.
Despite the simplicity of the pattern there are a few cases where Singleton code is harder to get right, like the following:
Thread safety
A single instance might seem simpler, but many times is actually trickier. Many problems can arise if multiple threads access that instance, manipulate it and also depend on that instance’s state to do various operations.
We have to ensure that critical parts of that instance can be changed only by one thread at a time. One critical part of the Singleton is the instance access method. In the following code we show a Singleton class that has a static property ( for holding the instance of the Singleton ) and a public static method ( as the global access point ) for getting that instance. Inside the getInstance() method we have a check that ensures only one instance is created and returned.
public class Singleton
{
   private static Singleton instance;

   public static Singleton getInstance()
   {
      if (instance == null)
         instance = new Singleton();
      return instance;
   }
}
This works well when there are no multiple threads accessing the Singleton at the same time, but in a multithreaded scenario we could easily run into problems. Two or more threads can enter the getInstance() method and many of them can create a new instance, resulting in multiple instances of the singleton object! Let’s take a closer look of how this can be occurred below:
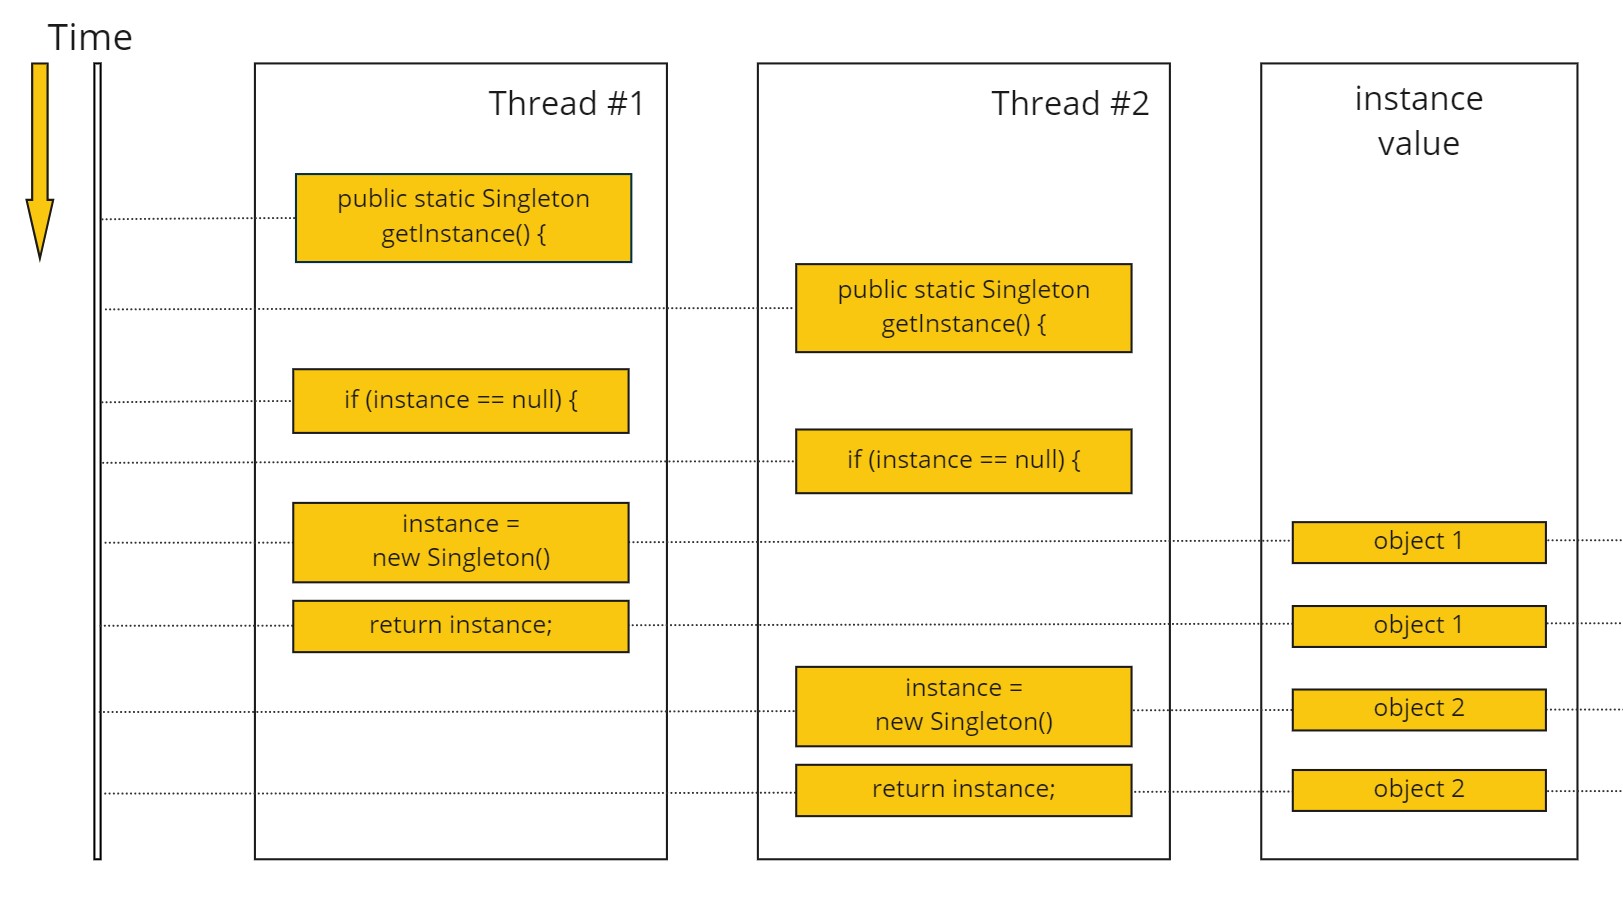
As we can see there is no guarantee that the getInstance() method will be executed completely from one thread at a time. Different threads can pause and resume their execution depending on lower level scheduling.
However, there are solutions to this problem all of them implementing a locking mechanism. This feature usually depends on the programming language we use to implement the Singleton Pattern. Different languages handle multithreading slightly different. In this article we discover how we can achieve that in Java and C#
Java
In Java we can use the synchronized keyword in a method in order to make it synchronous. That means only one thread at a time can access that method.
public static synchronized Singleton getInstance(){
   if(instance == null){
      instance = new Singleton();
   }
   return instance;
}
C#
In C# we can use the equivalent of Java’s synchronized keyword, the MethodImpl Annotation.
[MethodImpl(MethodImplOptions.Synchronized)]
public static Singleton getInstance(){
   if(instance == null){
      instance = new Singleton();
   }
   return instance;
}
There are many other ways to achieve thread safety but is beyond the scope of this article.
New instance prevention
Another aspect of the Singleton Pattern, usually overlooked, is to prevent other components from creating a new instance of the Singleton. This could result in incorrect program behavior, overuse of resources and inconsistent results.
This can easily be solved using a private constructor for the Singleton class. This way we can ensure that no other component can instantiate this class creating many copies. An example of this approach is shown below:
public class Singleton
{
   private static Singleton instance;

   private Singleton() {} // this prevents any other component from instantiating this object.
}
Example – A Singleton Board Controller
The Singleton Pattern can be used in many cases that require the state of the component to exist only once in our software. This requirement is also valid for a device driver or a controller for an electronic board. A printer for example, exists only once and has a certain state. Creating multiple instances of that printer could result in inconsistent state and undesirable results.
As an example, we will create a BoardController class that represents a real life board. The BoardController class itself would act also as a Singleton providing a method for accessing its single instance. In addition, it will have all the properties and methods it needs.

The board is equipped with 5 digital and 5 analog pins. We can control them using the DigitalWrite() and AnalogWrite() methods of the BoardController shown below:
public class BoardController
{
   private static BoardController instance;

   [MethodImpl(MethodImplOptions.Synchronized)]
   public static BoardController GetInstance()
   {
      if (instance == null)
         instance = new BoardController();
      return instance;
   }

   private bool[] _digitalPins;
   private int[] _analogPins;

   private BoardController()
   {
      _digitalPins = new bool[5];
      _analogPins = new int[5];
   }

   public void DigitalWrite(int pin, bool value)
      => _digitalPins[pin] = value;

   public void AnalogWrite(int pin, int value)
      => _analogPins[pin] = value;

   public void PrintState()
   {
      Console.WriteLine("digital pins");
      for (int i = 0; i < _digitalPins.Length; i++)
      {
         Console.Write($"pin{i}:{(_digitalPins[i] ? "HIGH" : "LOW" )} ");
      }
      Console.WriteLine();
      Console.WriteLine("analog pins");
      for (int i = 0; i < _analogPins.Length; i++)
      {
         Console.Write($"pin{i}:{(_analogPins[i])} ");
      }
   }
}
In the code above we can recognize the static variable that holds the single instance and also the global access point which is also a static method called GetInstance(). The rest of methods and properties belong to the BoardController and they are unrelated with the Singleton Pattern.
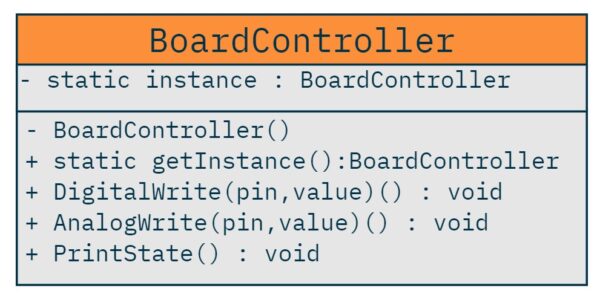
The class diagram of the BoardController shown below looks simple, as there is only component involved in this pattern.
Usage example
Finally, a simple usage example of the Singleton BoardController is shown below:
public static void Main()
{
   BoardController controller = BoardController.GetInstance();
   controller.AnalogWrite(3, 100); // we set a voltage to the pin with index 3.
   controller.DigitalWrite(1, true); // we set 5V to the pin with index 1.
   controller.PrintState();
}
As we see from the previous code we get the instance from the BoardController itself and then we can manipulate it like any other object. The output of the previous code is shown below:
digital pins
pin0:LOW pin1:HIGH pin2:LOW pin3:LOW pin4:LOW
analog pins
pin0:0 pin1:0 pin2:0 pin3:100 pin4:0
In order to prove that we cannot use another instance we use again the GetInstance() and call the PrintState() to see the board’s state:
public static void Main()
{
   BoardController controller = BoardController.GetInstance();
   controller.AnalogWrite(3, 100);
   controller.DigitalWrite(1, true);
   controller.PrintState();

   // this is actually the same instance as previously obtained.
   BoardController controller2 = BoardController.GetInstance();
   controller2.PrintState();
}
As we can see below the states of both objects ( controller and controller2 ) is the same and that is because they are actually the same object.
digital pins
pin0:LOW pin1:HIGH pin2:LOW pin3:LOW pin4:LOW
analog pins
pin0:0 pin1:0 pin2:0 pin3:100 pin4:0

digital pins
pin0:LOW pin1:HIGH pin2:LOW pin3:LOW pin4:LOW
analog pins
pin0:0 pin1:0 pin2:0 pin3:100 pin4:0
Using Dependency Injection
We can use Dependency Injection in order to ensure only one instance of a component is served. However, its important to understand that this is not entirely Singleton Pattern because you may still can create a new instance of that component ( depending on whether or not a private constructor is used ) even if its registered as a single instance.
Below we present examples to configure a component as single instance using various Dependency Injection containers.
Autofac
C#
var instance = BoardController.GetInstance();
builder.RegisterInstance<BoardController>(instance);
// or
builder.RegisterType<BoardController>().As<IBoardController>().SingleInstance();
Recommendations
If you want to learn more, refresh or better understand Design Patterns and Software Design in general, I also recommend reading the following books:
A must in Design Patterns:

A very well written book with plenty of examples and insights:

* This site contains product affiliate links. We may receive a commission if you make a purchase after clicking on one of these links.