

The code is available on GitHub here
The Command Pattern decouples the requester, which needs to execute a certain action, from the object that actually performs the action. A command object is the encapsulation of computation of a concept (e.g. login, create customer, etc.) in order to be used in different scenarios where the same computation is needed. Also, the Command Pattern is used for queue or log requests, and also for supporting undoable operations.
- When to use
- Command Pattern, deep dive
- Example – Build an RCCar control system using the Command Pattern
- Recommendations
When to use
The Command Pattern is a good fit when you want to parameterize requesters such as:
- GUI elements or other type of Buttons.
- Context Menu items.
- Http, GRPC and other controllers that receive a request and want to perform an operation.
The requester doesn’t know how the action is implemented. This decoupling makes the design more resilient to changes such as what action will be performed if a certain request is received. We can rewire the requests to different command objects that perform the action at any time during compilation or even at runtime.

Additionally, the Command Pattern is useful when we have to queue requests in order to execute them in a certain order. For example, we can record all actions that happen to a word processor (character editing, font changes etc.) each one of them in a separate command object. We can use those objects later and execute them in the same order to restore the word processors state.

Finally, using the pattern, our design can support undoable actions. Each command object will know not only how to execute a request but also how to undo it.
Command Pattern, deep dive
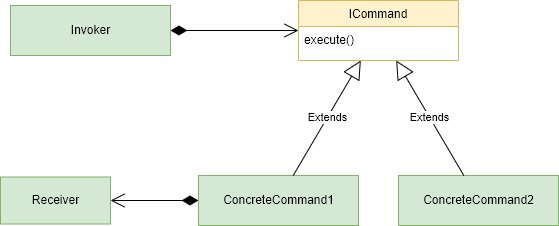
The Command Pattern consist of four distinct components:
- ICommand interface – This interface will be implemented by all command objects. It usually has an Execute method but for undoable commands/actions it can hold also an Undo method. Most importantly, it helps the Invoker to handle different commands using their common interface.
- The Invoker – This component holds a number of command objects and at some point asks those commands to execute their inner logic, by calling the Execute method. It can also hold a history of executed commands using them later in the future for undoable operations or other purposes.
- ConcreteCommand – This component represents a concrete command that extends the ICommand interface. Its a specific class that carries out the actual request by overriding the Execute method. It can contain all the logic itself, or use other classes (usually called Receivers) in order to complete the desired action.
- Receiver – is a component that a command can use in order to perform its action.
Below, we present all components and their relationships in a class diagram. As we can see, the main component that makes the decoupling possible between the Invoker and how an action is performed is the ICommand interface.
A Receiver is not required in all cases, but generally we tend to keep the commands simple and use the required receivers when possible. This also makes the command be parameterized with different receivers. For example, a command that turns the light on can be parameterized with the LightController for the kitchen and the LightController for the livingroom. Both controllers are considered Receivers.
Example – Build an RCCar control system using the Command Pattern
In this section, we learn how we can implement a remote control system for an RCCar (Remote Controlled car) using the Command Pattern. The software will use a RemoteControl component, as the Invoker, which will be flexible in terms of what actions each of its buttons is wired into. The actions we will be able to perform are move, turn and change the gear rations of the RCCar. We will also be able to make the RCCar execute a set of predefined commands in order to reach a specific point in space using a MacroCommand.
Creating the ICommand interface
First, we need to create the main component of the Command Pattern, the ICommand interface. That interface, will simply have one method, the Execute.
public interface ICommand
{
   void Execute();
}
All future concrete commands will implement the ICommand interface in order to execute a specific action.
However, some commands have the capability to undo their actions. That means, they should also implement an Undo method which does exactly that. In some designs, this method exists in the ICommand interface, but in our case, for the reason that Undo is not applicable to all of our commands, we will create another interface named IUndoableCommand, that extends from the ICommand and has the Undo method as shown below:
public interface IUndoableCommand : ICommand
{
   void Undo();
}
As we will see in the next section, some of the commands will implement the IUndoableCommand interface, and others the ICommand. Regardless of which type of interface they implement the important thing is that all are ICommand objects.
Create the Receivers
Our car will be capable of moving forward and backwards using a motor and steer its front wheels using a servo motor. Also, it can change gear rations using a gearbox. Those objects will be represented by specific classes in the design and are playing the role of the Receivers, which will be used by our concrete commands.

Motor
The first Receiver we implement is the Motor, shown below:
public class Motor
{
   public void Stop()
   {
      Console.WriteLine($"Motor stopped.");
   }

   public void SetSpeed(int speed)
   {
      if(speed > 0)
         Console.WriteLine($"Moving forward at {speed} m/s");
      else if(speed < 0)
         Console.WriteLine($"Moving backwards at {speed} m/s");
      else
         Console.WriteLine($"Motor stopped.");
   }
}
The Motor class has a SetSpeed method that will be used by the relevant commands.
ServoMotor
Next, we implement our next Receiver, the ServoMotor that will be used for steering the RCCar.
public class ServoMotor
{
   public int Degrees { get; private set; }

   public void Steer(int degrees)
   {
      Console.WriteLine($"Servo motor turned {degrees} degrees.");
      Degrees = degrees;
   }
}
Similarly, the ServoMotor has a simple Steer method that has degrees as arguments.
Gearbox
Finally, the Gearbox which helps our RCCar change gear rations, has three distinct rations (FIRST, SECOND, THIRD), an Up method which increases the ratio, a Down method which decreases the ratio and another one which sets the exact ratio.
public class Gearbox
{
   public enum Gear { FIRST, SECOND, THIRD }

   public Gear CurrentGear { get; private set; } = Gear.FIRST;

   public void Up()
   {
      switch (CurrentGear)
      {
         case Gear.FIRST:
            CurrentGear = Gear.SECOND;
            break;
         case Gear.SECOND:
            CurrentGear = Gear.THIRD;
            break;
      }
      Console.WriteLine($"Gearbox has {CurrentGear} gear.");
   }

   public void SetGear(Gear gear)
   {
      CurrentGear = gear;
      Console.WriteLine($"Gearbox has {CurrentGear} gear.");
   }

   public void Down()
   {
      switch (CurrentGear)
      {
         case Gear.THIRD:
            CurrentGear = Gear.SECOND;
            break;
         case Gear.SECOND:
            CurrentGear = Gear.FIRST;
            break;
      }
      Console.WriteLine($"Gearbox has {CurrentGear} gear.");
   }
}
Implementing the RemoteControl – Invoker
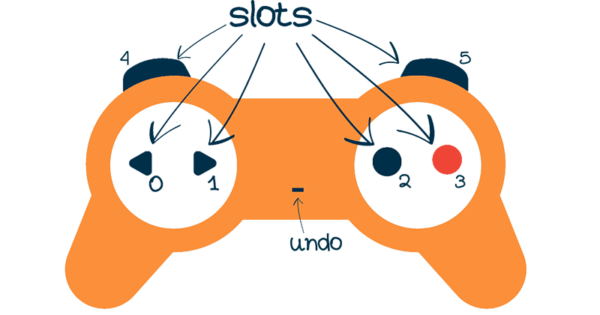
At this point, we are ready to build the RemoteControl component, which will hold an array of ICommand objects. It also has multiple slots that corresponds to its various buttons.
public class RemoteControl
{
   readonly ICommand[] onCommands;
   readonly ICommand[] offCommands;

   IUndoableCommand undoCommand;

   public RemoteControl()
   {
      var emptyCommand = new EmptyCommand();
      onCommands = new ICommand[6];
      offCommands = new ICommand[6];
      for (int i = 0; i < 6; i++)
      {
         onCommands[i] = emptyCommand;
         offCommands[i] = emptyCommand;
      }

      undoCommand = emptyCommand;
   }

   public void SetCommand(int slot, ICommand onCommand, ICommand offCommand)
   {
      onCommands[slot] = onCommand;
      offCommands[slot] = offCommand;
   }

   public void ButtonPushed(int slot)
   {
      onCommands[slot].Execute();
      if (onCommands[slot] is IUndoableCommand undoableCmd)
         undoCommand = undoableCmd;
   }

   public void ButtonReleased(int slot)
      => offCommands[slot].Execute();

   public void UndoPressed()
      => undoCommand.Undo();

   public override string ToString()
   {
      StringBuilder sb = new StringBuilder();
      sb.AppendLine("-------- REMOTE CONTROL ---------");
      for(int i = 0; i < 6; i++)
      {
         sb.AppendLine($"slot[{i}] -> Pressed:{onCommands[i].GetType().Name} Released:{offCommands[i].GetType().Name}");
      }
      sb.AppendLine();
      return sb.ToString();
   }
}
In the constructor of the RemoteControl class we initialize two arrays. One array is used for commands that will be executed when a button is pressed and the other is for a different set of commands, that will be executed when the button is released. The RemoteControl has six buttons that any command can be assigned to them and one undo button. In order to avoid assigning null to each array item, we use an EmptyCommand instead, which is a special type of ICommand that does nothing. Its relevant to the NullObject Design Pattern and simplify the rest of the RemoteControl code from the null checks.
In order to configure the RemoteControl we use its SetCommand method which assigns two commands in a specific slot. One command will be executed when the corresponding button is pressed and another command will be executed when that button is released.
Finally, we use the ButtonPushed and ButtonReleased to simulate the callbacks that we would normally get from the hardware. Those methods will be triggered later from the client.
Implementing the concrete commands
Finally, its time to implement the concrete commands that will be assigned to the RemoteControl in specific slots. We implement various commands, one for moving the RCCar forward and backwards, on for steering its wheels, one for stopping the RCCar and two for changing its gear ratio.
MoveCommand
The MoveCommand will have a reference to the Motor in order to control it and will implement the ICommand interface as follows:
public class MoveCommand: ICommand
{
   protected readonly Motor _motor;
   protected readonly int _speed;

   public MoveCommand(Motor motor, int speed)
   {
      this._motor = motor;
      this._speed = speed;
   }

   public void Execute()
   {
      _motor.SetSpeed(_speed);
   }
}
The MoveCommand also stores the speed that will set to the Motor. This enables us to parameterize the MoveCommand with a different speed.
SteerCommand
Similarly, the SteerCommand uses the ServoMotor in order to steer the front wheels to a certain direction. As with the MoveCommand, we extend the ICommand interface implementing its Execute method as shown below:
public class SteerCommand : ICommand
{
   private readonly ServoMotor _servo;
   private readonly int _degrees;

   public SteerCommand(ServoMotor servo, int degrees)
   {
      this._servo = servo;
      this._degrees = degrees;
   }

   public void Execute()
   {
      _servo.Steer(_degrees);
   }
}
For the Execute we simply call Steer on the ServoMotor passing the degrees as argument.
GearUp and GearDown commands
Those two commands will increase or decrease the gear ratio of the car’s gearbox. We will assign two buttons for those commands and one will set the ratio one level up and the other one level down. Also, those commands are the only that support undo capability, so they will implement the IUndoableCommand interface.
public class GearUpCommand : IUndoableCommand
{
   private readonly Gearbox _gearbox;
   Gearbox.Gear prevGear;

   public GearUpCommand(Gearbox gearbox)
   {
      _gearbox = gearbox;
   }

   public void Execute()
   {
      prevGear = _gearbox.CurrentGear;
      _gearbox.Up();
   }

   public void Undo()
      => _gearbox.SetGear(prevGear);
}
Similarly the GearDownCommand is shown below:
public class GearDownCommand : IUndoableCommand
{
   private readonly Gearbox _gearbox;
   Gearbox.Gear prevGear;

   public GearDownCommand(Gearbox gearbox)
   {
      _gearbox = gearbox;
   }

   public void Execute()
   {
      prevGear = _gearbox.CurrentGear;
      _gearbox.Down();
   }

   public void Undo()
      => _gearbox.SetGear(prevGear);
}
There is also a bit of logic for the prevGear and Undo method that is used for the undo operation, this will also be explained further in next sections.
Wire the commands with the RemoteControl
Having our concrete commands and the RemoteControl in place its time to wire commands into specific slots.
public static void Main()
{
   RemoteControl remoteControl = new RemoteControl();

   Motor motor = new Motor();
   ServoMotor servo = new ServoMotor();
   Gearbox gearbox = new Gearbox();

   MoveCommand forward = new(motor, 10);
   MoveCommand backwards = new(motor, -5);
   StopCommand stop = new StopCommand(motor);

   SteerCommand right = new SteerCommand(servo, 45);
   SteerCommand left = new SteerCommand(servo, -45);
   SteerCommand align = new SteerCommand(servo, 0);

   GearUpCommand gearUp = new GearUpCommand(gearbox);
   GearDownCommand gearDown = new GearDownCommand(gearbox);

   remoteControl.SetCommand(0, left, stop);
   remoteControl.SetCommand(1, right, align);
   remoteControl.SetCommand(2, forward, stop);
   remoteControl.SetCommand(3, backwards, align);
   remoteControl.SetCommand(4, gearDown, new EmptyCommand());
   remoteControl.SetCommand(5, gearUp, new EmptyCommand());

   Console.WriteLine(remoteControl);
}
The RemoteControl state from its ToString method is shown below:
slot[0] -> Pressed:MoveCommand      Released:StopCommand
slot[1] -> Pressed:TurnCommand      Released:TurnCommand
slot[2] -> Pressed:MoveCommand      Released:StopCommand
slot[3] -> Pressed:TurnCommand      Released:TurnCommand
slot[4] -> Pressed:GearDownCommand  Released:EmptyCommand
slot[5] -> Pressed:GearUpCommand    Released:EmptyCommand
Finally, we can trigger some buttons of the RemoteControl
remoteControl.ButtonPushed(2); // move forward
remoteControl.ButtonPushed(1); // turn right
remoteControl.ButtonPushed(5); // gear up
remoteControl.ButtonReleased(5); // nothing
remoteControl.ButtonReleased(1); // align
remoteControl.ButtonReleased(2); // stop
And the result will be the following
Moving forward at 10 m/s
Servo motor turned 45 degrees.
Gearbox has SECOND gear.
Servo motor turned 0 degrees.
Motor stopped.
Undo operation – Undoing the gear ratio
The commands that support undoable operations are the GearUpCommand and GearDownCommand. There is only one slot in our RemoteControl that when pushed, the latest undoable command that was executed is used for the undo. This is achieved because we deliberately set the undoCommand property of the RemoteControl to the command that was executed when ButtonPushed method was triggered. Later, when the undo button is pressed, the UndoPressed method is triggered and we simply call Undo in the undoCommand property. Also in the constructor we initialize the undoCommand like the other, as an EmptyCommand, to get rid of the null checking and null reference in case the UndoPressed method was triggered first.
public class RemoteControl
{
   ...
   IUndoableCommand undoCommand;

   public RemoteControl()
   {
      ...
      undoCommand = emptyCommand;
   }
   ...
   public void ButtonPushed(int slot)
   {
      onCommands[slot].Execute();
      if (onCommands[slot] is IUndoableCommand undoableCmd)
         undoCommand = undoableCmd;
   }
   ...
   public void UndoPressed()
      => undoCommand.Undo();
}
The Undo operation itself inside the GearUpCommand is achieved by saving the latest state of the gearbox before changing it, so later, when the Undo is called, it can restore it.
public class GearUpCommand : IUndoableCommand
{
   private readonly Gearbox _gearbox;
   Gearbox.Gear prevGear;
   ...
   public void Execute()
   {
      prevGear = _gearbox.CurrentGear;
      _gearbox.Up();
   }

   public void Undo()
      => _gearbox.SetGear(prevGear);
}
In our case, we use the current state of the Gearbox – Receiver and afterwards in the Undo method we set the stored state in the gearbox.
Now, we can perform the following actions in the RemoteControl and see what the result is when we press the Undo button. Remember that the GearDownCommand is wired in the 4th slot and the GearUpCommand in the 5th slot.
remoteControl.ButtonPushed(4); // gear down
remoteControl.ButtonPushed(5); // gear up
remoteControl.ButtonPushed(5); // gear up
remoteControl.UndoPressed(); // undo
The result of the previous code is shown below:
Gearbox has FIRST gear.
Gearbox has SECOND gear.
Gearbox has THIRD gear.
Gearbox has SECOND gear.
Travel a specific path with a Macro Command
A MacroCommand can used in order to perform more complex behavior, one that requires many simpler commands to execute. It acts like a composite of various commands and its Execute method calls the Execute of each of the inner commands.
public class MacroCommand : ICommand
{
   private readonly List<ICommand> _commands;

   public MacroCommand(params ICommand[] commands)
   {
      _commands = commands.ToList();
   }

   public void Execute()
   {
       foreach(var cmd in _commands)
          cmd. Execute();
   }
}
In our case, we will load the MacroCommand with the following configuration:
MacroCommand macro = new MacroCommand(forward, right, left, stop, align);
macro.Execute();
After executing the MacroCommand we get the following results:
Moving forward at 10 m/s
Servo motor turned 45 degrees.
Servo motor turned -45 degrees.
Motor stopped.
Servo motor turned 0 degrees.
Recommendations
If you want to learn more, refresh or better understand design patterns and software design in general, I also recommend reading the following books:
A must in Design Patterns

A very well written book with plenty of examples and insights