The code is available on GitHub here
The Observer Pattern makes possible for multiple objects (observers) to be notified when another object’s state (subject) is changed. This creates a one to many relationship between Subject and Observers. The Subject can notify many Observers when its state is changed.
Observer Pattern, when you should use it
In software, sometimes there is a need to transfer information to multiple objects from a single source. Those objects maybe not be known from the beginning and also maybe not be permanent. That means objects could easily be removed and new ones can join and be notified when a change is made. This flexibility should also be available at runtime.
Those situations are handled well by implementing the Observer Pattern. The object that contains the information/state, is called the Subject and the various objects that are notified by the Subject are called Observers. An easy example could be a subscription service where various clients can subscribe. Once every month, the newsletter provider notifies all the subscribers with the latest news. Also new subscribers can be added to the group or existing ones can be removed and not be notified ever again.
A deep dive into the pattern
Diving a little deeper into the Observer Pattern we notice that the pattern is build on top of the following Object Oriented principle.
Strive for loosely coupled dependencies between the objects
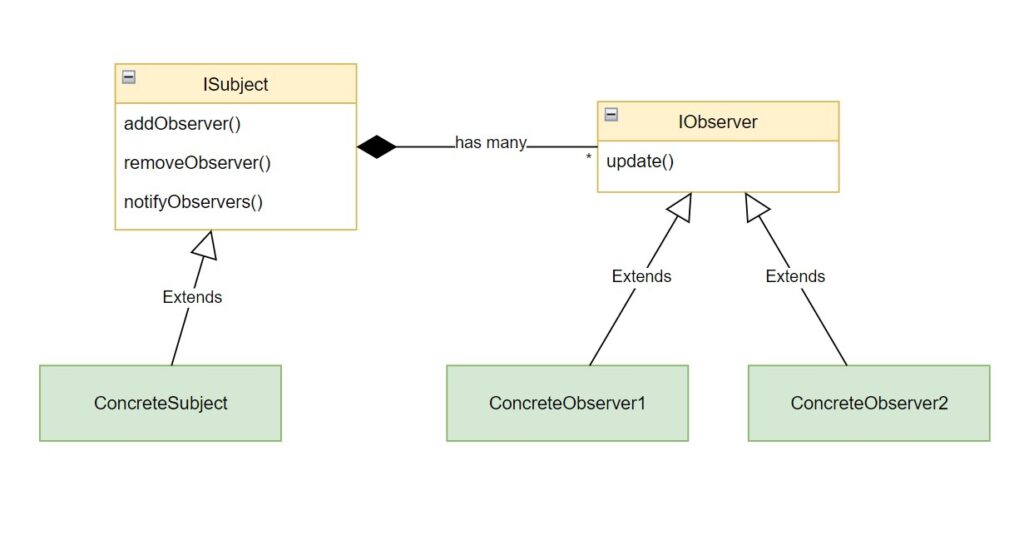
This allows us to have a more flexible design that can handle change (e.g. add or remove observers at runtime). The loose coupling is handled from the two core interfaces of the Observer Pattern, the ISubject and the IObserver interface.
Any object that needs to notify other objects implements the ISubject interface. This interface will provide the capability to add and remove observers, notify all the observers, and also keeping a list of the current observers. On the other hand, any object that needs to be notified from the Subject implements the IObserver interface. This interface has an update() method and will be triggered by the Subject every time its state is changed. This way the Observer can handle the update as it like.
Another flexibility this design gives us, is that any object can be an Observer and a Subject at once. It just needs to properly implement the ISubject and IObserver interfaces.
Below is the class diagram of the Observer Pattern showing the dependencies. Later we use the pattern to implement an Arduino weather station.

An Arduino Weather station example
Now, that we have an understanding about what the Observer Pattern is, we are going to implement the following scenario. Suppose we want to collect data with an Arduino that uses sensors like humidity, air speed and temperature, and distribute those data to various clients. Currently, the need is for a client that simply displays the weather data and another that controls a fan. Those clients should be updated every time new data are collected from the sensors. Also, we want in the future to be able to support more clients.
The previous description perfectly aligns with what the Observer Pattern can solve. Before we begin with the specific implementations, first we should put the ISubject and IObserver interfaces in place.
public interface ISubject
{
   void AddObserver(IObserver observer);
   void RemoveObserver(IObserver observer);
   void NotifyObservers();
}

public interface IObserver
{
   void Update(IWeatherData state);
}
The ISubject interface represents the object that will notify the clients. On the other hand, the IObserver interface represents every client that wants to be notified.
As you may notice from the previous code, there is an IWeatherData parameter in the Update method of the IObserver interface. This is the parameter where the latest data are stored in order to be accessed from the various observers. Actually, there are three approaches to how the Observers can get the state from the Subject:
- Pass every parameter to the Update() function ( e.g. Update(int airspeed, int humidity etc..) )
- Pass a reference to the Subject. The Subject will have a public method GetState() that retrieves the data in a structured form.
- Pass an interface or a DTO object that contains the data.
In this example we choose to use the latest choice which is to pass an interface that contains methods to retrieve each parameter separately. Passing an interface protects us from modifying all the observers in case a new parameter is added. Also, for accessing the data, the IWeatherData contains three methods, one for each parameter.
public interface IWeatherData
{
   int GetHumidity();
   int GetAirSpeed();
   int GetTemperature();
}
Another benefit from having get methods (or just properties) for each weather parameter is that each observer wants to use specific parameters. Passing all the parameters in the method introduce unnecessary noise.
Creating the ArduinoWeatherStation Subject
Next, for the Subject role, we create a new ArduinoWeatherStation that gets the latest data from the sensors. The mechanism it uses to pull the data from the sensors is out of scope of this article, but lets suppose that somehow its DataReceivedFromSensors() function is called every time the sensors have new data. Also, this function will be used later for testing the design.
public class ArduinoWeatherStation : ISubject
{
   private IWeatherData _state;

   public List<IObserver> _observers;

   public ArduinoWeatherStation()
   {
      _observers = new();
   }

   public void AddObserver(IObserver observer)
      => _observers.Add(observer);

   public void RemoveObserver(IObserver observer)
      => _observers.Remove(observer);

   public void NotifyObservers()
   {
      foreach (var observer in _observers)
         observer.Update(_state);
   }

   public void DataReceivedFromSensors(int humidity, int airspeed, int temperature)
   {
      _state = new ArduinoWeatherStationData(humidity, airspeed, temperature);
      NotifyObservers();
   }
}
Next, we will have the various implementations of the IObserver interface which the various clients will implement.
The FanController and Display Observers
The core mechanism is in place. Now, its time to add our two Observers, the FanController and the Display, each of them use different parameters from the Subject’s state in order to perform their functionality.
public class FanController : IObserver
{
   public void Update(IWeatherData state)
   {
      int temperature = state.GetTemperature();
      if (temperature > 30)
         Console.WriteLine($"{nameof(FanController)} => Turning fan ON");
      else
         Console.WriteLine($"{nameof(FanController)} => Turning fan OFF");
   }
}

public class Display : IObserver
{
   public void Update(IWeatherData state)
   {
      Console.WriteLine("---------- DISPLAY ----------");
      Console.WriteLine($"Temperature: {state.GetTemperature()} degrees Celsius" );
      Console.WriteLine($"Airspeed: {state.GetAirSpeed()} m/s");
      Console.WriteLine($"Humidity: {state.GetHumidity()} g/m3 (grams of moisture per cubic meter of air)");
      Console.WriteLine("-----------------------------");
   }
}
All future Observers can simply implement the IObserver interface in order to receive data.
Example usage
Finally, we are ready to hook all the components together and see how they interact.
public static void Main()
{
   ArduinoWeatherStation weatherStation = new ArduinoWeatherStation();

   Display display = new Display();
   FanController fanController = new FanController();

   weatherStation.AddObserver(display);
   weatherStation.AddObserver(fanController);

   weatherStation.DataReceivedFromSensors(10, 20, 25);
   weatherStation.DataReceivedFromSensors(12, 22, 32);
}
First, we instantiate our Subject. Then we create two observers and register them into the ArduinoWeatherStation. The call to the DataReceivedFromSensors() is to simulate the data receive from the Arduino sensors. Finally, the output is shown below:
---------- DISPLAY ----------
Temperature: 25 degrees Celsius
Airspeed: 20 m/s
Humidity: 10 g/m3 (grams of moisture per cubic meter of air)
-----------------------------
FanController => Turning fan OFF
---------- DISPLAY ----------
Temperature: 32 degrees Celsius
Airspeed: 22 m/s
Humidity: 12 g/m3 (grams of moisture per cubic meter of air)
-----------------------------
FanController => Turning fan ON
Recommendations
If you want to learn more, refresh or better understand design patterns and software design in general, I also recommend reading the following books:
A must in Design Patterns
A very well written book with plenty of examples and insights


